自助服务深度挖掘
Port 中的 Self-Service Actions 通过在蓝图和源于蓝图的实体上配置 3 种 Self-Service Action 类型中的一种,实现开发人员的自助服务:
- 创建 - 通过触发基础架构中的配置流程,创建一个新实体。
- 删除 - 通过触发基础架构中的删除逻辑来删除现有实体。
- Day-2 Operations - 在基础架构中触发现有实体的逻辑,按需更新或修改现有实体。
要了解如何更新现有自助服务操作调用的状态,请参阅reflect action progress 页面。
配置新的自助服务操作
让我们从蓝图开始,配置新的自助服务操作。
创建蓝图
例如,让我们创建 2 个蓝图,并将它们相互连接起来:
- 蓝图 1: 微服务;
- 蓝图 #2: 部署。
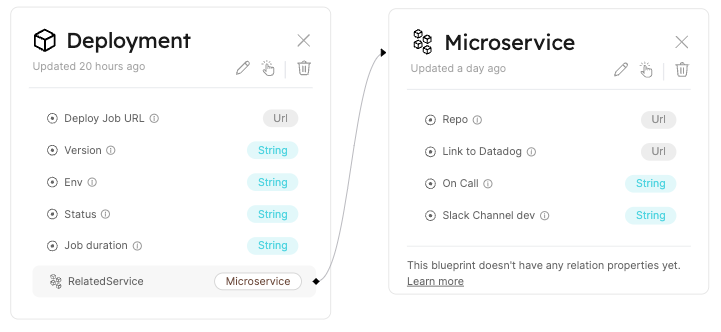
An example Microservice Blueprint
{
  "identifier": "microservice",
  "title": "Microservice",
  "icon": "Microservice",
  "calculationProperties": {},
  "schema": {
    "properties": {
      "on-call": {
        "title": "On Call",
        "type": "string",
        "description": "who is the on-call for this service (Pagerduty)",
        "default": "Dev Guy"
      },
      "repo": {
        "title": "Repo",
        "type": "string",
        "format": "url",
        "description": "link to repo",
        "default": "https://www.github.com"
      },
      "link-slack-dev": {
        "title": "Slack Channel dev",
        "type": "string",
        "description": "link to Slack dev channel",
        "default": "#rnd-microservices-alerts"
      },
      "datadog-link": {
        "title": "Link to Datadog",
        "type": "string",
        "format": "url",
        "description": "link to datadog",
        "default": "https://datadog.com"
      }
    },
    "required": []
  }
}
An example Deployment Blueprint (with the microservice Relation included)
{
  "identifier": "deployment",
  "title": "Deployment",
  "icon": "DeployedAt",
  "calculationProperties": {},
  "schema": {
    "properties": {
      "version": {
        "title": "Version",
        "type": "string",
        "description": "The deployed image tag"
      },
      "environment": {
        "title": "Env",
        "type": "string",
        "description": "The Env which is deployed"
      },
      "status": {
        "title": "Status",
        "type": "string",
        "description": "Deployment status (Running, Destroyed, ...)"
      },
      "duration": {
        "title": "Job duration",
        "type": "string",
        "description": "Deployment job duration"
      },
      "job-url": {
        "title": "Deploy Job URL",
        "type": "string",
        "format": "url",
        "description": "Link to the deployment Job"
      }
    },
    "required": []
  },
  "relations": {
    "microservice": {
      "title": "RelatedService",
      "target": "microservice",
      "required": false
    }
  }
}
创建蓝图自助服务
要创建自助服务操作,请转到 DevPortal 生成器页面,展开微服务蓝图并单击 "创建操作 "按钮,如下图所示:
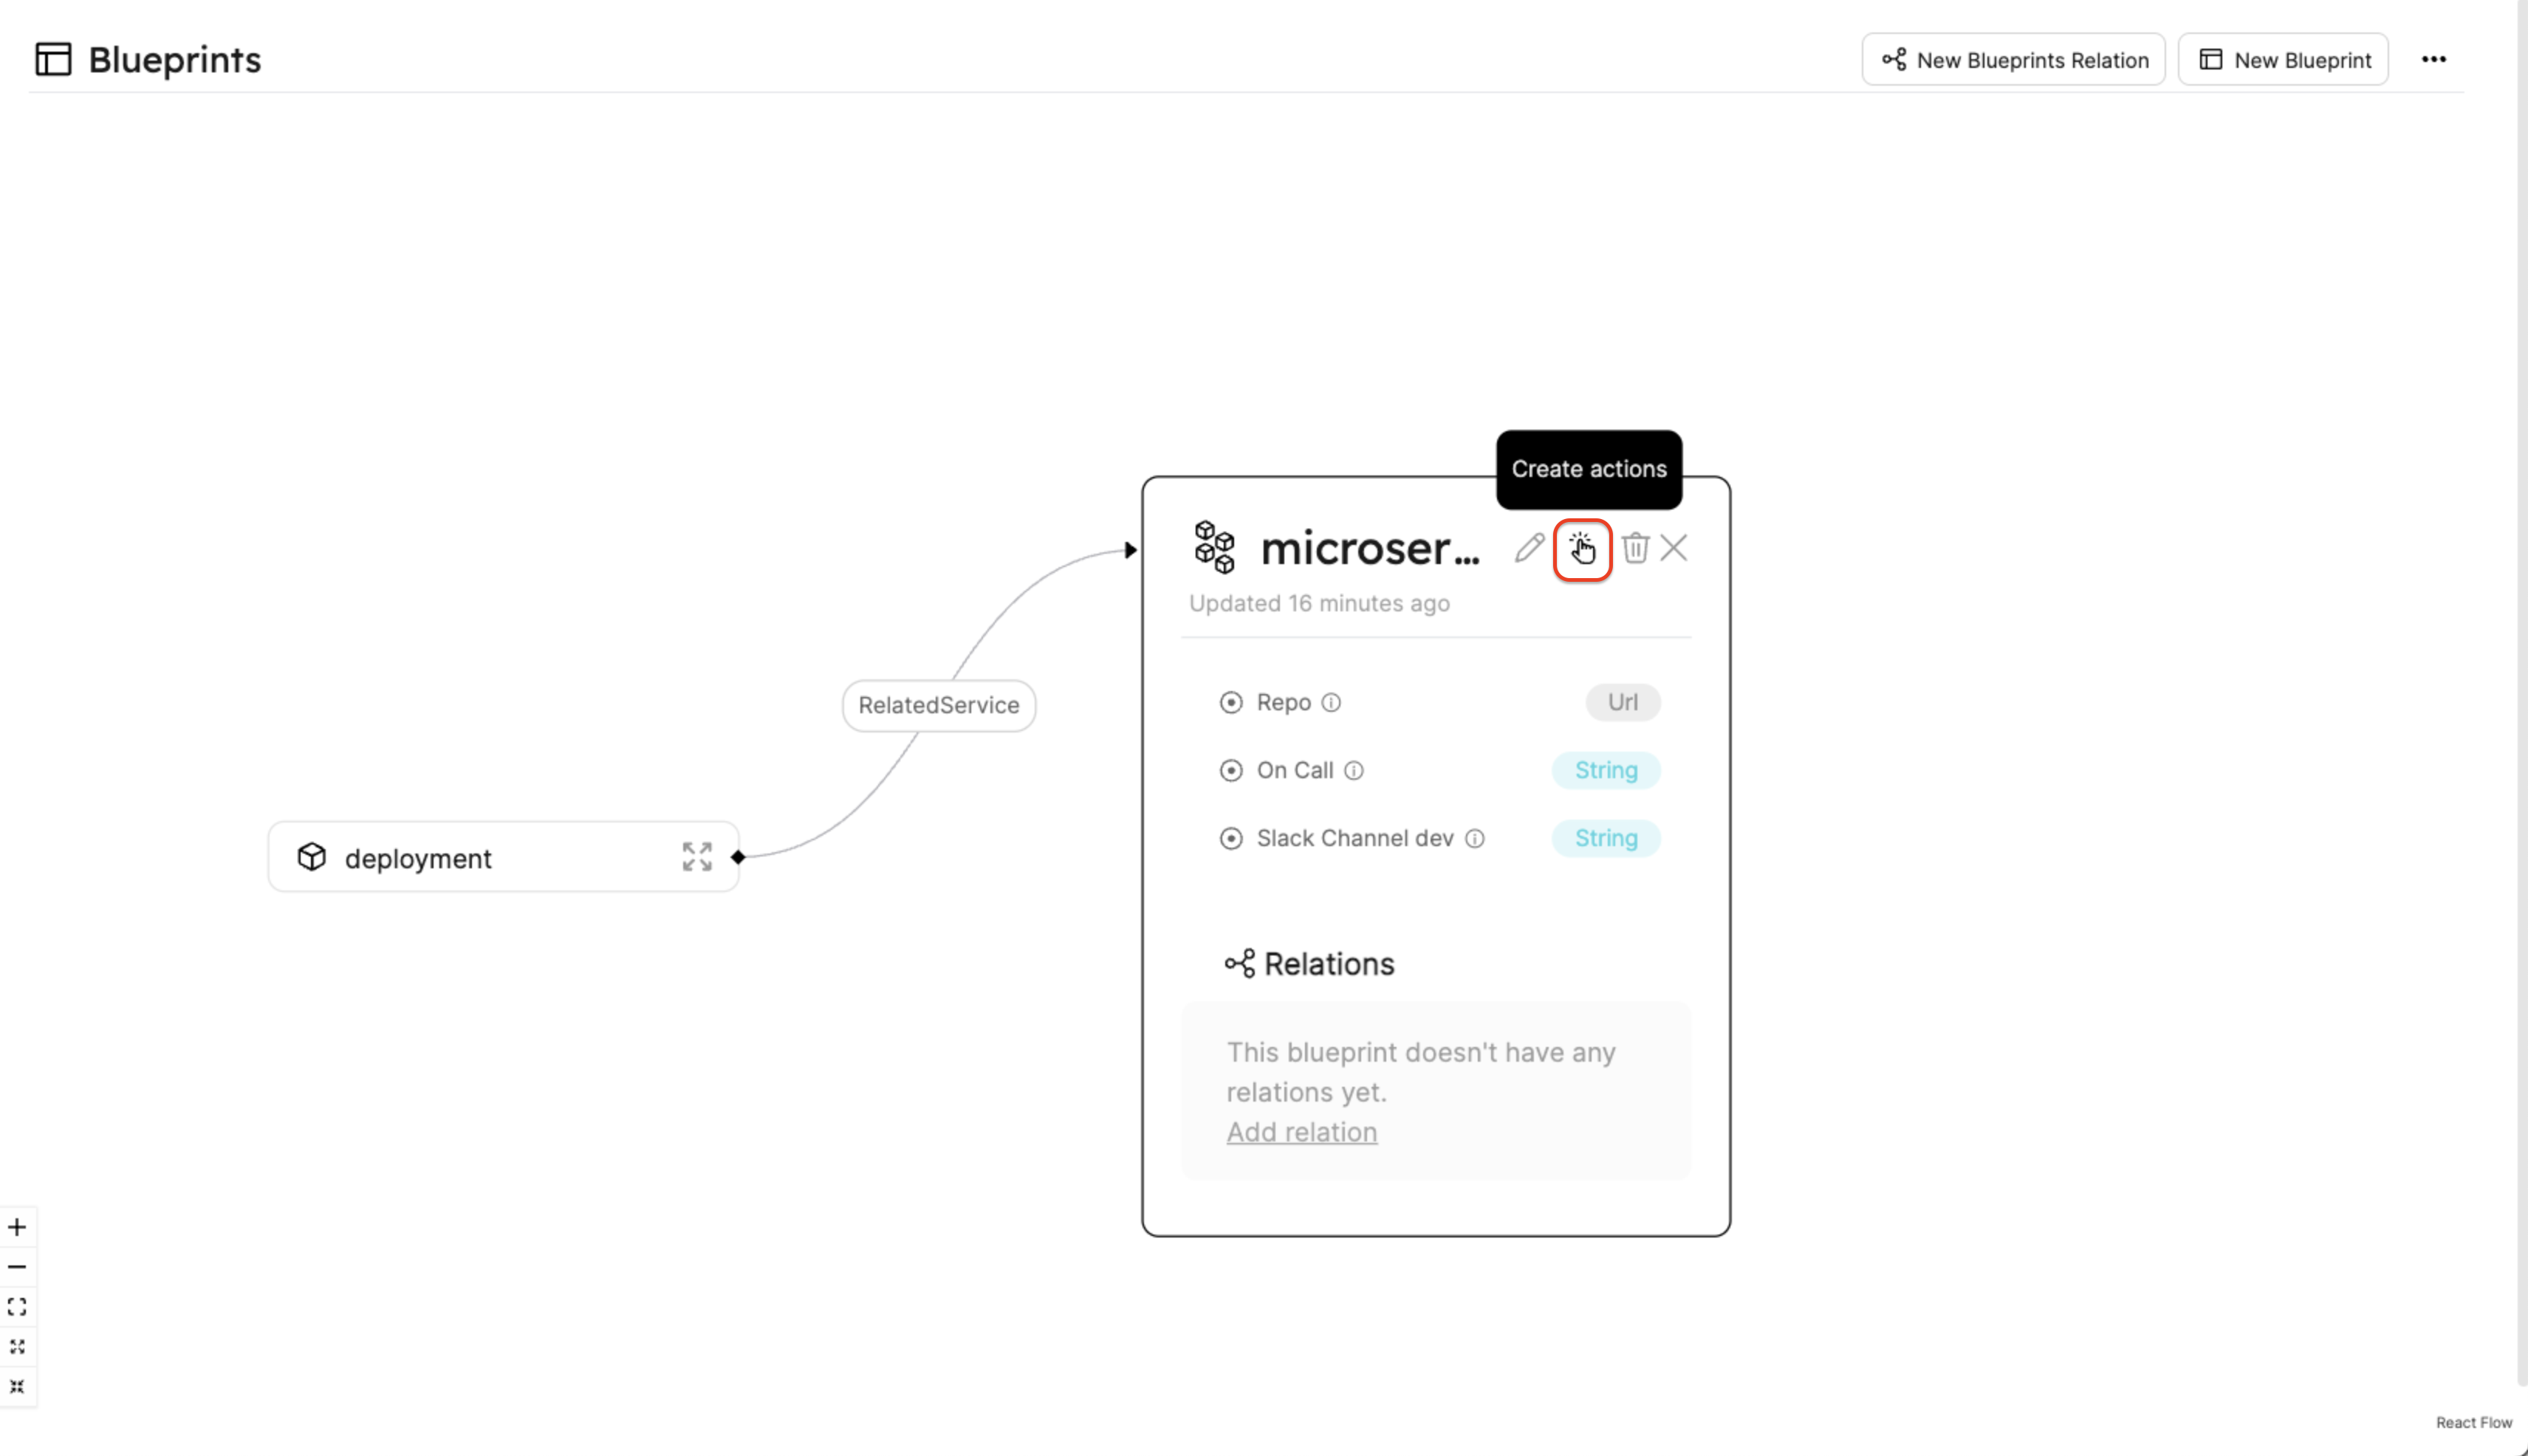
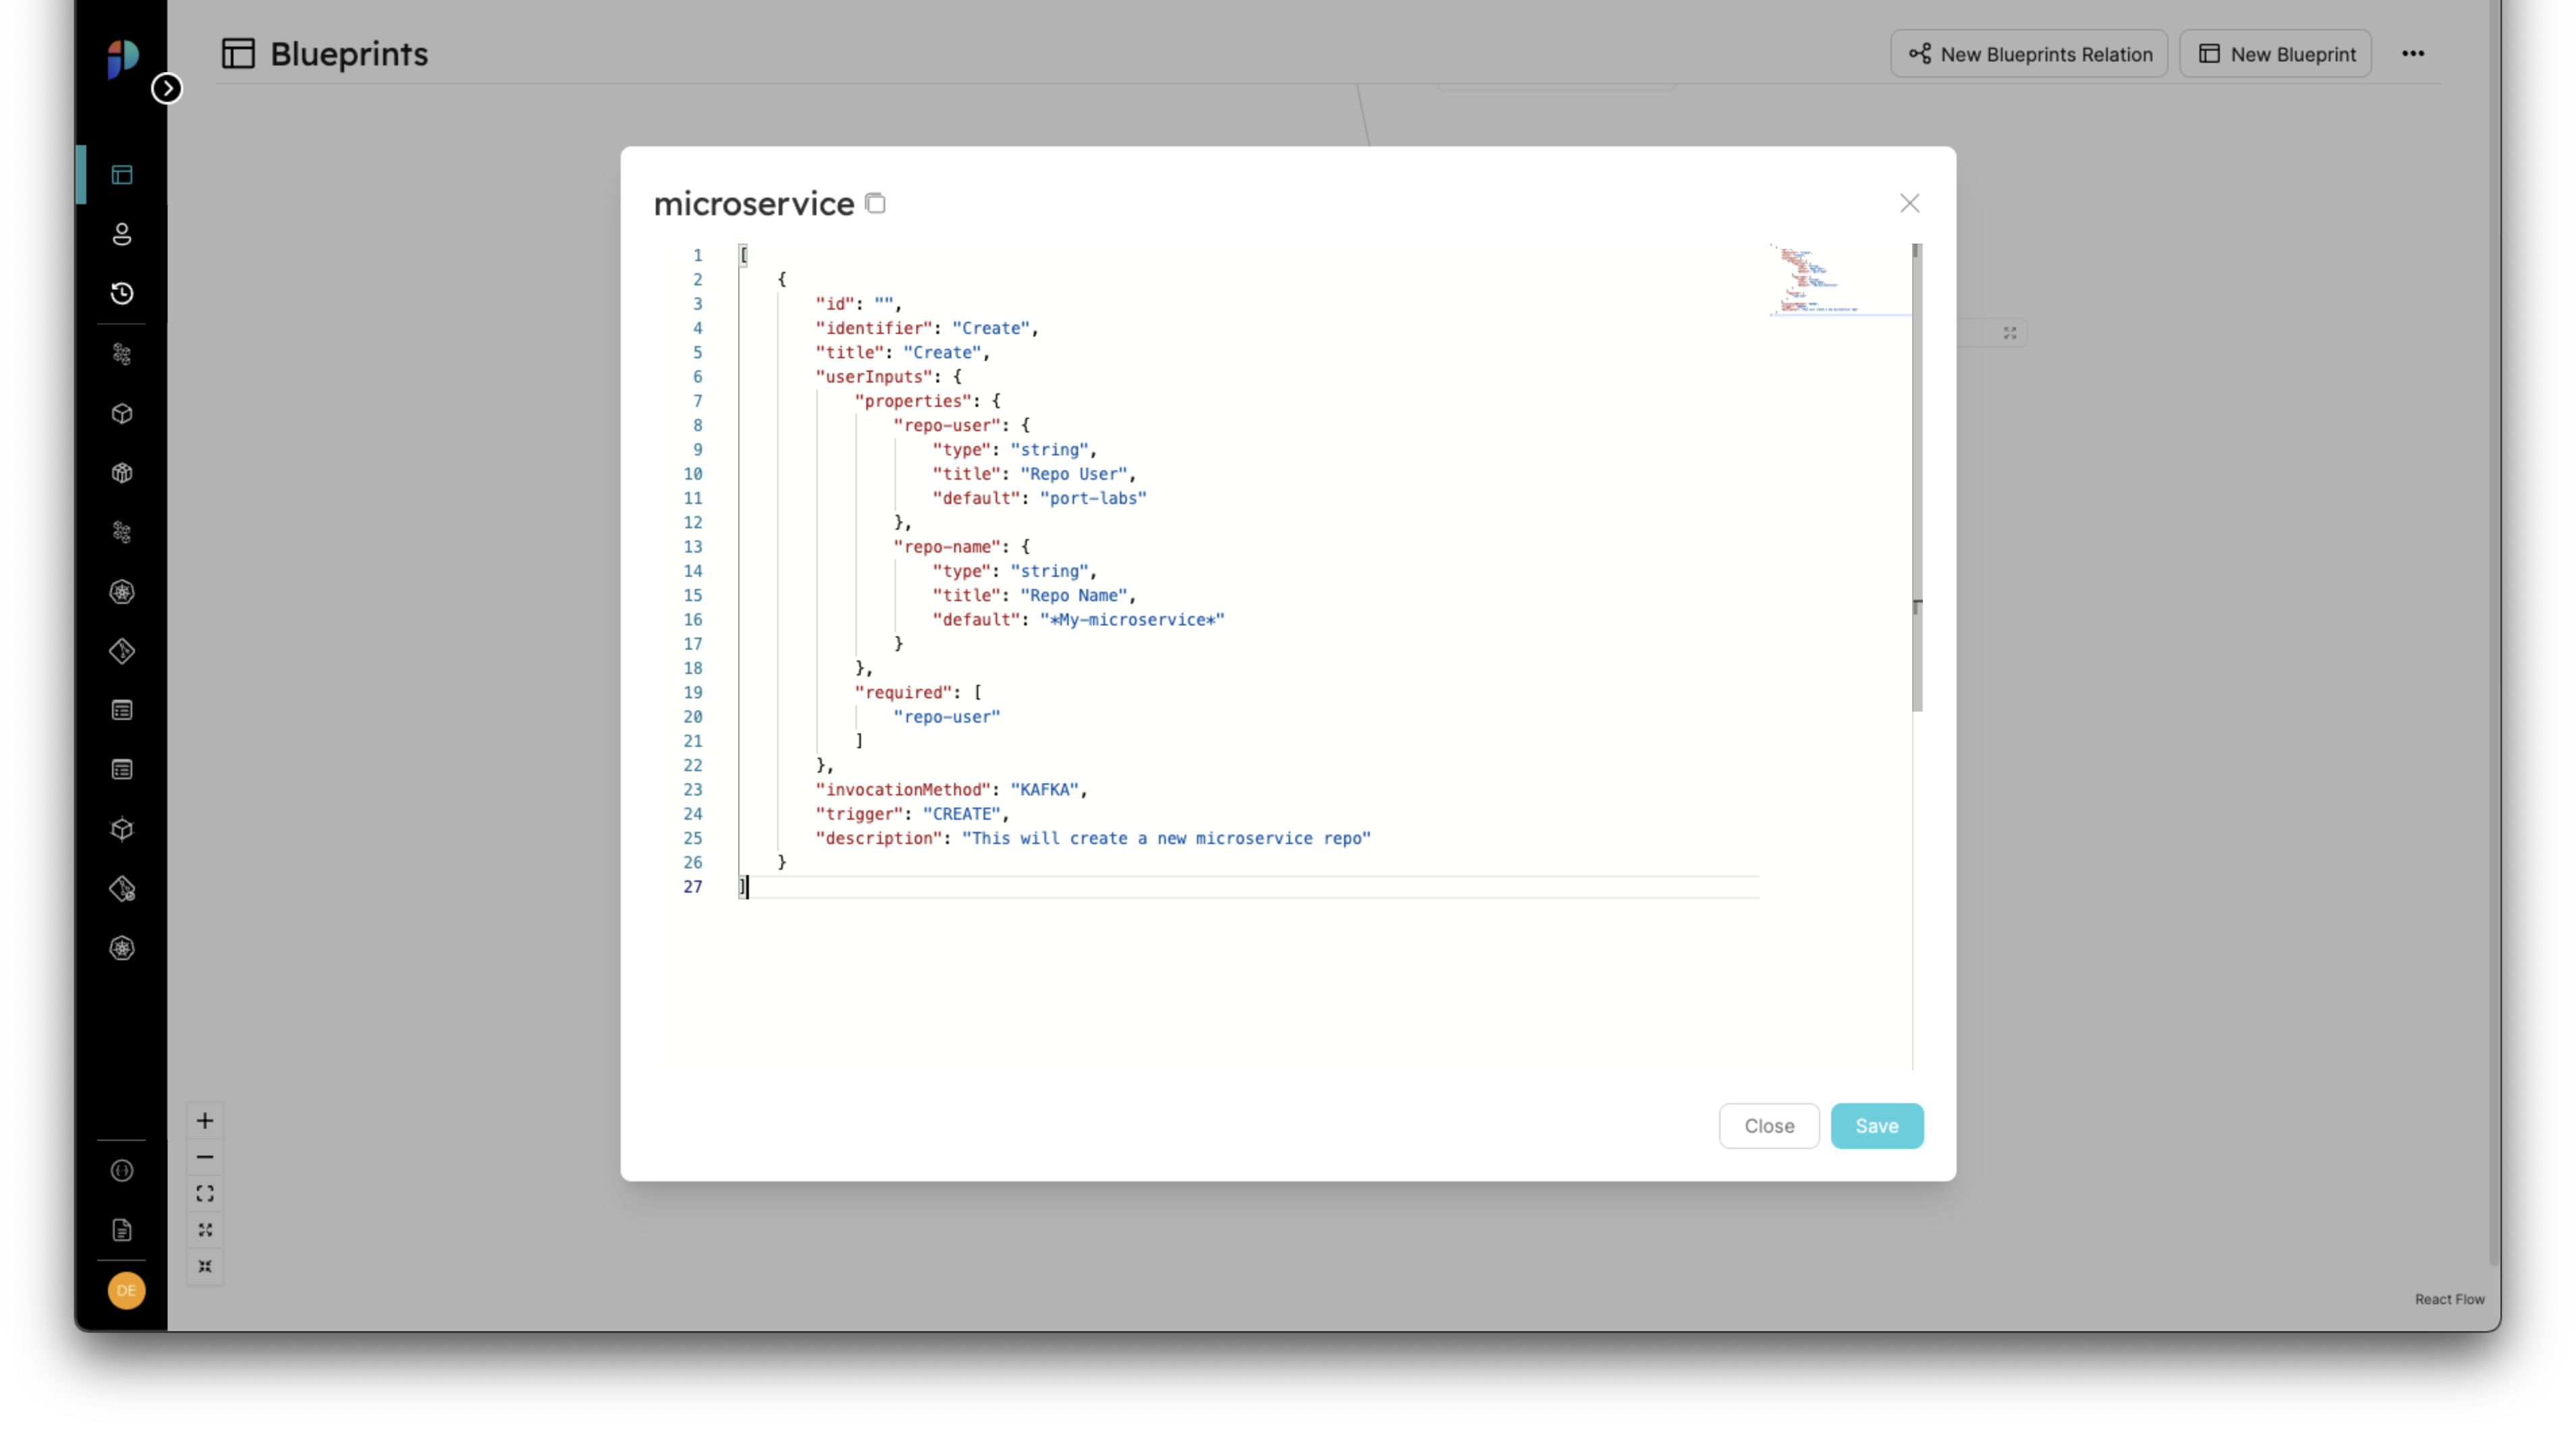
点击按钮后,你会看到一个带有空数组([])的编辑器出现,这就是我们要添加自助服务操作的地方
这是一个已填入 CREATE 操作的操作数组:
[
  {
    "identifier": "create",
    "title": "Create",
    "userInputs": {
      "properties": {
        "repo-user": {
          "type": "string",
          "title": "Repo User",
          "default": "port-labs"
        },
        "repo-name": {
          "type": "string",
          "title": "Repo Name",
          "default": "*My-microservice*"
        }
      },
      "required": ["repo-user"]
    },
    "invocationMethod": {
      "type": "WEBHOOK",
      "url": "https://example.com"
    },
    "trigger": "CREATE",
    "description": "This will create a new microservice repo"
  }
]
这就是提交自助服务操作后 JSON 编辑器的外观:
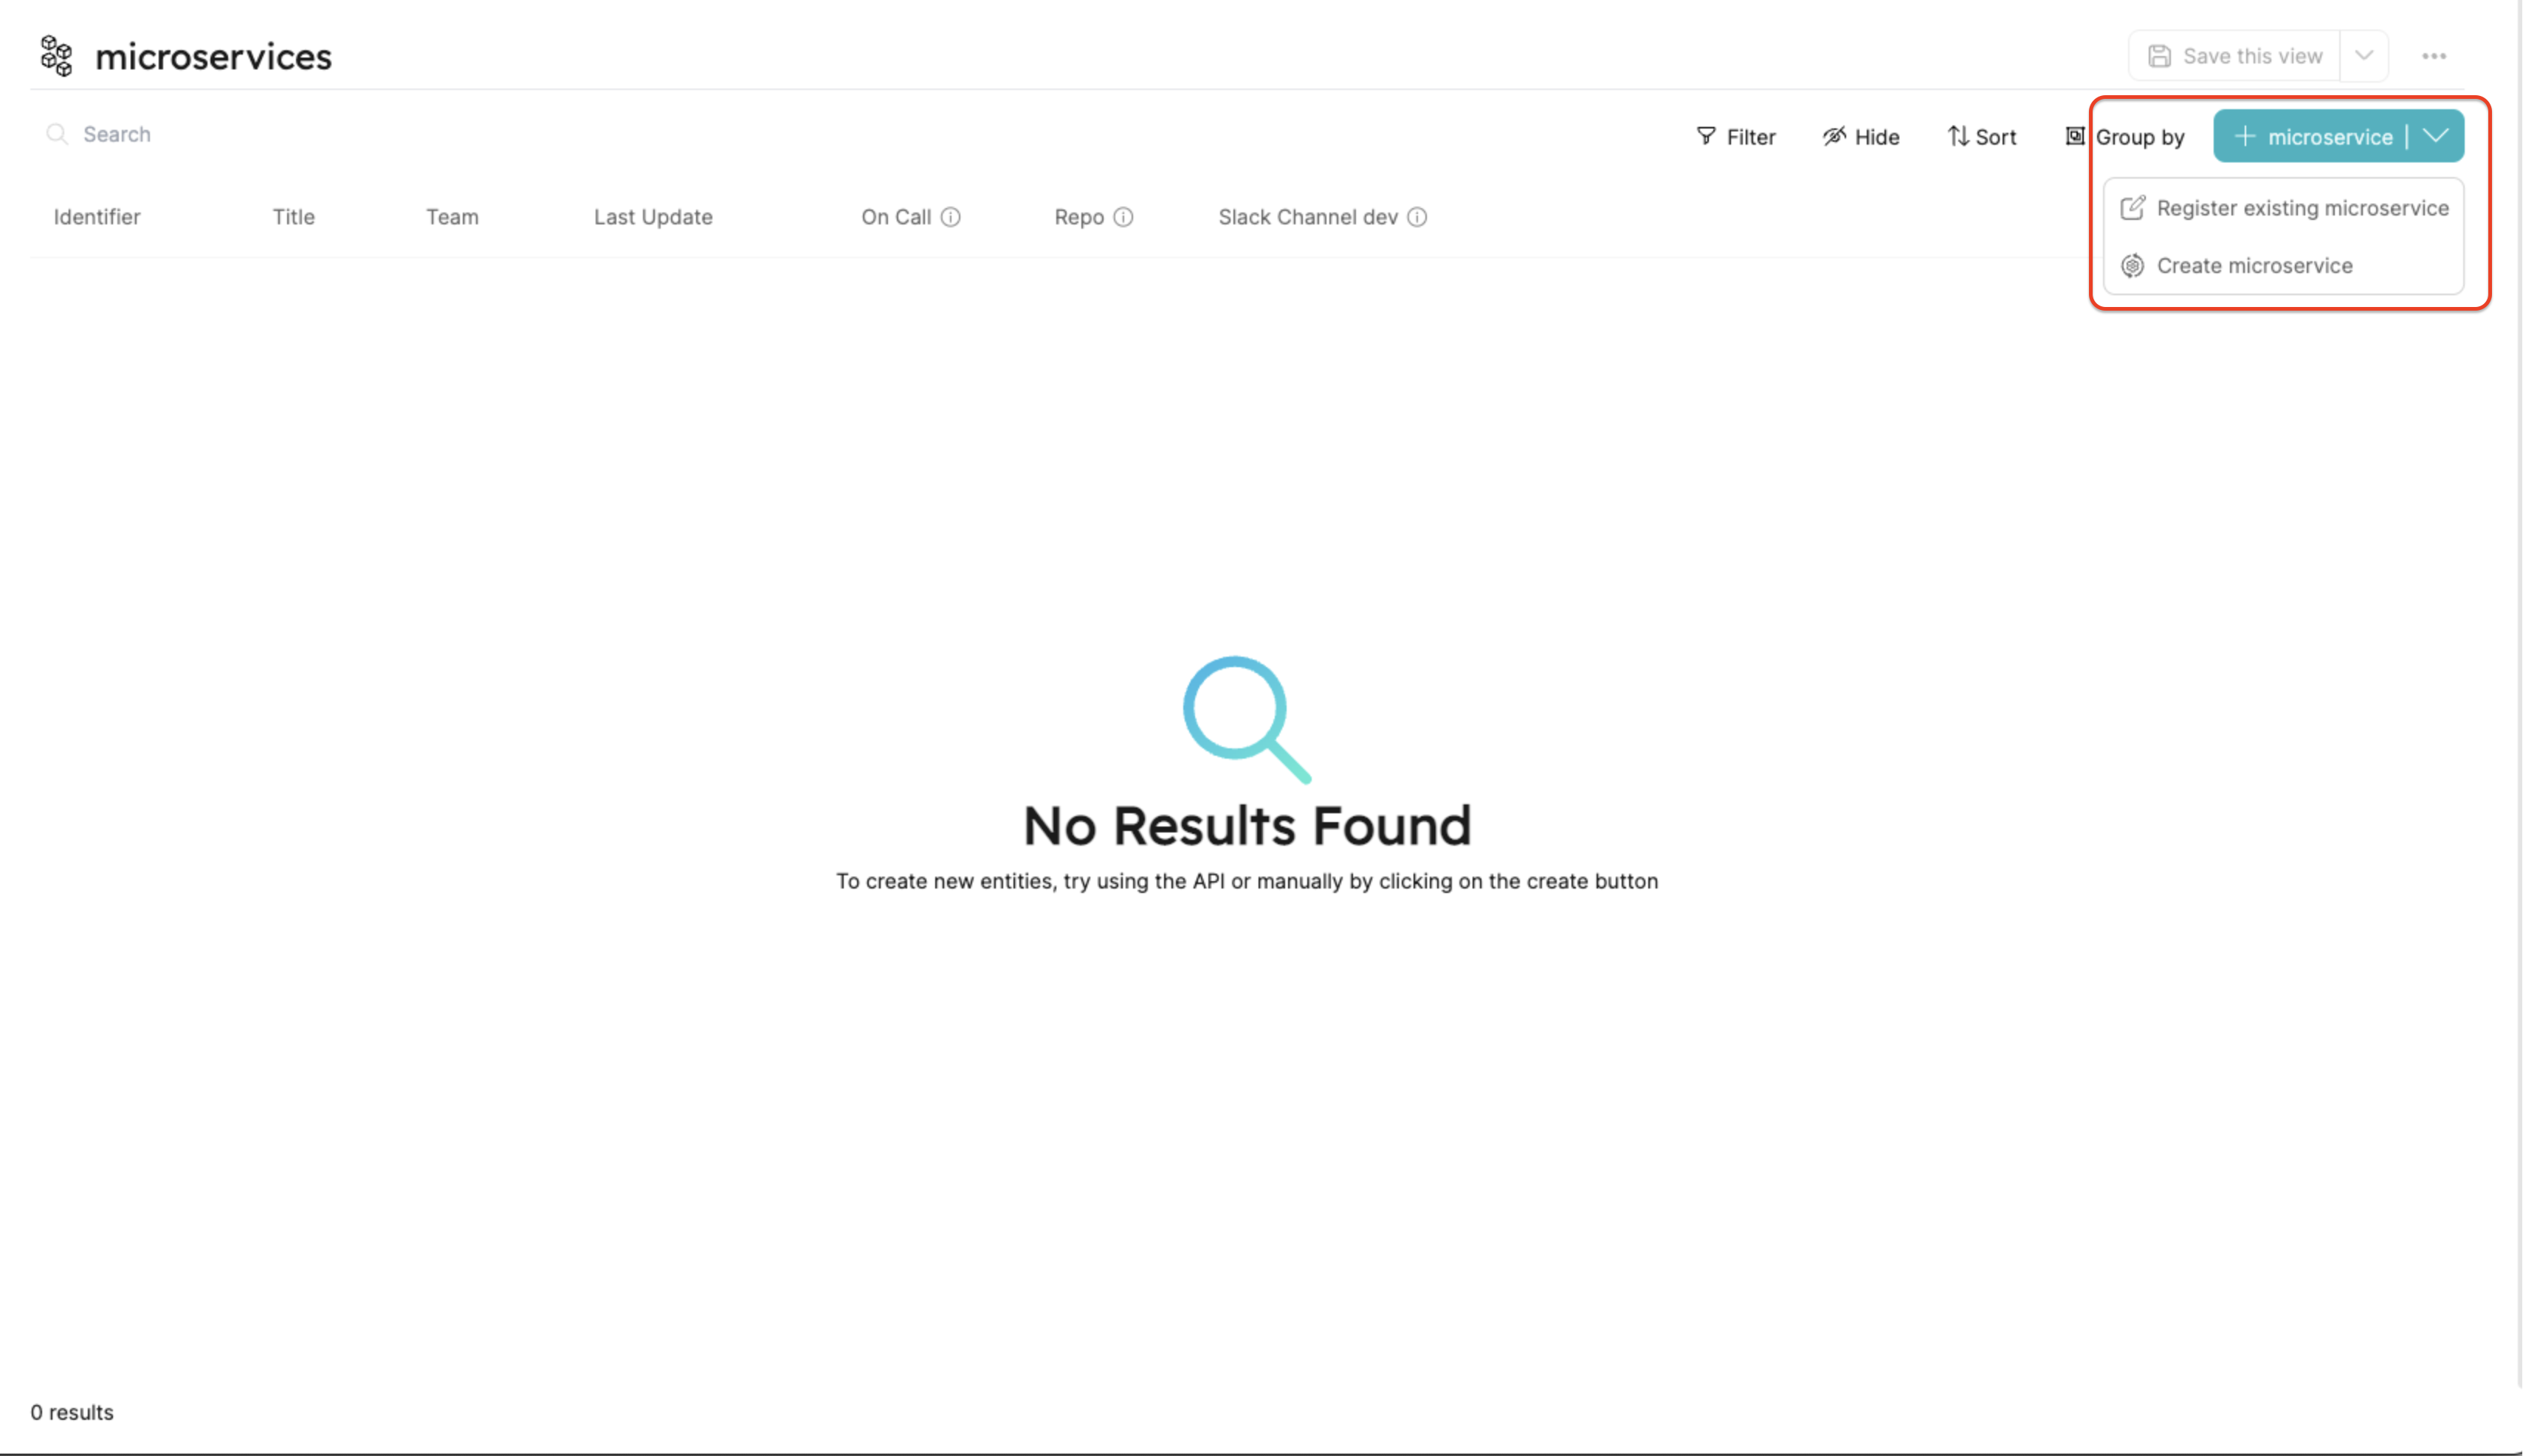
现在,当你进入微服务蓝图页面时,会看到一个新按钮--"创建微服务":
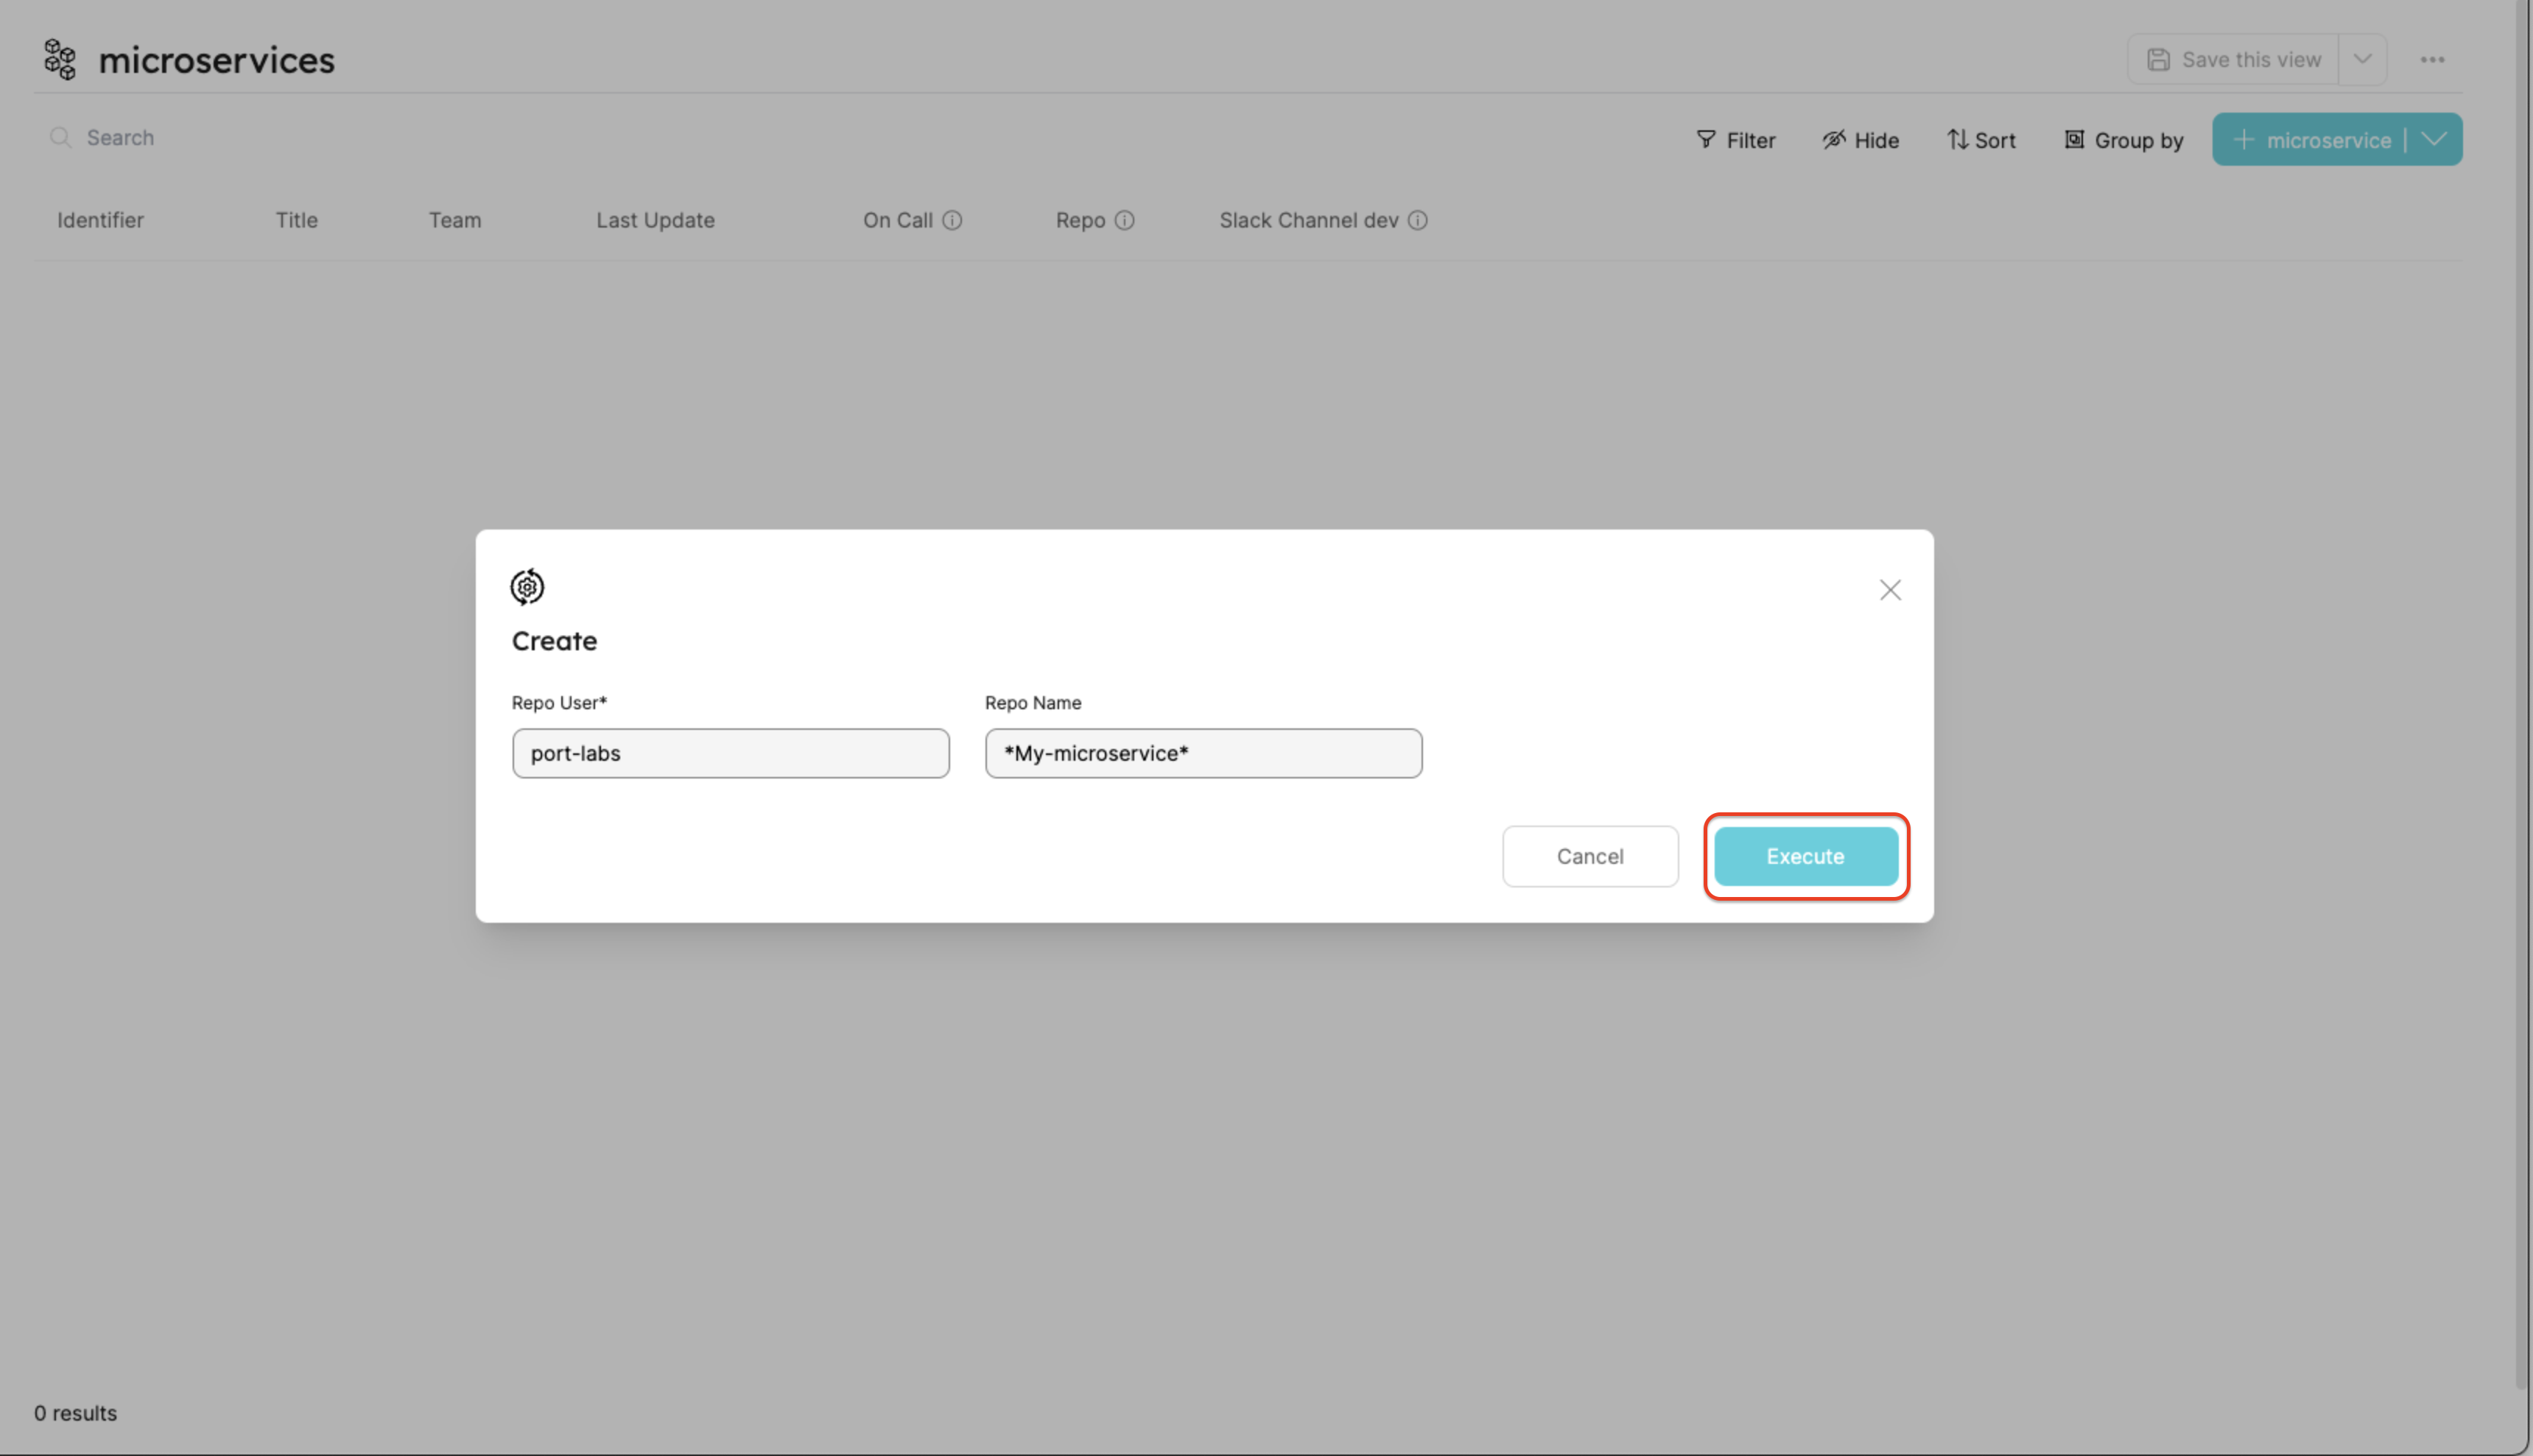
单击 "创建微服务 "选项后,我们将看到一个表单,其中包含在新操作输入到操作数组时指定的输入:
更多自助服务操作
让我们回到 "Microservice "蓝图的动作数组,粘贴以下 JSON,其中有 2 个额外的配置动作:
[
  {
    "identifier": "create",
    "title": "Create",
    "userInputs": {
      "properties": {
        "repo-user": {
          "type": "string",
          "title": "Repo User",
          "default": "port-labs"
        },
        "repo-name": {
          "type": "string",
          "title": "Repo Name",
          "default": "*My-microservice*"
        }
      },
      "required": ["repo-user"]
    },
    "invocationMethod": {
      "type": "WEBHOOK",
      "url": "https://example.com"
    },
    "trigger": "CREATE",
    "description": "This will create a new microservice repo"
  },
  {
    "identifier": "deploy",
    "title": "Deploy",
    "icon": "Deployment",
    "userInputs": {
      "properties": {
        "environment": {
          "type": "string",
          "enum": ["Prod", "Test", "Staging"],
          "title": "Environment"
        },
        "branch": {
          "type": "string",
          "title": "Branch Name"
        },
        "commit-hash": {
          "type": "string",
          "title": "Commit Hash"
        }
      },
      "required": ["environment", "branch", "commit-hash"]
    },
    "invocationMethod": {
      "type": "WEBHOOK",
      "url": "https://example.com"
    },
    "trigger": "DAY-2",
    "description": "This will deploy the microservice"
  },
  {
    "identifier": "delete",
    "title": "Delete",
    "userInputs": {
      "properties": {},
      "required": []
    },
    "invocationMethod": {
      "type": "WEBHOOK",
      "url": "https://example.com"
    },
    "trigger": "DELETE",
    "description": "This will delete the microservice's repo"
  }
]
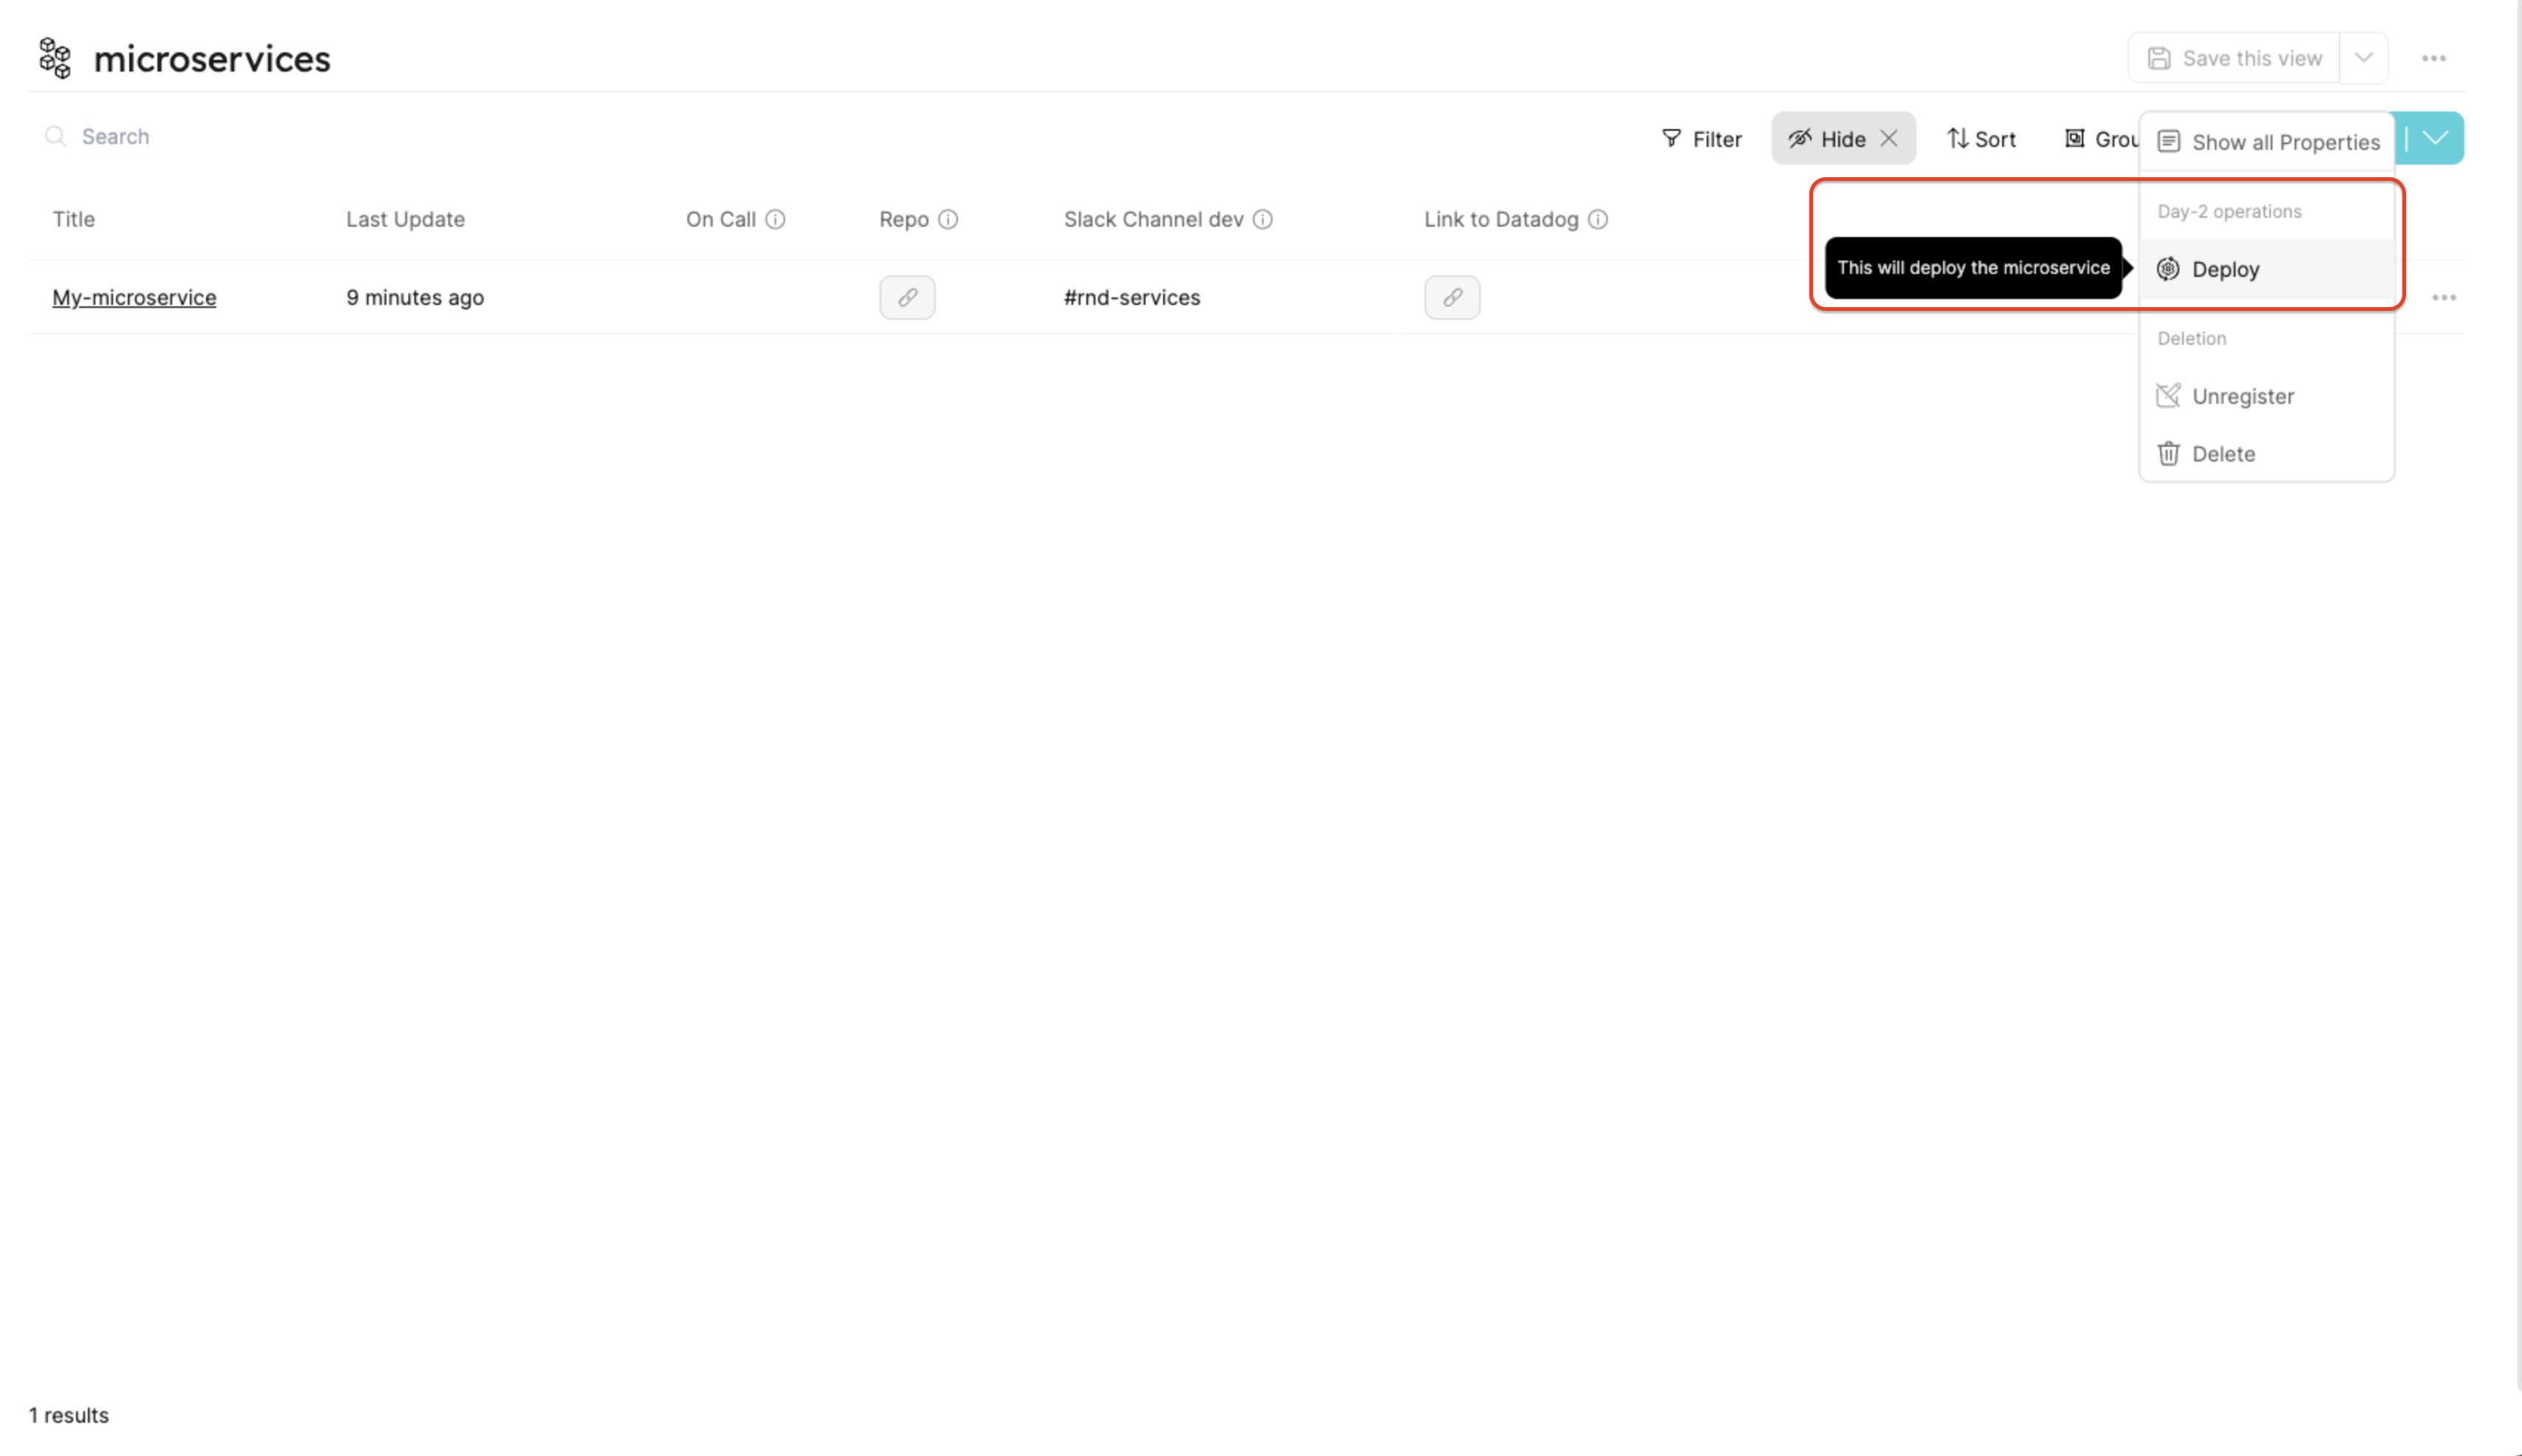
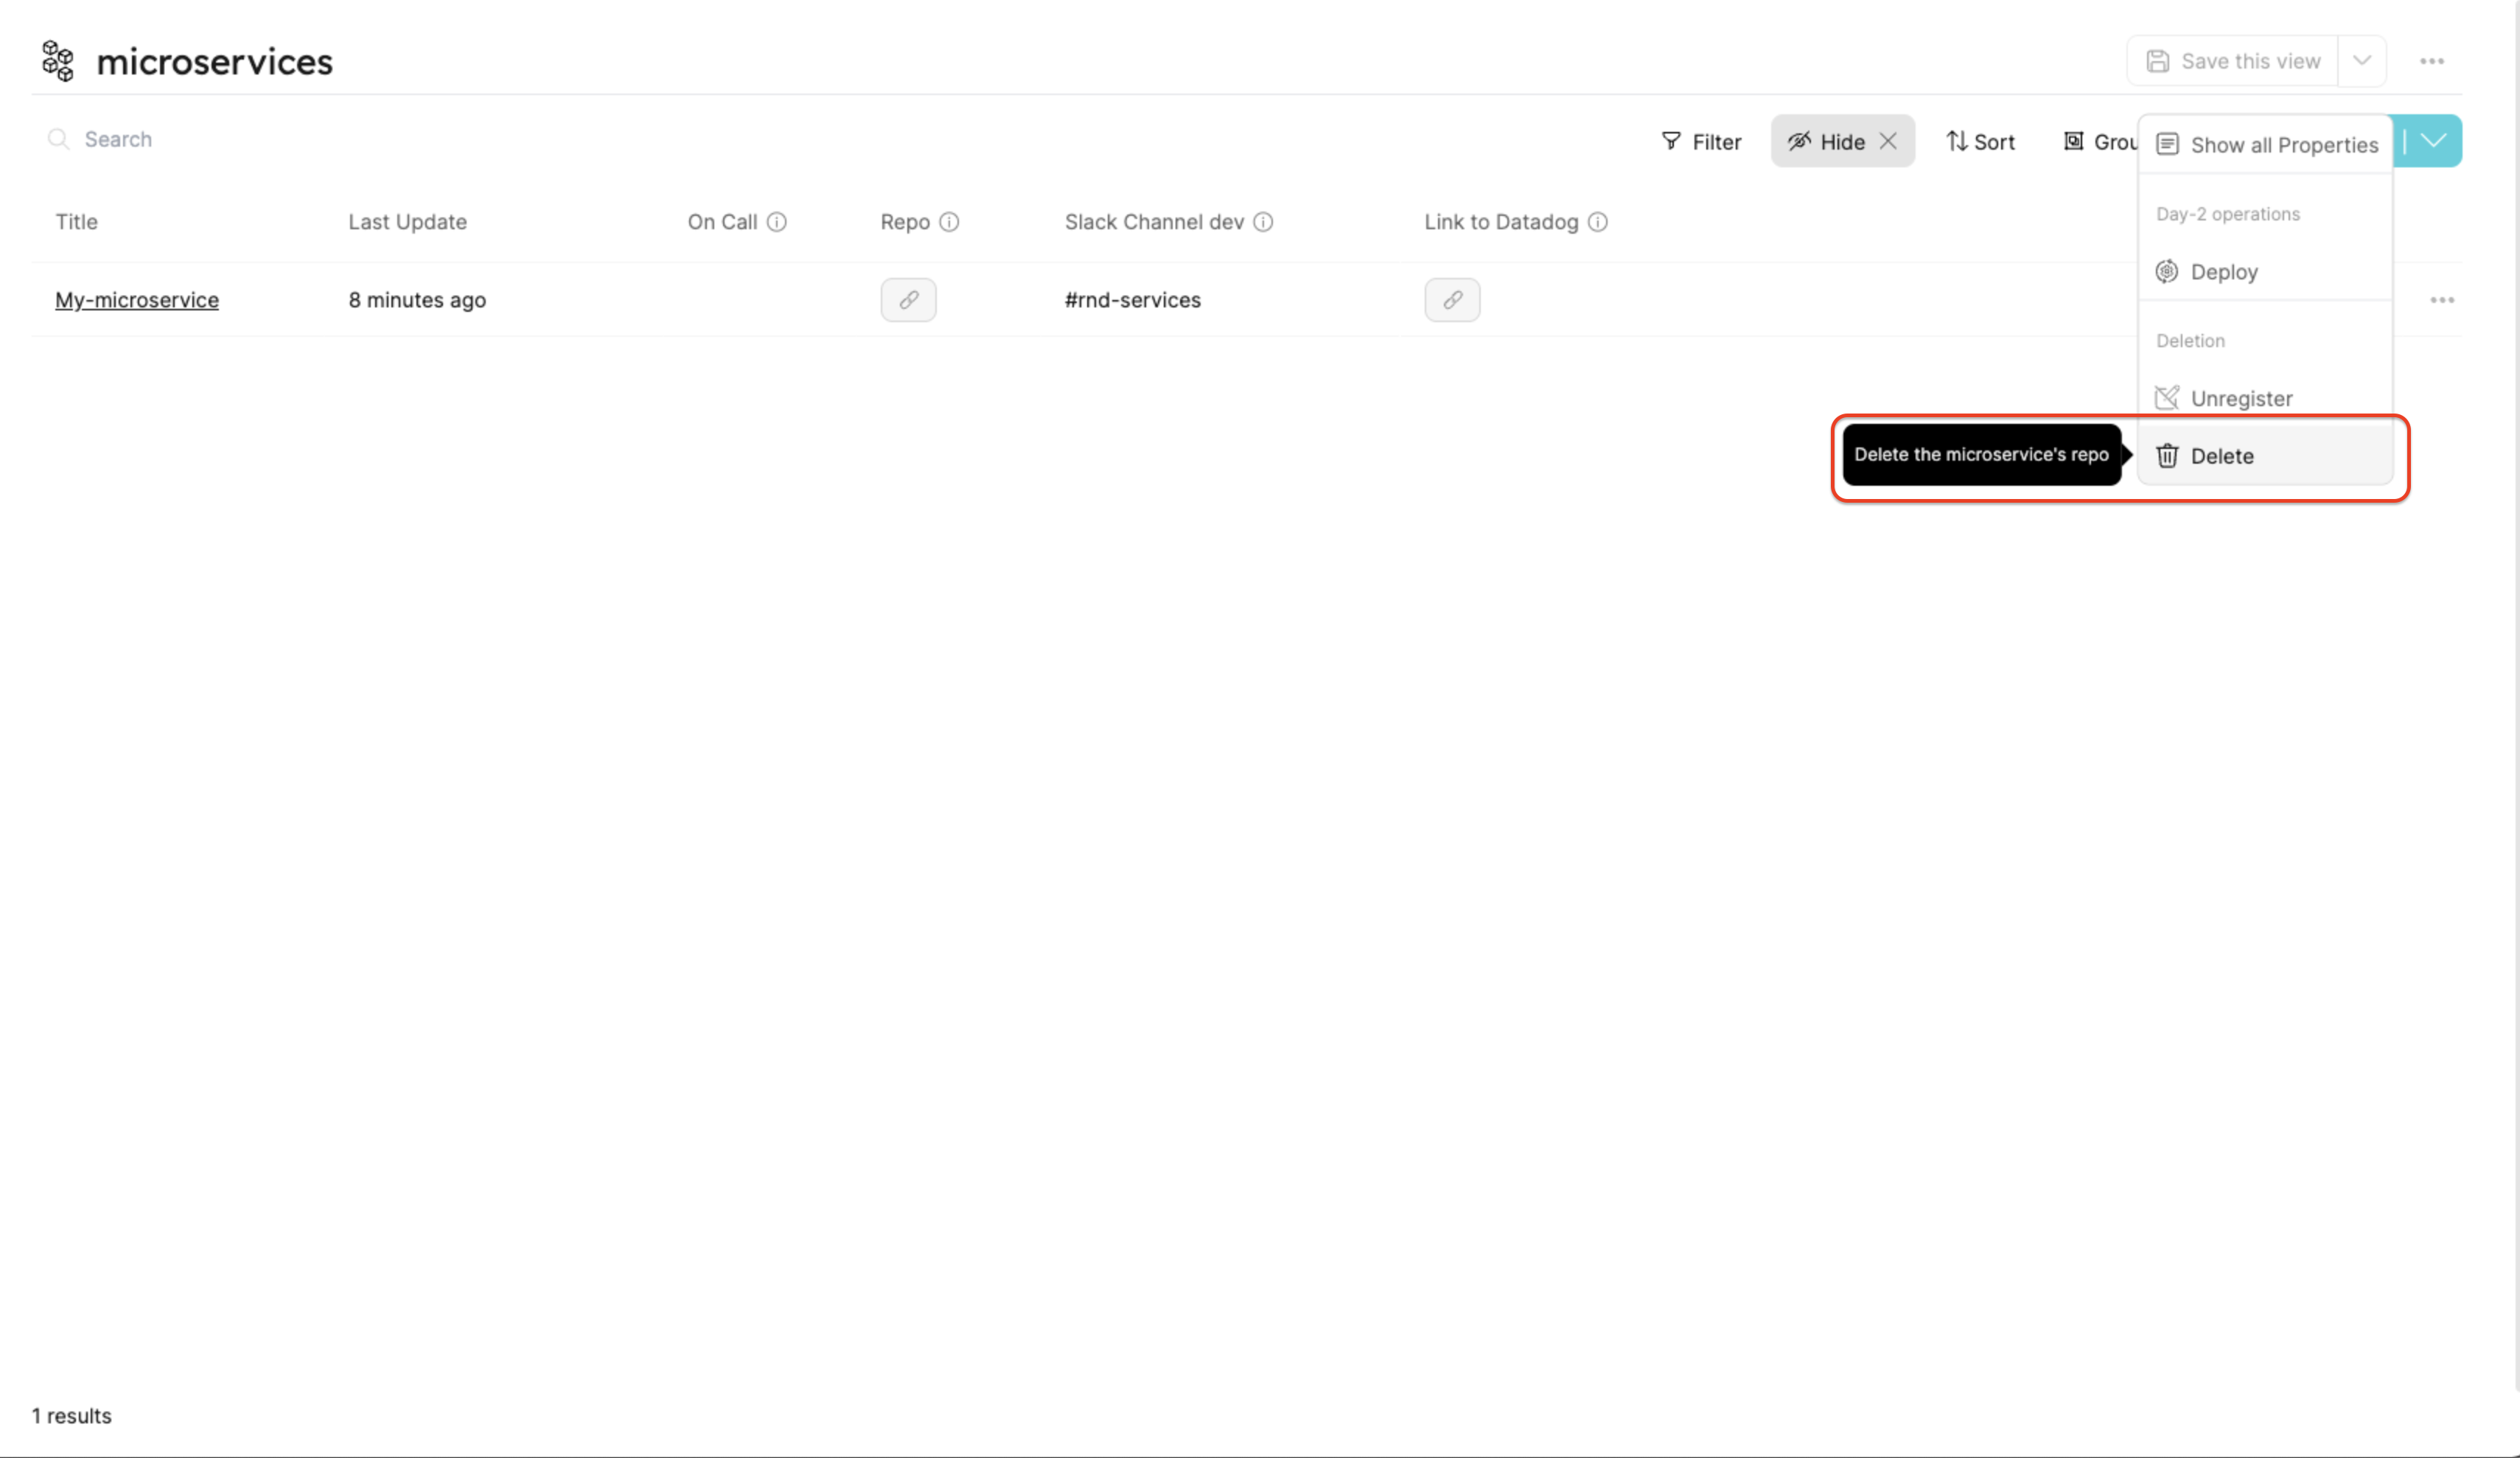
现在,当我们回到微服务页面时,如果点击现有实体旁边的 3 个点,就会看到我们刚刚添加的 Day-2 和删除自助服务操作:
**第 2 天: **
**删除: **
添加多个相同类型的自助服务操作
您可以添加多个相同类型的自助服务操作(如 "创建 "或 "删除")。
例如,你可以在 "Microservice "蓝图中添加 2 个 "创建 "自助服务操作,以支持不同的编程语言:
[
  {
    "identifier": "create_python",
    "title": "Create Python",
    "userInputs": {
      "properties": {
        "repo-user": {
          "type": "string",
          "title": "Repo User",
          "default": "port-labs"
        },
        "repo-name": {
          "type": "string",
          "title": "Repo Name",
          "default": "*My-Python-microservice*"
        }
      },
      "required": ["repo-user"]
    },
    "invocationMethod": {
      "type": "WEBHOOK",
      "url": "https://example.com"
    },
    "trigger": "CREATE",
    "description": "This will create a new Python microservice repo"
  },
  {
    "identifier": "create_go",
    "title": "Create Go",
    "userInputs": {
      "properties": {
        "repo-user": {
          "type": "string",
          "title": "Repo User",
          "default": "port-labs"
        },
        "repo-name": {
          "type": "string",
          "title": "Repo Name",
          "default": "*My-Go-microservice*"
        }
      },
      "required": ["repo-user"]
    },
    "invocationMethod": {
      "type": "WEBHOOK",
      "url": "https://example.com"
    },
    "trigger": "CREATE",
    "description": "This will create a new Go microservice repo"
  }
]
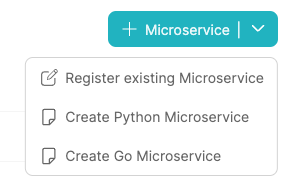
现在,当你进入微服务蓝图页面时,会看到 2 个新按钮--"创建 Python 微服务 "和 "创建 Go 微服务":
人工批准
您可以为您的操作配置一个手动审批步骤。 当一个操作可能具有危险性/破坏性/昂贵性,或组织政策决定在通过前需要多一双眼睛时,这个步骤就非常有用。
要配置手动审批步骤,请在操作中添加 requiredApproval 字段:
[
  {
    "identifier": "create",
    "title": "Create",
    "userInputs": {
      "properties": {
        "repo-user": {
          "type": "string",
          "title": "Repo User",
          "default": "port-labs"
        },
        "repo-name": {
          "type": "string",
          "title": "Repo Name",
          "default": "*My-microservice*"
        }
      },
      "required": ["repo-user"]
    },
    "invocationMethod": {
      "type": "WEBHOOK",
      "url": "https://example.com"
    },
    "trigger": "CREATE",
    "requiredApproval": true,
    "description": "This will create a new microservice repo"
  }
]
当用户点击需要审批的操作的 "执行 "按钮时,将在 Port 中创建一个新的 "运行 "对象,该 "运行 "对象的状态为 "WAITING_FOR_APPROVAL",并在操作的 "运行 "选项卡中可见。
要配置哪些用户可以批准操作,请参阅Managing permissions 。
自助服务操作定义结构
自助服务操作 JSON 结构
自助服务操作的基本结构:
{
  "identifier": "unique_id",
  "title": "Title",
  "userInputs": {
    "properties": {
      "property1": {
        "type": "string",
        "title": "Property title",
        "default": "default value"
      },
      "property2": {
        "type": "number",
        "title": "property title",
        "default": 5
      },
      "property3": {
        "type": "string",
        "format": "entity",
        "blueprint": "microservice"
      }
    }
  },
  "invocationMethod": {
    "type": "WEBHOOK",
    "url": "https://example.com"
  },
  "trigger": "CREATE",
  "description": "Action description"
}
结构表
| Field | Description |
|---|---|
id | Internal Action ID |
identifier | Action identifier |
title | Action title |
icon | Action icon |
userInputs | An object containing properties, required and order as seen in Blueprint structure |
invocationMethod | Defines the destination where invocations of the Self-Service Action will be delivered, see invocation method for details |
trigger | The type of the action: CREATE, DAY-2 or DELETE |
requiredApproval | Whether the action requires approval or not |
description | Action description |
属性结构表
下表列出了可在 properties 键中指定的不同字段:
| Field | Description |
|---|---|
type | All the types Port supports - string, number, boolean, etc... |
title | The title shown in the form when activating the Self-Service Action |
format | Specific data format to pair with some of the available types. You can explore all formats in the String Formats section |
blueprint | Identifier of an existing Blueprint to fetch Entities from |
description (Optional) | Extra description for the requested property |
default (Optional) | Default value |
enum (Optional) | A list of predefined values the user can choose from |
icon (Optional) | Icon for the user input property. Icon options: Airflow, Ansible, Argo, Aws, Azure, Blueprint, Bucket, Cloud,... See the full icon list. |
特殊格式
除了在Blueprint string property formats 中引入的格式外,Port 的自助服务操作还支持以下特殊格式:
type | Description | Example values |
|---|---|---|
entity | Entity from a specified Blueprint | "notifications-service" |
| Entity array | Array of Entities from a specified Blueprint | ["notifications-service", "frontend-service"] |
示例
下面介绍如何被用于的属性格式:
实体
"entity_prop": {
    "title": "My string prop",
    "type": "string",
    "format": "entity",
    "blueprint": "microservice",
    "description": "This is an entity property"
}
被用于"format": "entity"时,会出现一个blueprint字段。
蓝图 "字段会被用于一个现有蓝图的标识符。 然后,当在 Port 的用户界面中使用已配置的自助服务操作时,指定字段将包括软件目录中选定蓝图的现有实体列表,供用户选择。
实体数组
"entity_prop": {
    "title": "My string prop",
    "description": "This property is an array of Entities",
    "type": "array",
    "items": {
      "type": "string",
      "blueprint": "service",
      "format": "entity"
    }
}
当使用 "type": "array"时,您可以创建一个 items 属性。在 items 中,您可以使用 "format": "entity",并写入所选 blueprint 的标识符,您希望从该标识符中包含 Entities(类似于Entity 格式) 。然后,您就可以将 Entity 数组传递给 Port 操作。
调用方法
invocationMethod "对象控制向何处报告自助服务操作。
invocationMethod "支持 3 种配置:
调用方法结构字段
| Field | Type | Description | Example values |
|---|---|---|---|
type | string | Defines the self-service action destination type | Either WEBHOOK, KAFKA, GITHUB or GITLAB |
agent | boolean | Defines whether to use Port Agent for execution or not. Can only be added if type is set to WEBHOOK or GITLAB | Either true or false |
url | string | Defines the webhook URL to which Port sends self-service actions to via HTTP POST request. Can be added only if type is set to WEBHOOK | https://example.com |
org | string | Defines the GitHub organization name. Can be added only if type is set to GITHUB | port-labs |
repo | string | Defines the GitHub repository name. Can be added only if type is set to GITHUB | port-docs |
workflow | string | Defines the GitHub workflow ID to run (You can also pass the workflow file name as a string). Can be added only if type is set to GITHUB | blank.yml |
omitPayload | boolean | Flag to control whether to add port_payload JSON string to the GitHub/GitLab workflow trigger payload (default: false). Can be added only if type is set to GITHUB or GITLAB | false |
omitUserInputs | boolean | Flag to control whether to send the user inputs of the Port action as isolated parameters to the GitHub/GitLab workflow (default: false). When disabled, you can still get the user inputs from the port_payload (unless omitted too). Can be added only if type is set to GITHUB or GITLAB | false |
reportWorkflowStatus | boolean | Flag to control whether to automatically update the Port run object status at the end of the workflow (default: true). Can be added only if type is set to GITHUB | |
defaultRef | string | The default ref (branch / tag name) we want the action to use. defaultRef can be overriden dynamically,by adding ref as user input. Can be added only if type is set to GITLAB | |
projectName | string | Can be added only if type is set to GITLAB Defines the GitLab project name | port |
groupName | string | Can be added only if type is set to GITLAB Defines the GitLab group name | port-labs |
触发操作
现在,我们将查看每种操作类型的触发器示例,并解释执行每种操作类型时的幕后情况。
当我们点击操作的 "执行 "按钮时,一个 Portaction message 就会发布到用户指定的调用目的地。
例如,您可以在触发 "创建 "操作时部署微服务的新版本。
CREATE action
该操作由与我们配置的操作蓝图相匹配的页面触发:

- 注册"(Register)--该选项用于在不触发 "创建 "操作的情况下将新实体添加到目录中。如果基础结构实体是在使用 Port 之前创建的,而您希望将其数据引用到软件目录中,则此选项非常有用。 如果实体是手动创建的,而您希望事后将其记录到 Port 中,该选项也很有用。
- 创建"--该选项将显示包含操作所需的 "用户输入 "的表单。点击执行后,新的执行消息将发送到 Port 的 Kafka Topics,以便您在基础架构中处理创建请求。
点击 "创建微服务 "选项后,我们将看到一个表单,其中包含我们在动作数组中输入新动作时指定的输入:

DAY-2 操作
从现有实体的子菜单中选择该操作即可触发:

DELETE 操作
从现有实体的子菜单中选择该操作即可触发:

action信息结构
Self-Service Action 的每次调用都会发布一条新的 "run "消息(具有自己唯一�的 "runId "值)。 让我们来探讨一下 Self-Service Action 运行消息的结构:
| Field | Description | Example |
|---|---|---|
action | Action identifier | Create microservice |
resourceType | Resource type that triggered the action. In case of action runs, it always defaults to run | run |
status | Action status. In the case of action runs, it always defaults to TRIGGERED | TRIGGERED |
trigger | Audit data for the action run | Example below |
context | Contains the context of the action, and has keys for blueprint, entity and runId | Example below |
payload | Explanation below | Example below |
触发器示例
触发器包括审计数据,例如谁触发了操作,何时以及如何触发("用户界面 "或 "应用程序接口")。
"trigger": {
    "by": {
        "userId": "auth0|<USER>",
        "orgId": "<ORG>",
        "user": {
          "email": "<USER_EMAIL>",
          "firstName": "<USER_FIRST_NAME>",
          "lastName": "<USER_LASTT_NAME",
          "id": "<USER_ID>"
        }
    },
    "at": "2022-07-27T17:50:58.776Z",
    "origin": "UI"
}
示例语境
"context": {
    "entity": null,
    "blueprint": "k8sCluster",
    "runId": "r_AtbOjbe45GNDElcQ"
}
自助服务操作运行有效载荷
负载对象包含调用自助服务操作的数据,它包括以下键值:
entity- 执行运行的实体(在DAY-2或DELETE的情况下,对于CREATE它将为空)。action- 被触发的操作的定义,包括所有操作配置,包括预期的userInputs,description等。properties- 此键包括开发人员在执action作时提供的 Values。此对象中的键与动作定义中的userInputs键下定义的键相匹配。
下面是一个 CREATE 操作的 payload 对象示例:
"payload": {
    "entity": null,
    "properties": {
        "region": "prod-2-use1",
        "title": "dev-env",
        "version": "1.2",
        "type": "EKS"
    }
}