使用 webhooks 触发云构建
在本指南中,您将学习如何使用Webhook Actions 从 Port 触发您的Cloud Build Pipelines。
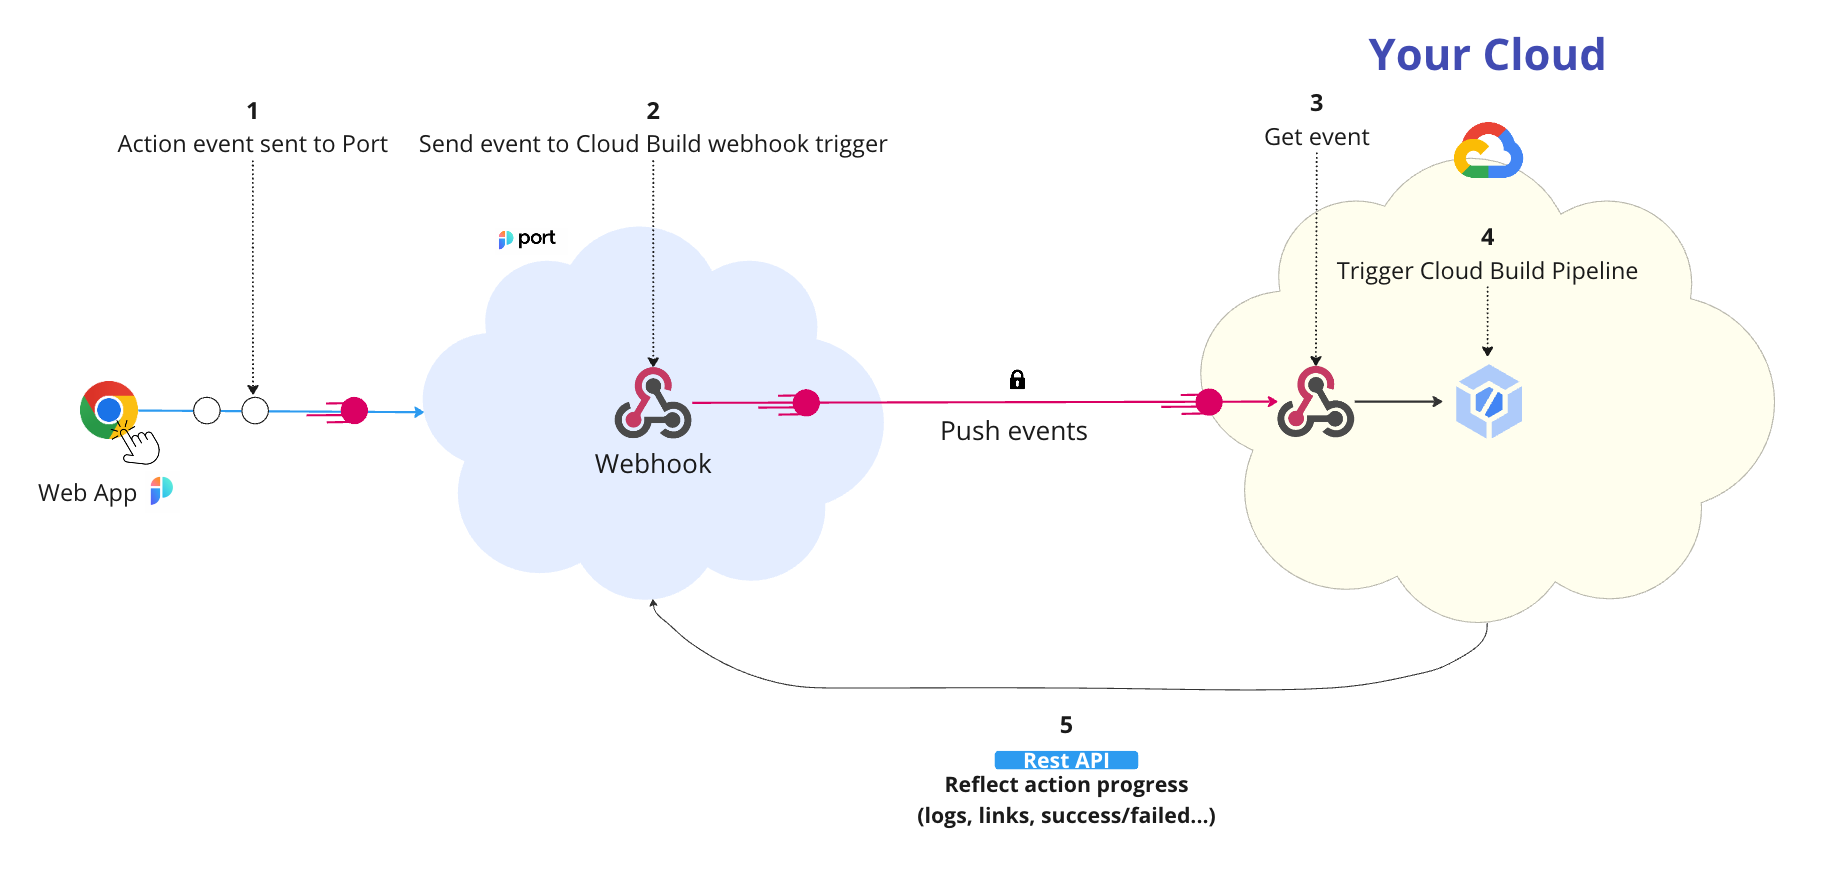
上图所示步骤如下:
- 在 Port 中调用一个操作;
- Port 使用 SHA-1 与
clientSecret值对动作有效载荷进行签名,并将其放入X-Port-Signature请求头中。 ::info Webhook 安全性 使用请求头验证 webhook 请求具有以下优点: - 确保请求有效载荷未被篡改- 确保信息发送方是 Port
- 确保收到的信息不是旧信息的重放
:::
3.Port 通过向
https://cloudbuild.googleapis.com/v1/projects/{project_id}/triggers/{webhook_name}:webhook?key={google_api_key}&secret={webhook_secret}的POST请求发布调�用的 `WEBHOOK
流程示例如下
- 开发人员要求运行云构建 Pipeline;
- Port向云构建 webhook
URL发送带有操作有效载荷的POST请求; - Cloud Build 网络钩子接收新的操作请求;
- 云构建网络钩子触发 Pipelines;
先决条件
Google Cloud Build 所需依赖项:
- 源代码库 - 您将被要求授权 Google Cloud Build 服务访问您的 GitHub、Gitlab 或 BitBucket 账户,以便继续。
- GCP 服务 - 如果您要学习本教程,则需要启用以下 GCP API: 1.云运行; 2.云构建; 3.Secret Manager; 4.人工制品注册表。
设置 webhook
配置 Pipelines
要启用使用 webhook 调用触发 Cloud Build 管道,您需要在源代码库的根目录中添加一个 cloudbuild.yaml 文件或一个 Dockerfile 文件。 这样,Cloud Build 就能读取管道步骤并执行指令。
下面的示例展示了一个简单的云构建管道,它可以构建容器镜像、将镜像推送到容器注册表并使用 Google Cloud Run 进行部署。 将此代码块复制并粘贴到您的 cloudbuild.yaml 文件中。
steps:
  # Build the container image
  - name: "gcr.io/cloud-builders/docker"
    args:
      [
        "build",
        "-t",
        "${_REGION}-docker.pkg.dev/$PROJECT_ID/${_REPOSITORY}/${_IMAGE_NAME}:${SHORT_SHA}",
        ".",
      ]
    id: Building the container image

  # Push the container image to Container Registry
  - name: "gcr.io/cloud-builders/docker"
    args:
      [
        "push",
        "${_REGION}-docker.pkg.dev/$PROJECT_ID/${_REPOSITORY}/${_IMAGE_NAME}:${SHORT_SHA}",
      ]
    id: Pushing the image to registry

  # Deploy container image to Cloud Run
  - name: "gcr.io/cloud-builders/gcloud"
    args:
      [
        "run",
        "deploy",
        "${_REPOSITORY}",
        "--image",
        "${_REGION}-docker.pkg.dev/$PROJECT_ID/${_REPOSITORY}/${_IMAGE_NAME}:${SHORT_SHA}",
        "--region",
        "${_REGION}",
        "--platform",
        "managed",
        "--allow-unauthenticated",
      ]

substitutions:
  # Repository Specific configuration. DevOps can change these as needed
  _REPOSITORY: <YOUR_CONTAINER_REPOSITORY_NAME>
  _IMAGE_NAME: $(body.payload.properties.imageName)
  _REGION: $(body.payload.properties.region)

options:
  substitution_option: ALLOW_LOOSE
  logging: CLOUD_LOGGING_ONLY
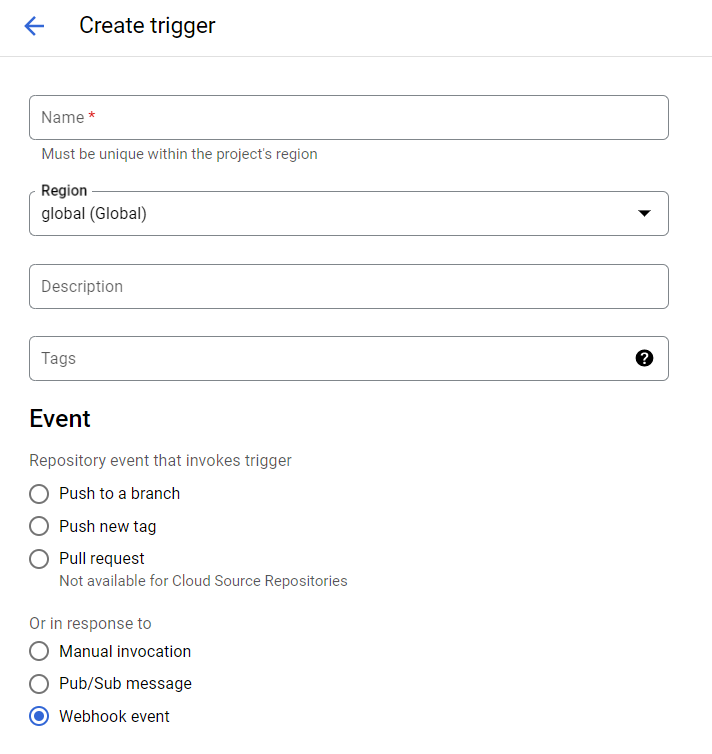
为 Pipelines 启用 webhook 触发器
在 Google Cloud Build 页面,进入左侧边栏的触发器选项卡,点击创建触发器,然后在表单中填写 webhook 信息。 在事件下选择 "Webhook 事件"。
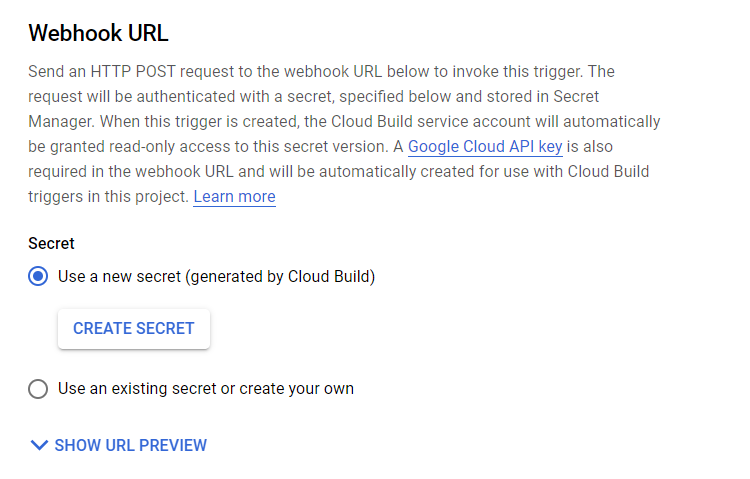
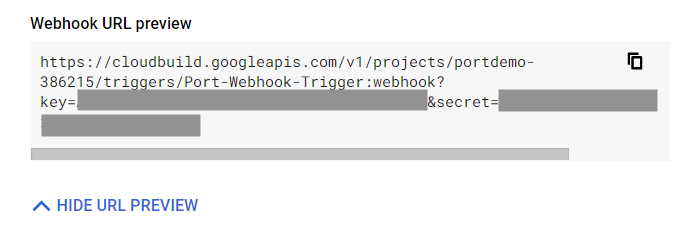
默认情况下,在为 Pipelines 启用 webhook 触发器时,Google 会要求您使用一个secret来验证 webhook URL。 该secret由 Cloud Build 自动生成,其功能是保护传入的 webhook 请求。
创建或选择现有secret后,您将看到 Webhook URL 预览。 该 URL 包含 Cloud Build 生成的 API 密钥和您的secret。
此外,如果您将 webhook 触发器配置为被用于服务帐户,Google 会要求在 cloudbuild.yaml 文件中任选一个:
- 指定 "build.logs_bucket"。此选项允许将构��建日志存储在 Google 云存储桶中。请使用以下配置引用此设置:
steps:
  - name: "bash"
    args: ["echo", "Hello world!"]
logsBucket: "LOGS_BUCKET_LOCATION"
serviceAccount: "projects/PROJECT_ID/serviceAccounts/SERVICE_ACCOUNT"
options:
  logging: GCS_ONLY
2.使用 CLOUD_LOGGING_ONLY 日志选项,如above 所示; 3.使用 NONE 日志选项。
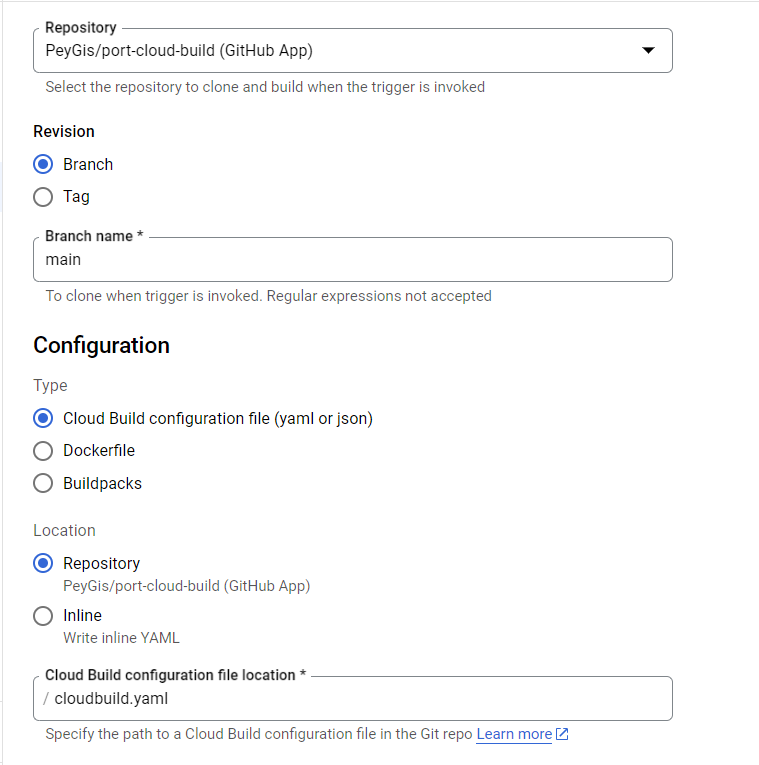
最后,您需要将源代码库连接到此 Pipeline,并指定是在 cloudbuild.yaml 还是 Dockerfile 中调用 Pipeline 步骤(如果您引用了上面提供的 Pipeline 片段,请确保标记为 cloudbuild.yaml)。
定义变量
Google Cloud Build 使开发人员能够将传入的 webhook 有效载荷数据绑定到管道配置文件中。 如果您查看一下上面的示例 cloudbuild.yaml 文件,就会发现 substitutions 部分有如下内容。 这是您定义将传递给管道运行的变量的地方。
... # Cloud Build pipeline steps
substitutions:
  _REPOSITORY: <YOUR_CONTAINER_REPOSITORY_NAME>
  _IMAGE_NAME: $(body.payload.properties.imageName)
  _REGION: $(body.payload.properties.region)
- substitutions "字段值应与 Pipelines 配置中定义的、作业运行所需的变量名称相匹配。
[
  {
    "identifier": "runPipeline",
    "title": "Run Pipeline",
    "icon": "GCP",
    "userInputs": {
      "properties": {
        "region": {
          "type": "string"
        }
      }
    }
    ... # Port Action configuration
  }
]
下面是一个示例有效载荷,它在触发操作并发送到 Cloud Build 时生成:
{
    ... # Event metadata
    "payload": {
        "properties": {
            "region": "region_value"
        }
    }
}
例如,"区域 "输入的替换值为
$.payload.properties.region
Port操作 - 完整的Port操作定义可在here 上找到。
设置 Port 操作
要触发云构建管道,您需要设置一个 PortWebhook Action 。
下面是一个触发 webhook 的操作示例:
[
   {
      "identifier":"runPipeline",
      "title":"Run GCP Cloud Build Pipeline",
      "icon":"GCP",
      "userInputs":{
         "properties":{
            "region":{
               "type":"string",
               "title":"Region Name"
            },
            "imageName":{
               "type":"string",
               "title":"Container Image Name"
            }
         },
         "required":[]
      },
      "invocationMethod":{
         "type":"WEBHOOK",
         "url":"https://cloudbuild.googleapis.com/v1/projects/{project_id}/triggers/{webhook_name}:webhook?key={google_api_key}&secret={webhook_secret}"
      },
      "trigger":"CREATE",
      "description":"Webhook trigger for Google Cloud Build",
      "requiredApproval":false
   }
]
向 Port 报告 CloudBuild 运行状态
成功触发云构建管道后,必须在 Port 中更新运行操作的状态。 此更新可让 Port 监控云构建管道的状态。
下面的代码片段演示了如何向 Port 报告管道的进度。 记住修改替换部分中的 Port 凭据,以便 Cloud Build 使用您的 Port 访问令牌进行身份验证。
steps:
  # Get Port's Access Token
  - name: "gcr.io/cloud-builders/curl"
    entrypoint: "bash"
    args:
      - "-c"
      - |
        # Get access token and save it to a file
        accessToken=$(curl -X POST \
          -H 'Content-Type: application/json' \
          -d '{"clientId": "${_PORT_CLIENT_ID}", "clientSecret": "${_PORT_CLIENT_SECRET}"}' \
          -s 'https://api.getport.io/v1/auth/access_token' | grep -o '"accessToken":"[^"]*' | awk -F'"' '{print $4}')
        echo "$accessToken" > /workspace/token.txt

  # Logs sending example
  - name: "gcr.io/cloud-builders/curl"
    args:
      - "-c"
      - |
        curl -X POST \
          -H 'Content-Type: application/json' \
          -H "Authorization: Bearer $(cat /workspace/token.txt)" \
          -d '{"message": "this is a log test message example"}' \
          'https://api.getport.io/v1/actions/runs/${_RUN_ID}/logs'
    entrypoint: bash

  # Port status update example
  - name: "gcr.io/cloud-builders/curl"
    args:
      - "-c"
      - |
        curl -X PATCH \
          -H 'Content-Type: application/json' \
          -H "Authorization: Bearer $(cat /workspace/token.txt)" \
          -d '{"status":"SUCCESS", "message": {"run_status": "CloudBuild Run completed successfully!"}}' \
          'https://api.getport.io/v1/actions/runs/${_RUN_ID}'
    entrypoint: bash

substitutions:
  _RUN_ID: $(body.context.runId)
  _PORT_CLIENT_ID: <Your Port Client Id>
  _PORT_CLIENT_SECRET: <Your Port Client Secret>

options:
  substitution_option: ALLOW_LOOSE
  logging: CLOUD_LOGGING_ONLY
就是这样!只要用户在 Port UI 中调用操作,就会向 Google Cloud Build 发送 webhook 触发器,以执行管道。
欲了解更多信息,请访问