验证
使用此功能,您可以嵌入另一个受 SSO 身份验证保护的网站。 为此,您需要创建 JWT 令牌所需的参数。
验证码流程 + PKCE
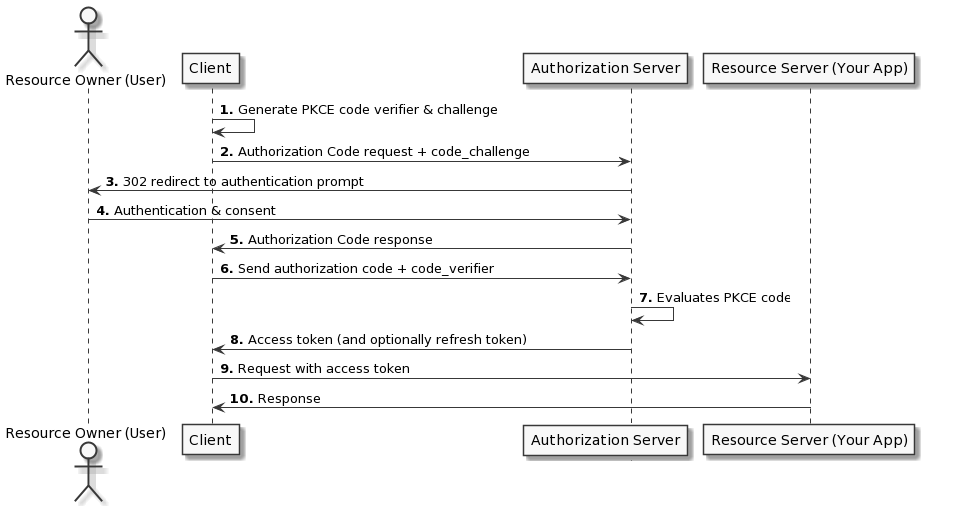
下图概述了用于验证 SSO 和访问私有资源的登录方案:

下面是登录流程的说明:
- Widget 将生成 PKCE
code_verifier和code_challange; - 小工具的 URL 将设置为
authorizationUrl以及clientId和生成的code_challange; - 然后,widget 将被重定向到 SSO 登录页面;
- 用户将使用 SSO 登录(如果用户已登录 SSO,该步骤将自动进行);
- SSO 登录页面会将 widget 重定向回 https://app.getport.io,并将授权 "code "作为 URL 哈希参数;
- 小工具将把
code、clientId和code_verifier发送到tokenURL; - SSO 将验证 PKCE 代码;
- 响应将返回访问令牌;
- 小工具将把访问令牌作为查询参数
auth_token={accessToken}传递到属性值中指定的 URL; - 现在应该可以显示页面了!
必要参数
要设置身份验证,您需要以下参数:
- 客户 ID
- 授权Url
tokenUrl
下面举例说明如何在蓝图中应用这些参数:
{
  "title": "Grafana",
  "type": "string",
  "format": "url",
  "spec": "embedded-url",
  "specAuthentication": {
    "clientId": "your-client-id",
    "authorizationUrl": "your-authorization-url",
    "tokenUrl": "your-token-url"
  }
}
示例
Okta
Setup
**步骤: **
- 请按照Okta's documentation 中的步骤在您的 Okta 组织中创建应用程序;
- 确保Port主机位于 "Redirect Uris "中:
1.转到应用程序 -> 您刚创建的应用程序 -> 登录;
2.添加
https://app.getport.io作为登录重定向 URI。 3.为登录页面启用 IFrame: 1.转到自定义 -> 其他; 2.滚动到 "IFrame 嵌入 "并启用。
Configure Grafana with OAuth & Port embedding :::note 以下示例仅供参考,可能无法反映您的 Okta 设置中实际使用的 URL 和客户端 ID。
基于JWT Configuration & 的 Grafana 文档OAuth Configuration
:::
[security] ;Required for the embedding
allow_embedding = true

[auth.jwt] ;Required for the embedding
...
jwk_set_url = https://{your-okta-org}.okta.com/oauth2/default/v1/keys
expected_claims = {"iss": "https://{your-okta-org}.okta.com", "aud": "https://{your-okta-org}.okta.com"}
url_login = true
...

[auth.generic_oauth] ;Regular OAuth authentication
...
client_id = {CLIENT_ID}
client_secret = {CLIENT_SECRET}
auth_url = https://{your-okta-org}.okta.com/oauth2/v1/authorize
token_url = https://{your-okta-org}.okta.com/oauth2/v1/token
api_url = https://{your-okta-org}.okta.com/oauth2/v1/userinfo
enable_login_token = true
use_pkce = true
...
故障排除
- "Okta 400 坏请求"
- 检查是否使用了正确的 authorizationUrl 和 clientId;
- 检查应用程序是否已激活。
- 显示"Okta 400 Bad Request"。您的请求导致错误。redirect_uri'参数必须是客户端应用程序设置中的登录重定向 URI"。
- 请确保按照上述步骤为您的应用程序输入 https://app.getport.io 作为登录重定向 URI。
- "拒绝连接_"。
- 请确保按照上述步骤启用了 "IFrame Embedding"。
- "无法获取您的授权令牌。"
- 请确保 tokenUrl 是正确的 URL。
Onelogin
Setup
**步骤: **
- 按照Onelogin's documentation 中的步骤 1 和 2,在 Onelogin 组织中添加 OpenId Connect (OIDC) 应用程序;
- 确保Port主机位于 "重定向 URIs "中:
1.转到应用程序 -> 刚添加的应用程序 -> 配置;
2.添加
https://app.getport.io作为重定向 URI。
Configure Grafana with OAuth & Port embedding :::note 以下示例仅供参考,可��能无法反映您的 Onelogin 设置中实际使用的 URL 和客户端 ID。
基于JWT Configuration & 的 Grafana 文档OAuth Configuration
:::
[security] ;Required for the embedding
allow_embedding = true

[auth.jwt] ;Required for the embedding
...
jwk_set_url = https://{your-onelogin-org}.onelogin.com/oidc/2/certs
expected_claims = {"iss": "https://{your-onelogin-org}/oidc/2"}
url_login = true
...

[auth.generic_oauth] ;Regular OAuth authentication
...
client_id = {CLIENT_ID}
client_secret = {CLIENT_SECRET}
auth_url = https://{your-onelogin-org}.onelogin.com/oidc/2/auth
token_url = https://{your-onelogin-org}.onelogin.com/oidc/2/token
api_url = https://{your-onelogin-org}.onelogin.com/oidc/2/me
enable_login_token = true
use_pkce = true
...
故障排除
- "未识别路由或不允许的方法"
- 检查您是否被用于了正确的 authorizationUrl。
- "客户端无效_"
- 检查是否使用了正确的 clientId。
- "redirect_uri 与任何客户端注册的 redirect_uris 不匹配"。
- 请确保您按照上述步骤为应用程序输入了 https://app.getport.io 作为重定向 URI。
- "Could not fetch your auth token."(无法获取您的授权令牌)。
- 请确保 tokenUrl 是正确的 URL。
Azure AD
Setup
**步骤: **
-
请按照 Azure 文档中的Register an application 步骤在 Azure 订阅中添加应用程序;
-
按照 Azure 文档中的Add a redirect URI 步骤将
https://app.getport.io添加为重定向 URI; -
按照Configure platform settings 中的步骤将应用程序配置为 "单页应用程序";
-
为新应用程序添加自定义作用域: 1.在您的应用程序中点击左侧边栏的 Expose an API(公开 API)按钮; 2.点击 "添加作用域 "按钮,添加一个允许管理员和用户同意 "读取用户 "的作用域;
 3.在 Port 内蓝图的属性中的
 Authorization Scope字段下添加您刚刚创建的作用域。...
"schema": {
"properties": {
"ff": {
"type": "string",
"title": "ff",
"format": "url",
"spec": "embedded-url",
"specAuthentication": {
"authorizationUrl": "https://app.com",
"tokenUrl": "https://app.com",
"clientId": "1234",
"authorizationScope": [
"api://xxxx-xxxx-xxxx-xxxx-xxxx/user.read"
]
}
}
}
}
...
Configure Grafana with OAuth & Port embedding :::note 以下示例仅供参考,可能无法反映 Azure AD 设置中实际使用的 URL 和客户端 ID。
基于JWT Configuration & 的 Grafana 文档Azure AD Configuration
:::
[security] ;Required for the embedding
allow_embedding = true

[auth.jwt] ;Required for the embedding
...
email_claim = preferred_username
username_claim = preferred_username
jwk_set_url = "https://login.microsoftonline.com/common/discovery/v2.0/keys"
expect_claims = {"iss": "https://login.microsoftonline.com/{YOUR_APPLICATION_UUID}/v2.0"}
url_login = true
...

[auth.azuread] ;Regular Azure AD authentication
...
client_id = {CLIENT_ID}
client_secret = {CLIENT_SECRET}
auth_url = "https://login.microsoftonline.com/{YOUR_APPLICATION_UUID}/oauth2/v2.0/authorize"
token_url = "https://login.microsoftonline.com/{YOUR_APPLICATION_UUID}/oauth2/v2.0/token"
allowed_domains = "{my-domain}.com"
use_pkce = true
...
故障排除
- "无法获取您的授权令牌。"
- 确保 tokenUrl 是正确的 URL。