API
Port'sAPI 是一个通用接口,用于为软件目录建模、摄取数据、调用操作、查询记分卡等。
💡 通用Port API Usage
由于 Port API 是一个通用接口,因此任何可以通过 Port 实现的功能都可以通过 API 实现,例如
- 被用于脚本��更新软件目录;
- 从 CSV 文件导入现有资产目录;
- 将 Port 与您自定义的 CI/CD 集成;
- 报告正在运行的 **CI 作业的状态;
- 为微服务更新有关新构建版本**的软件目录;
- 从软件目录中获取现有数据。
获取应用程序接口令牌
要与应用程序接口交互,您需要一个应用程序接口令牌。
获取 API 令牌需要两个步骤:
- 查找 Port API 证书;
- 提出 API 请求以生成有效令牌。
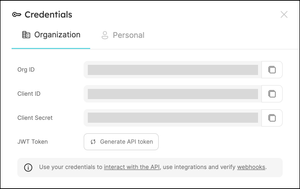
查找您的 Port 凭据
To get your Port API credentials go to your Port application, click on the ... button in the top right corner, and select Credentials. Here you can view and copy your CLIENT_ID and CLIENT_SECRET:
生成应用程序接口令牌
下面是一些代码示例,展示了如何用各种编程语言生成 API 令牌:
- Python
- Javascript
- cURL
# Dependencies to install:
# $ python -m pip install requests

import requests

CLIENT_ID = 'YOUR_CLIENT_ID'
CLIENT_SECRET = 'YOUR_CLIENT_SECRET'

API_URL = 'https://api.getport.io/v1'

credentials = {'clientId': CLIENT_ID, 'clientSecret': CLIENT_SECRET}

token_response = requests.post(f'{API_URL}/auth/access_token', json=credentials)

access_token = token_response.json()['accessToken']

# You can now use the value in access_token when making further requests
// Dependencies to install:
// $ npm install axios --save

const axios = require("axios").default;

const CLIENT_ID = "YOUR_CLIENT_ID";
const CLIENT_SECRET = "YOUR_CLIENT_SECRET";

const API_URL = "https://api.getport.io/v1";

(async () => {
  const response = await axios.post(`${API_URL}/auth/access_token`, {
    clientId: CLIENT_ID,
    clientSecret: CLIENT_SECRET,
  });

  const accessToken = response.data.accessToken;

  // You can now use the value in accessToken when making further requests
})();
# Dependencies to install:
# For apt:
# $ sudo apt-get install jq
# For yum:
# $ sudo yum install jq

access_token=$(curl --location --request POST 'https://api.getport.io/v1/auth/access_token' \
--header 'Content-Type: application/json' \
--data-raw '{
    "clientId": "CLIENT_ID",
    "clientSecret": "CLIENT_SECRET"
}' | jq '.accessToken' | sed 's/"//g')

# The token will be available in the access_token variable
通过应用程序接口获取数据
由于 Port 以 API 为先,因此可以使用简单的 REST 调用从您使用的任何平台创建和更新实体。
设置
要被用于 Port 的 REST API,您需要执行以下步骤:
- 查找您的Port credentials ;
- 将它们保存为 secrets 或以其他相同方式保存,以便在代码或 CI/CD 流程中引用;
- 确保你有一个支持 HTTP 的客户端。 1.例如: cURL、使用请求包的 python、使用 fetch/axios 的 nodejs 等。
Usage
由于您直接引用的是 Provider 的 REST API,因此 API 提供的任何方法都可以使用。
我们将重点关注三个具体的被用于案例:
- 获取目录实体--可通过 HTTP GET 向
https://api.getport.io/v1/blueprints/{blueprint_identifier}/entities/{entity_identifier}提出请求,接收现有实体的标识符并将其引用到 CI 中; - 创建/更新目录实体--可通过 HTTP POST 向
https://api.getport.io/v1/blueprints/{blueprint_identifier}/entities/提出请求,接收新实体或需要更新的实体的标识符和其他属性; - 删除目录实体--可通过向
https://api.getport.io/v1/blueprints/{blueprint_identifier}/entities/{entity_identifier}发送 HTTP DELETE 请求来实现,接收现有实体的标识符并将其删除。
- Get
- Create
- Create/Update
- Create/Override
- Delete
- Delete All
- Python
- Javascript
- cURL
# Dependencies to install:
# $ python -m pip install requests

import requests

CLIENT_ID = 'YOUR_CLIENT_ID'
CLIENT_SECRET = 'YOUR_CLIENT_SECRET'

API_URL = 'https://api.getport.io/v1'

credentials = {'clientId': CLIENT_ID, 'clientSecret': CLIENT_SECRET}

token_response = requests.post(f'{API_URL}/auth/access_token', json=credentials)

access_token = token_response.json()['accessToken']

# You can now use the value in access_token when making further requests

headers = {
    'Authorization': f'Bearer {access_token}'
}

blueprint_id = 'MY_BLUEPRINT'
entity_id = 'MY_ENTITY_IDENTIFIER'

response = requests.get(f'{API_URL}/blueprints/{blueprint_id}/entities/{entity_id}', headers=headers)

# response.json() contains the content of the resulting entity
// Dependencies to install:
// $ npm install axios --save

const axios = require("axios").default;

const CLIENT_ID = "YOUR_CLIENT_ID";
const CLIENT_SECRET = "YOUR_CLIENT_SECRET";

const API_URL = "https://api.getport.io/v1";

(async () => {
  const response = await axios.post(`${API_URL}/auth/access_token`, {
    clientId: CLIENT_ID,
    clientSecret: CLIENT_SECRET,
  });

  const accessToken = response.data.accessToken;

  // You can now use the value in accessToken when making further requests

  const blueprintId = "MY_BLUEPRINT";
  const entityId = "MY_ENTITY_IDENTIFIER";

  const config = {
    headers: {
      Authorization: `Bearer ${accessToken}`,
    },
  };

  const getResponse = await axios.get(
    `${API_URL}/blueprints/${blueprintId}/entities/${entityId}`,
    config
  );

  // getResponse.data contains the content of the resulting entity
})();
# Dependencies to install:
# for brew:
# brew install jq
# For apt:
# $ sudo apt-get install jq
# For yum:
# $ sudo yum install jq

access_token=$(curl --location --request POST 'https://api.getport.io/v1/auth/access_token' \
--header 'Content-Type: application/json' \
--data-raw '{
    "clientId": "CLIENT_ID",
    "clientSecret": "CLIENT_SECRET"
}' | jq '.accessToken' | sed 's/"//g')

# The token will be available in the access_token variable

blueprint_id='MY_BLUEPRINT'
entity_id='MY_ENTITY_IDENTIFIER'

curl --location --request GET "https://api.getport.io/v1/blueprints/${blueprint_id}/entities/${entity_id}" \
    --header "Authorization: Bearer $access_token" \
    --header "Content-Type: application/json"

# The output of the command contains the content of the resulting entity
如果 Provider 的 "标识符 "不存在,则基本创建请求将创建一个新实体,否则将以 "409 CONFLICT "状态代码失败。
不提供查询参数,或提供值设置为 values 的 upsert 查询参数,即为基本的创建请求。
- Python
- Javascript
- cURL
# Dependencies to install:
# $ python -m pip install requests

import requests

CLIENT_ID = 'YOUR_CLIENT_ID'
CLIENT_SECRET = 'YOUR_CLIENT_SECRET'

API_URL = 'https://api.getport.io/v1'

credentials = {'clientId': CLIENT_ID, 'clientSecret': CLIENT_SECRET}

token_response = requests.post(f'{API_URL}/auth/access_token', json=credentials)

access_token = token_response.json()['accessToken']

# You can now use the value in access_token when making further requests

headers = {
    'Authorization': f'Bearer {access_token}'
}

blueprint_id = 'MY_BLUEPRINT'

entity = {
  'identifier': 'MY_ENTITY_IDENTIFIER',
  'title': 'MY TITLE',
  'properties': {
    'MY_STRING_PROP': 'MY VALUE',
    'MY_BOOLEAN_PROP': False
  },
  'relations': {}
}

response = requests.post(f'{API_URL}/blueprints/{blueprint_id}/entities', json=entity, headers=headers)

# response.json() contains the content of the resulting entity
// Dependencies to install:
// $ npm install axios --save

const axios = require("axios").default;

const CLIENT_ID = "YOUR_CLIENT_ID";
const CLIENT_SECRET = "YOUR_CLIENT_SECRET";

const API_URL = "https://api.getport.io/v1";

(async () => {
  const response = await axios.post(`${API_URL}/auth/access_token`, {
    clientId: CLIENT_ID,
    clientSecret: CLIENT_SECRET,
  });

  const accessToken = response.data.accessToken;

  // You can now use the value in accessToken when making further requests

  const blueprintId = "MY_BLUEPRINT";

  const config = {
    headers: {
      Authorization: `Bearer ${accessToken}`,
    },
  };

  const entity = {
    identifier: "MY_ENTITY_IDENTIFIER",
    title: "MY TITLE",
    properties: {
      MY_STRING_PROP: "MY VALUE",
      MY_BOOLEAN_PROP: false,
    },
    relations: {},
  };

  const postResponse = await axios.post(
    `${API_URL}/blueprints/${blueprintId}/entities`,
    entity,
    config
  );

  // postResponse.data contains the content of the resulting entity
})();
# Dependencies to install:
# For apt:
# $ sudo apt-get install jq
# For yum:
# $ sudo yum install jq

access_token=$(curl --location --request POST 'https://api.getport.io/v1/auth/access_token' \
--header 'Content-Type: application/json' \
--data-raw '{
    "clientId": "CLIENT_ID",
    "clientSecret": "CLIENT_SECRET"
}' | jq '.accessToken' | sed 's/"//g')

# The token will be available in the access_token variable

blueprint_id='MY_BLUEPRINT'

curl --location --request POST "https://api.getport.io/v1/blueprints/${blueprint_id}/entities" \
    --header "Authorization: Bearer $access_token" \
    --header "Content-Type: application/json" \
    --data-raw '{
    "identifier": "MY_ENTITY_IDENTIFIER",
    "title": "MY ENTITY TITLE",
    "properties": {
            "MY_STRING_PROP": "MY VALUE",
            "MY_BOOLEAN_PROP": false
    }
}'

# The output of the command contains the content of the resulting blueprint
创建/更新请求将创建一个新实体(如果所提供的 "标识符 "实体还不存在),如果 "标识符 "实体已经存在,则只会更新请求中提供的字段值。
通过提供查询参数: "upsert=true&merge=true",可以注意到创建/更新请求。
- Python
- Javascript
- cURL
# Dependencies to install:
# $ python -m pip install requests

import requests

CLIENT_ID = 'YOUR_CLIENT_ID'
CLIENT_SECRET = 'YOUR_CLIENT_SECRET'

API_URL = 'https://api.getport.io/v1'

credentials = {'clientId': CLIENT_ID, 'clientSecret': CLIENT_SECRET}

token_response = requests.post(f'{API_URL}/auth/access_token', json=credentials)

access_token = token_response.json()['accessToken']

# You can now use the value in access_token when making further requests

headers = {
    'Authorization': f'Bearer {access_token}'
}

blueprint_id = 'MY_BLUEPRINT'

entity = {
  'identifier': 'MY_ENTITY_IDENTIFIER',
  'title': 'MY TITLE',
  'properties': {
    'MY_STRING_PROP': 'MY VALUE',
    'MY_BOOLEAN_PROP': False
  },
  'relations': {}
}

# Note the ?upsert=true&merge=true query parameters
response = requests.post(f'{API_URL}/blueprints/{blueprint_id}/entities?upsert=true&merge=true', json=entity, headers=headers)

# response.json() contains the content of the resulting entity
// Dependencies to install:
// $ npm install axios --save

const axios = require("axios").default;

const CLIENT_ID = "YOUR_CLIENT_ID";
const CLIENT_SECRET = "YOUR_CLIENT_SECRET";

const API_URL = "https://api.getport.io/v1";

(async () => {
  const response = await axios.post(`${API_URL}/auth/access_token`, {
    clientId: CLIENT_ID,
    clientSecret: CLIENT_SECRET,
  });

  const accessToken = response.data.accessToken;

  // You can now use the value in accessToken when making further requests

  const blueprintId = "MY_BLUEPRINT";

  const config = {
    headers: {
      Authorization: `Bearer ${accessToken}`,
    },
  };

  const entity = {
    identifier: "MY_ENTITY_IDENTIFIER",
    title: "MY TITLE",
    properties: {
      MY_STRING_PROP: "MY VALUE",
      MY_BOOLEAN_PROP: false,
    },
    relations: {},
  };

  // Note the ?upsert=true&merge=true query parameters
  const postResponse = await axios.post(
    `${API_URL}/blueprints/${blueprintId}/entities?upsert=true&merge=true`,
    entity,
    config
  );

  // postResponse.data contains the content of the resulting entity
})();
# Dependencies to install:
# For apt:
# $ sudo apt-get install jq
# For yum:
# $ sudo yum install jq

access_token=$(curl --location --request POST 'https://api.getport.io/v1/auth/access_token' \
--header 'Content-Type: application/json' \
--data-raw '{
    "clientId": "CLIENT_ID",
    "clientSecret": "CLIENT_SECRET"
}' | jq '.accessToken' | sed 's/"//g')

# The token will be available in the access_token variable

blueprint_id='MY_BLUEPRINT'

# Note the ?upsert=true&merge=true query parameters
curl --location --request POST "https://api.getport.io/v1/blueprints/${blueprint_id}/entities?upsert=true&merge=true" \
    --header "Authorization: Bearer $access_token" \
    --header "Content-Type: application/json" \
    --data-raw '{
    "identifier": "MY_ENTITY_IDENTIFIER",
    "title": "MY ENTITY TITLE",
    "properties": {
            "MY_STRING_PROP": "MY VALUE",
            "MY_BOOLEAN_PROP": false
    }
}'

# The output of the command contains the content of the resulting blueprint
如果所提供的 identifier 实体还不存在,则创建/覆盖请求将创建一个新实体;如果所提供的 identifier 实体已经存在,则覆盖所有现有 Values,只保留请求中提供的字段值。
通过提供查询参数: "upsert=true",同时不包含 "merge "参数(或将其值设置为 "false"),可注意到创建/覆盖请求
- Python
- Javascript
- cURL
# Dependencies to install:
# $ python -m pip install requests

import requests

CLIENT_ID = 'YOUR_CLIENT_ID'
CLIENT_SECRET = 'YOUR_CLIENT_SECRET'

API_URL = 'https://api.getport.io/v1'

credentials = {'clientId': CLIENT_ID, 'clientSecret': CLIENT_SECRET}

token_response = requests.post(f'{API_URL}/auth/access_token', json=credentials)

access_token = token_response.json()['accessToken']

# You can now use the value in access_token when making further requests

headers = {
    'Authorization': f'Bearer {access_token}'
}

blueprint_id = 'MY_BLUEPRINT'

entity = {
  'identifier': 'MY_ENTITY_IDENTIFIER',
  'title': 'MY TITLE',
  'properties': {
    'MY_STRING_PROP': 'MY VALUE',
    'MY_BOOLEAN_PROP': False
  },
  'relations': {}
}

# Note the ?upsert=true query parameter
response = requests.post(f'{API_URL}/blueprints/{blueprint_id}/entities?upsert=true', json=entity, headers=headers)

# response.json() contains the content of the resulting entity
// Dependencies to install:
// $ npm install axios --save

const axios = require("axios").default;

const CLIENT_ID = "YOUR_CLIENT_ID";
const CLIENT_SECRET = "YOUR_CLIENT_SECRET";

const API_URL = "https://api.getport.io/v1";

(async () => {
  const response = await axios.post(`${API_URL}/auth/access_token`, {
    clientId: CLIENT_ID,
    clientSecret: CLIENT_SECRET,
  });

  const accessToken = response.data.accessToken;

  // You can now use the value in accessToken when making further requests

  const blueprintId = "MY_BLUEPRINT";

  const config = {
    headers: {
      Authorization: `Bearer ${accessToken}`,
    },
  };

  const entity = {
    identifier: "MY_ENTITY_IDENTIFIER",
    title: "MY TITLE",
    properties: {
      MY_STRING_PROP: "MY VALUE",
      MY_BOOLEAN_PROP: false,
    },
    relations: {},
  };

  // Note the ?upsert=true query parameter
  const postResponse = await axios.post(
    `${API_URL}/blueprints/${blueprintId}/entities?upsert=true`,
    entity,
    config
  );

  // postResponse.data contains the content of the resulting entity
})();
# Dependencies to install:
# For apt:
# $ sudo apt-get install jq
# For yum:
# $ sudo yum install jq

access_token=$(curl --location --request POST 'https://api.getport.io/v1/auth/access_token' \
--header 'Content-Type: application/json' \
--data-raw '{
    "clientId": "CLIENT_ID",
    "clientSecret": "CLIENT_SECRET"
}' | jq '.accessToken' | sed 's/"//g')

# The token will be available in the access_token variable

blueprint_id='MY_BLUEPRINT'

# Note the ?upsert=true query parameter
curl --location --request POST "https://api.getport.io/v1/blueprints/${blueprint_id}/entities?upsert=true" \
    --header "Authorization: Bearer $access_token" \
    --header "Content-Type: application/json" \
    --data-raw '{
    "identifier": "MY_ENTITY_IDENTIFIER",
    "title": "MY ENTITY TITLE",
    "properties": {
            "MY_STRING_PROP": "MY VALUE",
            "MY_BOOLEAN_PROP": false
    }
}'

# The output of the command contains the content of the resulting blueprint
- Python
- Javascript
- cURL
# Dependencies to install:
# $ python -m pip install requests

import requests

CLIENT_ID = 'YOUR_CLIENT_ID'
CLIENT_SECRET = 'YOUR_CLIENT_SECRET'

API_URL = 'https://api.getport.io/v1'

credentials = {'clientId': CLIENT_ID, 'clientSecret': CLIENT_SECRET}

token_response = requests.post(f'{API_URL}/auth/access_token', json=credentials)

access_token = token_response.json()['accessToken']

# You can now use the value in access_token when making further requests

headers = {
    'Authorization': f'Bearer {access_token}'
}

blueprint_id = 'MY_BLUEPRINT'

entity_id = 'MY_ENTITY'

response = requests.delete(f'{API_URL}/blueprints/{blueprint_id}/entities/{entity_id}', headers=headers)

# response.json() contains the content of the resulting entity
// Dependencies to install:
// $ npm install axios --save

const axios = require("axios").default;

const CLIENT_ID = "YOUR_CLIENT_ID";
const CLIENT_SECRET = "YOUR_CLIENT_SECRET";

const API_URL = "https://api.getport.io/v1";

(async () => {
  const response = await axios.post(`${API_URL}/auth/access_token`, {
    clientId: CLIENT_ID,
    clientSecret: CLIENT_SECRET,
  });

  const accessToken = response.data.accessToken;

  // You can now use the value in accessToken when making further requests

  const blueprintId = "MY_BLUEPRINT";

  const entityId = "MY_ENTITY";

  const config = {
    headers: {
      Authorization: `Bearer ${accessToken}`,
    },
  };

  const deleteResponse = await axios.delete(
    `${API_URL}/blueprints/${blueprintId}/entities/${entityId}`,
    config
  );

  // deleteResponse.data contains the content of the resulting entity
})();
# Dependencies to install:
# For apt:
# $ sudo apt-get install jq
# For yum:
# $ sudo yum install jq

access_token=$(curl --location --request POST 'https://api.getport.io/v1/auth/access_token' \
--header 'Content-Type: application/json' \
--data-raw '{
    "clientId": "CLIENT_ID",
    "clientSecret": "CLIENT_SECRET"
}' | jq '.accessToken' | sed 's/"//g')

# The token will be available in the access_token variable

blueprint_id='MY_BLUEPRINT'

entity_id='MY_ENTITY'

curl --location --request DELETE "https://api.getport.io/v1/blueprints/${blueprint_id}/entities/${entity_id}" \
    --header "Authorization: Bearer $access_token"

# The output of the command contains the content of the resulting blueprint
可以使用专用路由,通过一次请求删除蓝图中的所有实体。
也可以通过添加 delete_blueprint=true 查询参数,在同一删除操作中删除包含实体的蓝图,例如: https://api.getport.io/v1/blueprints/<BLUEPRINT_IDENTIFIER>/all-entities?delete_blueprint=true 。
- Python
- Javascript
- cURL
# Dependencies to install:
# $ python -m pip install requests

import requests

CLIENT_ID = 'YOUR_CLIENT_ID'
CLIENT_SECRET = 'YOUR_CLIENT_SECRET'

API_URL = 'https://api.getport.io/v1'

credentials = {'clientId': CLIENT_ID, 'clientSecret': CLIENT_SECRET}

token_response = requests.post(f'{API_URL}/auth/access_token', json=credentials)

access_token = token_response.json()['accessToken']

# You can now use the value in access_token when making further requests

headers = {
    'Authorization': f'Bearer {access_token}'
}

blueprint_id = 'MY_BLUEPRINT'

response = requests.delete(f'{API_URL}/blueprints/{blueprint_id}/all-entities', headers=headers)

# response.json() contains the content of the resulting entity
// Dependencies to install:
// $ npm install axios --save

const axios = require("axios").default;

const CLIENT_ID = "YOUR_CLIENT_ID";
const CLIENT_SECRET = "YOUR_CLIENT_SECRET";

const API_URL = "https://api.getport.io/v1";

(async () => {
  const response = await axios.post(`${API_URL}/auth/access_token`, {
    clientId: CLIENT_ID,
    clientSecret: CLIENT_SECRET,
  });

  const accessToken = response.data.accessToken;

  // You can now use the value in accessToken when making further requests

  const blueprintId = "MY_BLUEPRINT";

  const config = {
    headers: {
      Authorization: `Bearer ${accessToken}`,
    },
  };

  const deleteResponse = await axios.delete(
    `${API_URL}/blueprints/${blueprintId}/all-entities`,
    config
  );

  // deleteResponse.data contains the content of the resulting entity
})();
# Dependencies to install:
# For apt:
# $ sudo apt-get install jq
# For yum:
# $ sudo yum install jq

access_token=$(curl --location --request POST 'https://api.getport.io/v1/auth/access_token' \
--header 'Content-Type: application/json' \
--data-raw '{
    "clientId": "CLIENT_ID",
    "clientSecret": "CLIENT_SECRET"
}' | jq '.accessToken' | sed 's/"//g')

# The token will be available in the access_token variable

blueprint_id='MY_BLUEPRINT'

curl --location --request DELETE "https://api.getport.io/v1/blueprints/${blueprint_id}/all-entities" \
    --header "Authorization: Bearer $access_token"

# The output of the command contains the content of the resulting blueprint
- 请访问DevPortal Builder page ;
- 点击所需蓝图上的 "删除所有
BLUEPRINT_NAME"按钮; - 按照说明操作。
**注意: ** 只有具有admin 角色的用户��才能使用 Port 的用户界面执行全部删除操作。