为服务运行部署
在下面的指南中,您将在 Port 中创建一个自助操作,在幕后执行 GitHub 工作流。
本例中的 GitHub 工作流程将运行新的部署,并向 Port 报告部署实体。
先决条件
- Port API
CLIENT_ID和CLIENT_SECRET。
创建 GitHub 工作流程
首先,我们需要建立一个 GitHub 工作流来实现我们的业务逻辑,以便进行部署。
下面是工作流程的骨架--deploy.yml(包括部署逻辑的占位符):
Deployment GitHub workflow
name: CI
on:
  workflow_dispatch:
    inputs:
      service:
        required: true
        description: "Service name to deploy"
        type: string
      environment:
        required: true
        default: staging
        description: "Environment to deploy service to"
        type: string
      port_payload:
        required: true
        description: "Port's payload, including details for who triggered the action and general context (blueprint, run id, etc...)"
        type: string
jobs:
  deploy:
    runs-on: ubuntu-latest
    steps:
      - uses: actions/checkout@v3
      - id: echo-deploy
        run: echo "deploy"

      # ADD YOUR DEPLOYMENT LOGIC HERE!

  report-deployment:
    name: Report new deployment Entity
    runs-on: ubuntu-latest
    steps:
      - name: Extract SHA short
        run: echo "SHA_SHORT=${GITHUB_SHA:0:7}" >> $GITHUB_ENV
      - name: "Report deployment Entity to port 🚢"
        uses: port-labs/port-github-action@v1
        with:
          clientId: ${{ secrets.PORT_CLIENT_ID }}
          clientSecret: ${{ secrets.PORT_CLIENT_SECRET }}
          identifier: ${{ inputs.service }}-${{ inputs.environment }}-${{ env.SHA_SHORT }}
          blueprint: deployment
          properties: |
            {
               "jobUrl": "${{ github.server_url }}/${{ github.repository }}/actions/runs/${{ github.run_id }}",
               "deployingUser": "${{ github.actor }}",
               "imageTag": "latest",
               "commitSha": "${{ env.SHA_SHORT }}"
            }
          runId: "${{fromJson(inputs.port_payload).context.runId}}"
请注意工作流程中名为
port_payload 的附加参数。默认情况下该参数以Port's action message 完成。您可以在 Port 的操作定义中指定 "omitPayload": true 来禁用它。 更多详情请点击here创建部署蓝图
让我们配置一个 "部署 "蓝图,它的基本结构是
{
  "identifier": "deployment",
  "title": "Deployment",
  "icon": "Deployment",
  "schema": {
    "properties": {
      "jobUrl": {
        "type": "string",
        "format": "url",
        "title": "Job URL"
      },
      "deployingUser": {
        "type": "string",
        "title": "Deploying User"
      },
      "imageTag": {
        "type": "string",
        "title": "Image Tag"
      },
      "commitSha": {
        "type": "string",
        "title": "Commit SHA"
      }
    },
    "required": []
  },
  "mirrorProperties": {},
  "calculationProperties": {},
  "relations": {}
}
下面是蓝图的 "python "代码(切记插入 "CLIENT_ID "和 "CLIENT_SECRET "以获取访问令牌)。
Click here to see the code
import requests

CLIENT_ID = 'YOUR_CLIENT_ID'
CLIENT_SECRET = 'YOUR_CLIENT_SECRET'

API_URL = 'https://api.getport.io/v1'

credentials = {'clientId': CLIENT_ID, 'clientSecret': CLIENT_SECRET}

token_response = requests.post(f'{API_URL}/auth/access_token', json=credentials)

access_token = token_response.json()['accessToken']

headers = {
    'Authorization': f'Bearer {access_token}'
}

blueprint = {
    "identifier": "deployment",
    "title": "Deployment",
    "icon": "Deployment",
    "schema": {
        "properties": {
            "jobUrl": {
                "title": "Job URL",
                "type": "string",
                "format": "url"
            },
            "deployingUser": {
                "title": "Deploying User",
                "type": "string"
            },
            "imageTag": {
                "title": "Image Tag",
                "type": "string"
            },
            "commitSha": {
                "title": "Commit SHA",
                "type": "string"
            }
        },
        "required": []
    },
    "calculationProperties": {},

}

response = requests.post(f'{API_URL}/blueprints', json=blueprint, headers=headers)

print(response.json())
创建 Port 操作
现在让我们配置一个自助服务操作。 添加一个 CREATE 操作,开发人员每次要为服务启动新的部署时都会触发该操作。
以下是该操作的 JSON 文件:
{
  "identifier": "deploy_service",
  "title": "Deploy Service",
  "icon": "DeployedAt",
  "userInputs": {
    "properties": {
      "ref": {
        "type": "string",
        "description": "The GitHub branch to deploy (Optional, otherwise will use repo's default branch)"
      },
      "service": {
        "type": "string",
        "description": "The service to deploy"
      },
      "environment": {
        "type": "string",
        "description": "The environment to deploy the service to"
      }
    },
    "required": ["service", "environment"]
  },
  "invocationMethod": {
    "type": "GITHUB",
    "org": "<GITHUB_ORG>",
    "repo": "<GITHUB_REPO>",
    "workflow": "deploy.yml"
  },
  "trigger": "CREATE",
  "description": "Deploy a service to the environment"
}
您可以在下面看到创建此操作的 python 代码(请记住插入您的 CLIENT_ID 和 CLIENT_SECRET 以获取访问令牌)。
请注意 "部署 "蓝图标识符是如何被用于到新蓝图中的。
此外,不要忘记替换 YOUR_GITHUB_ORG、YOUR_GITHUB_REPO 的占位符。
Click here to see code
import requests

CLIENT_ID = 'YOUR_CLIENT_ID'
CLIENT_SECRET = 'YOUR_CLIENT_SECRET'

GITHUB_ORG = 'YOUR_GITHUB_ORG'
GITHUB_REPO = 'YOUR_GITHUB_REPO'
GITHUB_WORKFLOW = 'deploy.yml'

API_URL = 'https://api.getport.io/v1'

credentials = {'clientId': CLIENT_ID, 'clientSecret': CLIENT_SECRET}

token_response = requests.post(f'{API_URL}/auth/access_token', json=credentials)

access_token = token_response.json()['accessToken']

headers = {
    'Authorization': f'Bearer {access_token}'
}

blueprint_identifier = 'deployment'

action = {
    'identifier': 'deploy_service',
    'title': 'Deploy Service',
    'icon': 'DeployedAt',
    'description': 'Deploy a service to the environment',
    'trigger': 'CREATE',
    'invocationMethod': {
        'type': 'GITHUB',
        'org': GITHUB_ORG,
        'repo': GITHUB_REPO,
        'workflow': GITHUB_WORKFLOW
    },
    'userInputs': {
        'properties': {
            'ref': {
                'type': 'string',
                'title': 'The GitHub branch to deploy (Optional, otherwise will use repo's default branch)'
            },
            'service': {
                'type': 'string',
                'title': 'The service to deploy'
            },
            'environment': {
                'type': 'string',
                'title': 'The environment to deploy the service to'
            },
        },
        'required': [
            'service', 'environment'
        ]
    }
}

response = requests.post(f'{API_URL}/blueprints/{blueprint_identifier}/actions', json=action, headers=headers)

print(response.json())
自助服务操作配置完成后,就可以开始调用了。
触发action
让我们使用 Port API 引用自助服务操作。
Click here to see the API call code
import requests

CLIENT_ID = 'YOUR_CLIENT_ID'
CLIENT_SECRET = 'YOUR_CLIENT_SECRET'

API_URL = 'https://api.getport.io/v1'

credentials = {'clientId': CLIENT_ID, 'clientSecret': CLIENT_SECRET}

token_response = requests.post(f'{API_URL}/auth/access_token', json=credentials)

access_token = token_response.json()['accessToken']

headers = {
    'Authorization': f'Bearer {access_token}'
}

blueprint_identifier = 'deployment'

action_identifier = 'deploy_service'

action_run = {
    'properties': {
        'service': 'backend',
        'environment': 'staging'
    }
}

response = requests.post(f'{API_URL}/blueprints/{blueprint_identifier}/actions/{action_identifier}/runs', json=action_run, headers=headers)

print(response.json())
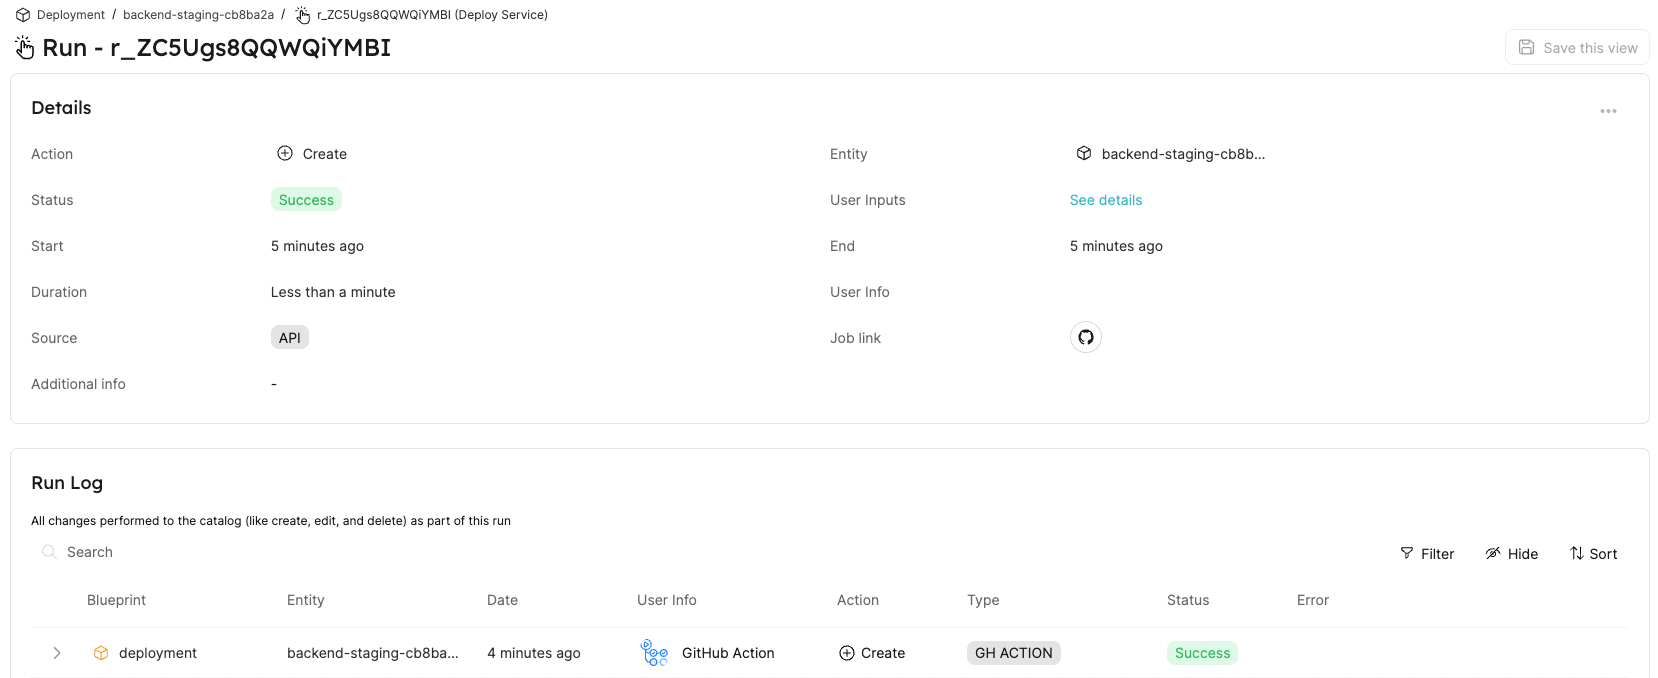
当操作完成后,它会将操作运行标记为成功。 这样,您的开发人员就可以了解您的部署已成功完成。
下一步
这是一个非常基本的示例,说明如何使用 Port 的自助操作触发 GitHub 工作流。 我们为您留下了占位符代码,以便您插入适合自己基础架构的自定义逻辑。