服务锁定
使用 Port 的搜索功能,可以非常简单地为不同开发和生产环境中的服务实现便捷�的服务锁定。
目标
在本指南中,您将使用 Port'sGitHub Action 实现服务锁定机制。
我们要引用的环境包括 2 个Blueprints ,它们之间有一个Relation :

让我们来看看上面显示的不同蓝图,以及我们如何为每个蓝图创建Entities :
- 部署配置 - 部署配置是在特定环境中运行的服务的当前 "实时 "版本��的表示。它将包括对服务、环境和部署的引用,以及状态、正常运行时间等实时信息和任何其他相关元数据。
- 在本示例中,将手动报告部署配置。
- 部署 - 部署可描述为代表 CD 作业的对象。它包括部署服务的版本和作业本身的链接。与其他对象不同,部署是软件目录中不可变的项目。保持其不可变性对确保目录的可靠性非常重要。
- 在本示例中,部署将被用于 Port 的 GitHub Action 作为部署流程的一部分。
既然您已经知道了本指南的最终结果,那就让我们从创建蓝图和关系开始吧。
蓝图与关系
您可以在下面找到以下指南所需的所有蓝图的 JSON:
Deployment Config Blueprint JSON
{
  "identifier": "deploymentConfig",
  "title": "Deployment Config",
  "icon": "Service",
  "schema": {
    "properties": {
      "locked": {
        "type": "boolean",
        "title": "Locked",
        "default": false,
        "description": "Are deployments currently allowed for this configuration",
        "icon": "Lock"
      }
    },
    "required": []
  },
  "mirrorProperties": {},
  "calculationProperties": {},
  "relations": {}
}
Deployment Blueprint JSON
{
  "identifier": "deployment",
  "title": "Deployment",
  "icon": "Deployment",
  "schema": {
    "properties": {
      "jobUrl": {
        "type": "string",
        "format": "url",
        "title": "Job URL"
      },
      "deployingUser": {
        "type": "string",
        "title": "Deploying User"
      },
      "imageTag": {
        "type": "string",
        "title": "Image Tag"
      },
      "commitSha": {
        "type": "string",
        "title": "Commit SHA"
      }
    },
    "required": []
  },
  "mirrorProperties": {},
  "calculationProperties": {},
  "relations": {
    "deploymentConfig": {
      "title": "Deployment Config",
      "target": "deploymentConfig",
      "required": false,
      "many": false
    }
  }
}
现在你已经创建了蓝图,连接好蓝图并准备就绪,是时候创建实体了:
实体
部署配置 - Port API
部署配置用于表示在基础架构的特定环境中部署服务。 一个部署配置有多个与之绑定的 "部署",每个 "部署 "代表匹配服务在其匹配环境中部署代码的新版本。
部署配置 "听起来就像 "配置",这意味着它是存储运行时变量和 Values、日志、跟踪或仪表盘工具链接以及在不同部署之间不会更改的静态数据的好地方。
让我们为生产环境中的 "通知服务 "服务手动创建一个部署配置实体:
{
  "identifier": "notification-service-prod",
  "title": "Notification Service Production",
  "properties": {
    "locked": true
  },
  "relations": {}
}
下面是创建此部署配置的 "python "代码片段:
Click here to see the code
import requests

CLIENT_ID = 'YOUR_CLIENT_ID'
CLIENT_SECRET = 'YOUR_CLIENT_SECRET'

API_URL = 'https://api.getport.io/v1'

target_blueprint = 'deploymentConfig'

credentials = {'clientId': CLIENT_ID, 'clientSecret': CLIENT_SECRET}

token_response = requests.post(f'{API_URL}/auth/access_token', json=credentials)

access_token = token_response.json()['accessToken']

headers = {
    'Authorization': f'Bearer {access_token}'
}

entity = {
    "identifier": "notification-service-prod",
    "title": "Notification Service Production",
    "properties": {
        "locked": True
    },
    "relations": {}
}

response = requests.post(f'{API_URL}/blueprints/{target_blueprint}/entities', json=entity, headers=headers)

print(response.json())
现在,让我们使用部署配置实体为新部署锁定 "通知服务"。
在部署过程中读取 locked 字段
为了在部署配置中使用 locked 字段,您需要使用 Port'sGitHub Action 。
以下是部署检查流程:
- 新代码会被推送到 "通知服务 "Git 代码库的 "主 "分支;
- 推送事件会触发GitHub workflow ;
- Github 工作流调用callable workflow ,其参数与
Notification Service的locked字段检查相匹配; - 如果
locked字段的值为true,则部署检查将失败,并显示错误�信息,说明服务已锁定,且不会尝试部署; - 如果
locked字段的值为false,部署检查将成功,并在 Port 中创建一个新的部署实体;
让我们在 GitHub 仓库中为 "通知服务 "微服务创建一个GitHub workflow 文件:
- 创建 GitHub 仓库(或被用于现有仓库);
- 创建一个
.github目录;- 在其中创建一个
workflows目录。
- 在其中创建一个
在 /.github/workflows 目录中创建一个名为 check-service-lock.yml 的文件,内容如下:
name: Check Service Lock

on:
  workflow_call:
    inputs:
      SERVICE_NAME:
        required: true
        type: string
        default: notification-service
      RUNTIME:
        required: true
        type: string
        default: production
    secrets:
      PORT_CLIENT_ID:
        required: true
      PORT_CLIENT_SECRET:
        required: true

jobs:
  get-entity:
    runs-on: ubuntu-latest
    outputs:
      entity: ${{ steps.port-github-action.outputs.entity }}
    steps:
      - id: port-github-action
        name: Get entity from Port
        uses: port-labs/port-github-action@v1
        with:
          clientId: ${{ secrets.PORT_CLIENT_ID }}
          clientSecret: ${{ secrets.PORT_CLIENT_SECRET }}
          identifier: ${{ inputs.SERVICE_NAME }}-${{ inputs.RUNTIME }}
          blueprint: deploymentConfig
          operation: GET
  check-lock-status:
    runs-on: ubuntu-latest
    needs: get-entity
    steps:
      - name: Get entity lock status
        run: echo "LOCK_STATUS=$(echo '${{needs.get-entity.outputs.entity}}' | jq -r .properties.locked)" >> $GITHUB_ENV
      - name: Check lock status 🚧
        if: ${{ env.LOCK_STATUS == 'true' }}
        run: |
          echo "Service ${{ inputs.SERVICE_NAME }} in environment ${{ inputs.RUNTIME }} is locked, stopping deployment"
          exit 1
check-service-lock.yml 中的工作流是一个callable workflow ,您可以使用 calling 工作流中提供的参数将其用于任何部署工作流中,从而省去重复相同工作流逻辑的麻烦。
在 /.github/workflows 目录中创建一个名为 deploy-notification-service.yml 的文件,内容如下:
name: Report Deployment

on:
  push:
    branches:
      - "main"

jobs:
  check-lock-status:
    uses: ./.github/workflows/check-service-lock.yml
    with:
      SERVICE_NAME: notification-service
      RUNTIME: prod
    secrets:
      PORT_CLIENT_ID: ${{ secrets.PORT_CLIENT_ID }}
      PORT_CLIENT_SECRET: ${{ secrets.PORT_CLIENT_SECRET }}

  report-deployment:
    name: Report new deployment Entity
    needs: [check-lock-status]
    runs-on: ubuntu-latest
    steps:
      - name: Extract SHA short
        run: echo "SHA_SHORT=${GITHUB_SHA:0:7}" >> $GITHUB_ENV
      - name: "Report deployment Entity to port 🚢"
        uses: port-labs/port-github-action@v1
        with:
          clientId: ${{ secrets.PORT_CLIENT_ID }}
          clientSecret: ${{ secrets.PORT_CLIENT_SECRET }}
          identifier: notification-service-prod-${{ env.SHA_SHORT }}
          title: Notification-Service-Production-${{ env.SHA_SHORT }}
          blueprint: deployment
          properties: |
            {
               "jobUrl": "${{ github.server_url }}/${{ github.repository }}/actions/runs/${{ github.run_id }}",
               "deployingUser": "${{ github.actor }}",
               "imageTag": "latest",
               "commitSha": "${{ env.SHA_SHORT }}"
            }
          relations: |
            {
               "deploymentConfig": "notification-service-prod"
            }
每次向版本库的 main 分支推送时,都会触发 deploy-notification-service.yml 中的工作流程。
工作流程中有 2 项配置工作:
- 检查锁定状态;
- 报告部署。
report-deployment "工作配置了一个 "needs "键,其值为"[check-lock-status]",这意味着只有当 "check-lock-status "完成后,"report-deployment "步骤才会启动。
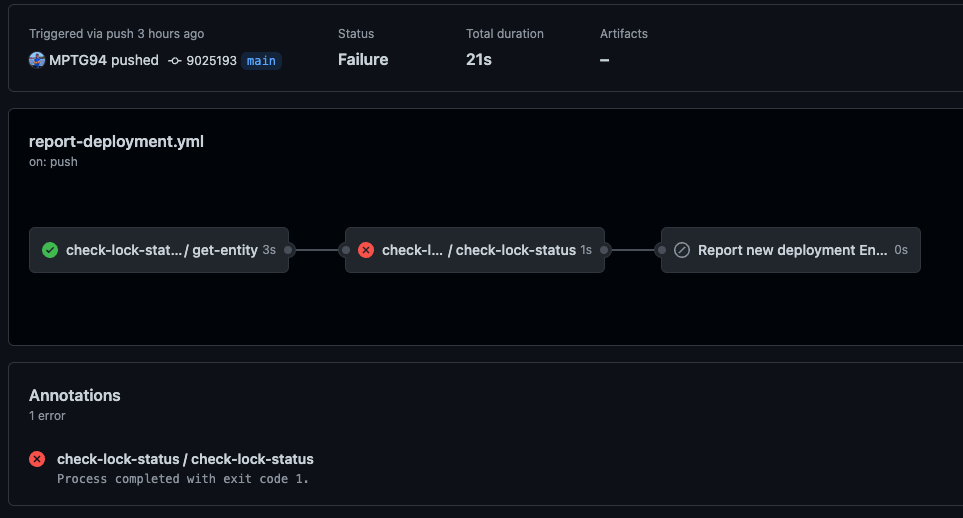
如果在部署配置的 "锁定 "字段设置为 "true "时尝试向版本库推送代码,部署就会停止:
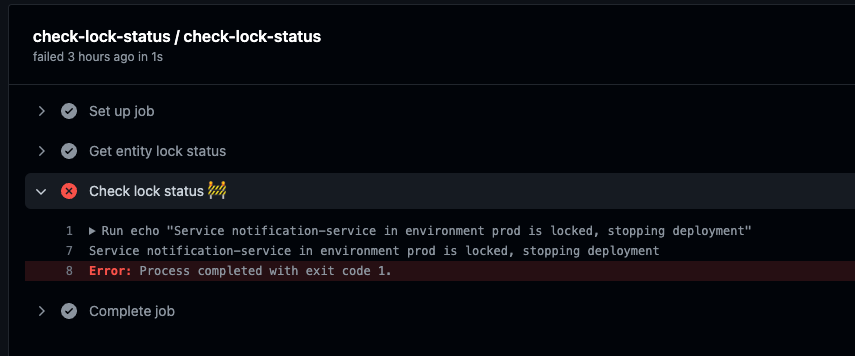
当你查看失败的步骤时,你会发现失败是由于 locked 字段的值造成的:
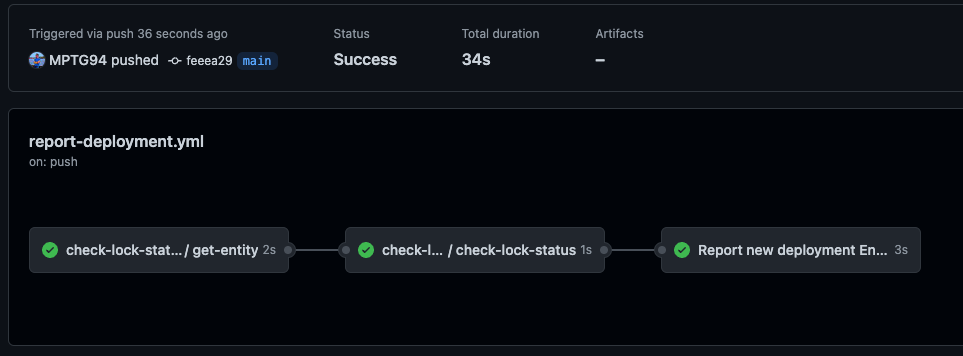
如果将 "locked "字段的值设置为 "false",工作流程将顺利执行部署:
摘要
这只是 Pipelines 的 GitHub Action 在您的 CI/CD 管道中的价值的一个例子。 通过在 CI 过程中查询和创建 Entities,您可以使 CI 作业更加动态和灵敏,而无需编辑 yml 文件并向您的版本库推送新代码。
如果您正在使用不同的 CI/CD Provider,请务必查看我们的其他CI/CD integrations ,以找到适合您使用情况的集成。