安装
本页面将帮助您安装 Port 的 GitLab 集成(由 Ocean 框架提供支持)。
本页概述了以下步骤:
- 具有管理员权限的 gitlab 账户。
- 一个权限为
api的 gitlab group �账户。 - 如果选择实时和始终开启安装方式,则需要一个用于安装集成的 kubernetes 集群。
- Port 用户角色设置为
Admin。
创建 GitLab 组访问令牌
组访问令牌可被用于到其生成的组,以及其下的所有子组。
GitLab 集成能够查询多个 GitLab 根组,为此需要多个组访问令牌,每个令牌都位于正确的根组。
GitLab group access tokens example
例如,假设 GitLab 账户结构如下:
GitLab account
.
├── microservices-group
│   ├──microservice1-group
│   └──microservice2-group
├── apis-group
│   ├── rest-api-group
│   └── graphql-api-group
在这个例子中
- 若要***只映射 "microservices-group",我们需要一个组访问令牌--"microservices-group "的一个。
- 要映射
microservices-group及其所有子组,我们只需要一个组访问令牌 -microservices-group的一个。 - 要映射
microservices-group、theapis-group**及其所有子组,我们只需要两个组访问令牌--一个用于microservices-group,另一个用于apis-group。 - 要映射 "microservice1-group",我们有两个选择:
- 为 "microservices-group "创建一个组访问令牌,然后使用token mapping 只选择 "microservice1-group"。
- 直接为 "microservice1-group "创建组访问令牌。
更多信息,请参阅token mapping 部分。
下面的步骤将指导你如何创建 GitLab 组访问令牌。
- 登录 GitLab,进入所需组的设置页面:
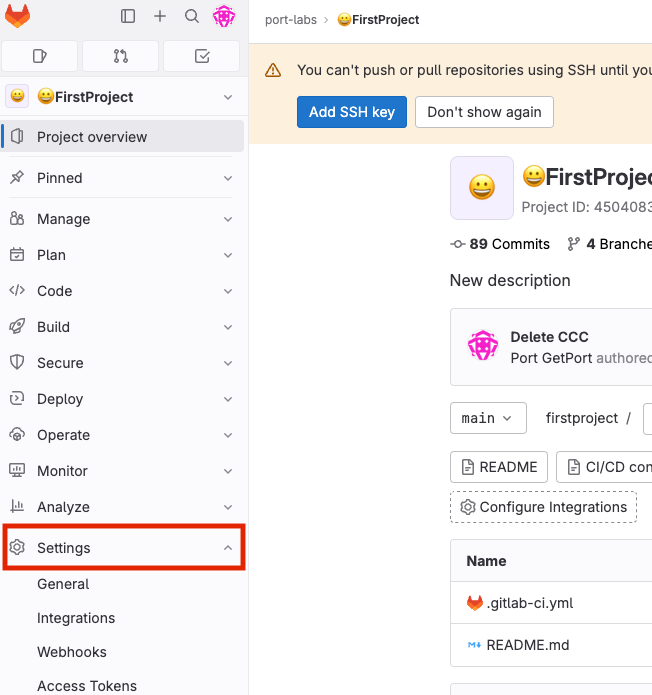 2.在 "访问令牌 "部分,需要提供令牌的详细信息,包括名称和可选的到期日期。此外,选择 api 范围,然后点击 "创建访问令牌 "按钮。
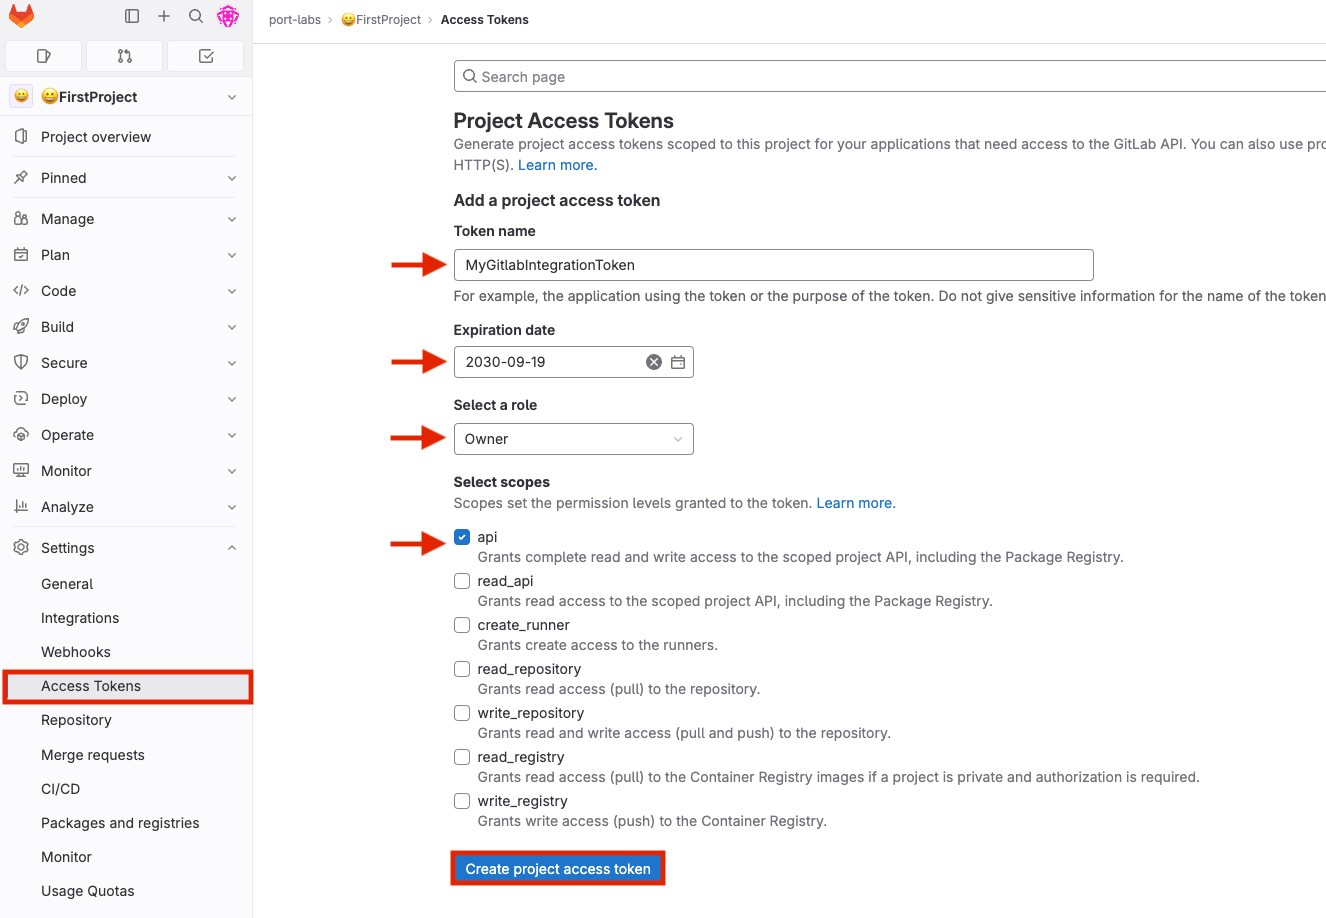 3.点击 "创建组访问令牌"。
4.复制生成的令牌,并在以下步骤部署集成时使用。
配置 GitLab 集成
###令牌映射
GitLab 集成支持获取与 GitLab 组中特定路径相关的数据。 通过提供额外的组令牌,集成还能从不同的 GitLab 父组中获取数据。 为此,您需要将所需路径映射到相关访问令牌。tokenMapping参数支持指定集成将搜索文件和信息的路径,使用globPatterns 。
映射格式:
{"MY_FIRST_GITLAB_PROJECT_GROUP_TOKEN": ["**/MyFirstGitLabProject/**","**/MySecondGitLabProject/*"]}
例如
{"glpat-QXbeg-Ev9xtu5_5FsaAQ": ["**/DevopsTeam/*Service", "**/RnDTeam/*Service"]}
多个 GitLab 组访问令牌示例:
{"glpat-QXbeg-Ev9xtu5_5FsaAQ": ["**/DevopsTeam/*Service", "**/RnDTeam/*Service"],"glpat-xF7Ae-vXu5ts5_QbEgAQ9": ["**/MarketingTeam/*Service"]}
###appHost & listening to hooks
如果不提供,集成将继续正常运行。在这种配��置下,要从目标系统获取最新信息,必须设置scheduledResyncInterval 参数,或者通过 Port 的用户界面手动触发重新同步。
为了让 GitLab 整合能根据 GitLab 仓库中的每次更改更新 Port 中的数据,您需要指定 appHost 参数。 appHost参数应设置为 GitLab 整合实例的url` 。 此外,您的 GitLab 实例(无论是 GitLab SaaS 还是 GitLab 的自托管版本)需要有向 GitLab 整合实例发送 webhook 请求的选项,因此请相应配置您的网络。
Hooks
GitLab 集成支持监听 GitLab webhooks 并相应更新 Port 中的相关实体。
支持的 webhook 是Group webhooks 和System hooks 。
作为安装过程的一部分,集成会在 GitLab 实例中创建一个 webhook,并用它来监听相关事件。
在决定选择哪种 webhook 之前,有几点需要考虑_**:
- 如果选择组网络钩子,集成将为 GitLab 实例中的每个组创建一个网络钩子。如果选择系统钩子,集成将为整个 GitLab 实例创建一个 webhook。
- 系统钩子的事件类型比组网络钩子少得多。
- 组网络钩子支持的事件类型:
+`push
- 问题
- `jobs
- `合并请求
- `管道
- System Hooks 支持的事件类型:
+`push
合并请�求 这意味着如果您选择系统钩子,集成将无法在issues或pipelines` 等事件上更新 Port 中的相关实体。
- 组网络钩子支持的事件类型:
+`push
- 创建系统钩子需要 GitLab 的管理员权限。鉴于此,集成支持手动创建系统钩子,集成将用它来监听相关事件。
配置集成以使用 Hooks
默认情况下,如果提供了 appHost,集成将为 GitLab 实例中的每个组创建组 webhook。
创建系统钩子有两个选项:
useSystemHook 参数的值为 true。- 使用
tokenMapping参数在 GitLab 中被用于一个具有管理权限的令牌。- 选择该选项时,集成将自动在 GitLab 账户中创建系统钩子。 2.手动创建系统钩子
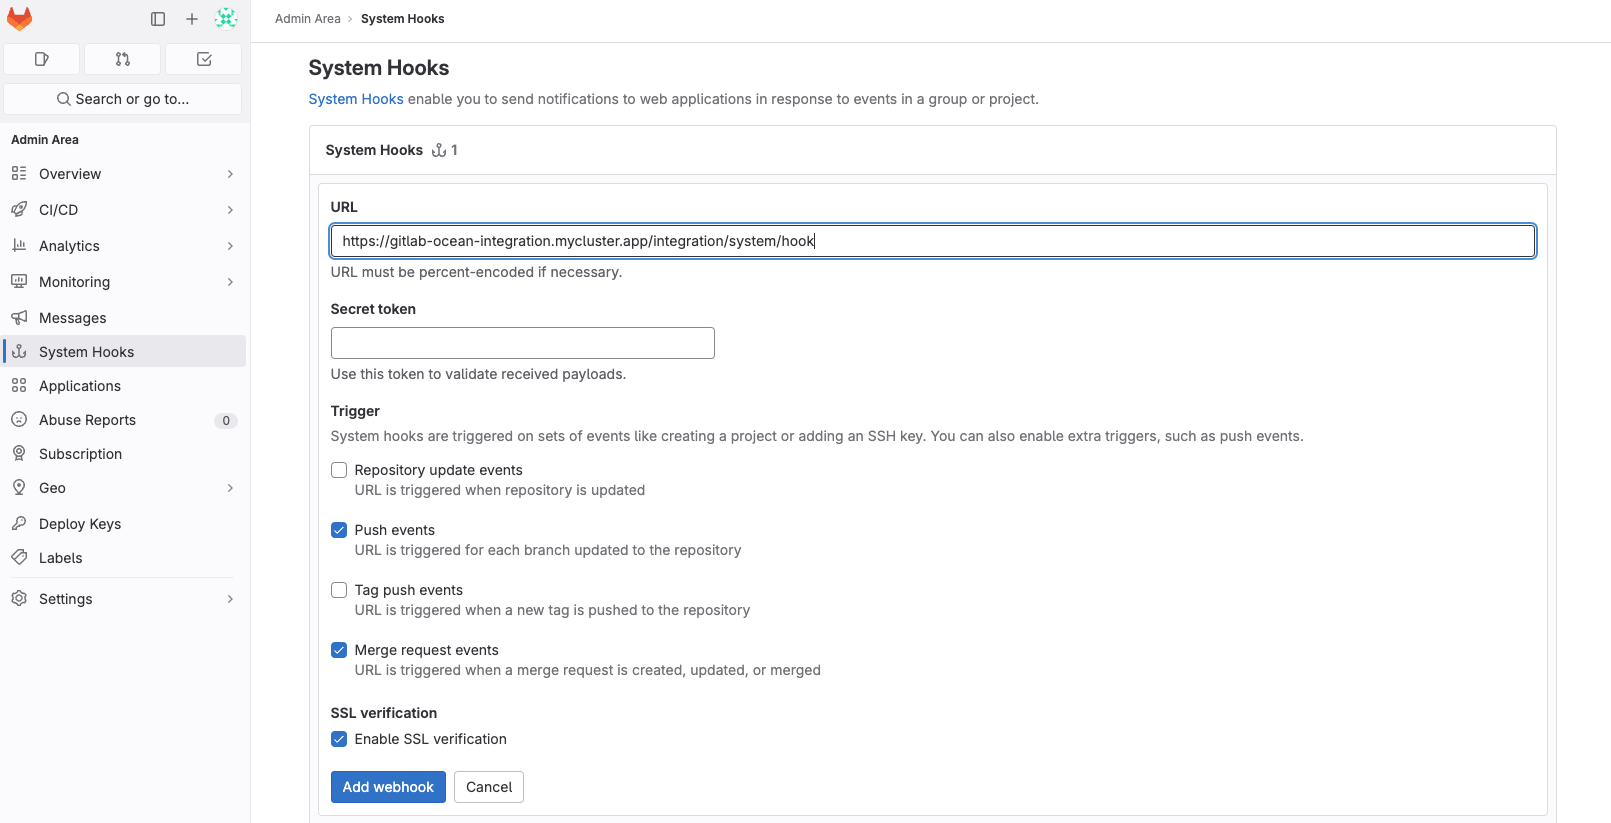
- 请按照在 GitLabhere 中创建系统钩子的说明操作。
- 在
URL字段,ProviderappHost参数值,路径为/integration/system/hooks。例如https://my-gitlab-integration.com/integration/system/hook。 - 在 "触发器 "部分,GitLab 集成目前支持以下事件:
- `push
- 合并请求
部署 GitLab 集成
从以下安装方法中选择一种:
- Real Time & Always On
- Scheduled
使用该安装选项意味着集成将能使用 webhook 实时更新 Port。
本表总结了安装时可用的参数,请在下面的脚本中按自己的需要进行设置,然后复制并在终端运行:
| Parameter | Description | Example | Required |
|---|---|---|---|
port.clientId | Your port client id | ✅ | |
port.clientSecret | Your port client secret | ✅ | |
integration.secrets.tokenMapping | The token mapping configuration used to query GitLab | ✅ | |
integration.config.appHost | The host of the Port Ocean app. Used to set up the integration endpoint as the target for webhooks created in GitLab | https://my-ocean-integration.com | ❌ |
integration.config.gitlabHost | (for self-hosted GitLab) the URL of your GitLab instance | https://my-gitlab.com | ❌ |
Advanced configuration
| Parameter | Description |
|---|---|
integration.eventListener.type | The event listener type. Read more about event listeners |
integration.type | The integration to be installed |
scheduledResyncInterval | The number of minutes between each resync. When not set the integration will resync for each event listener resync event. Read more about scheduledResyncInterval |
initializePortResources | Default true, When set to true the integration will create default blueprints and the port App config Mapping. Read more about initializePortResources |
- Helm
- ArgoCD
To install the integration using Helm, run the following command:
helm repo add --force-update port-labs https://port-labs.github.io/helm-charts
helm upgrade --install my-gitlab-integration port-labs/port-ocean \
    --set port.clientId="PORT_CLIENT_ID"  \
    --set port.clientSecret="PORT_CLIENT_SECRET"  \
    --set port.baseUrl="https://api.getport.io"  \
    --set initializePortResources=true  \
    --set scheduledResyncInterval=120 \
    --set integration.identifier="my-gitlab-integration"  \
    --set integration.type="gitlab"  \
    --set integration.eventListener.type="POLLING"  \
    --set integration.secrets.tokenMapping="\{\"TOKEN\": [\"GROUP_NAME/**\"]\}"
也可以让 Port 的用户界面为您生成安装命令,Port 会将您的 Port 客户端 ID 和客户端 secrets 等值直接注入命令,让您更容易上手。
请按照以下步骤通过 Port 的用户界面设置集成:
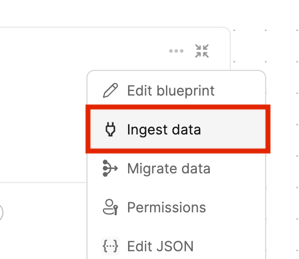
- 在 "Port生成器页面 "中点击要使用 GitLab 引用的蓝图的 "引用 "按钮:
 2.在 Git Provider 类别下选择 GitLab:
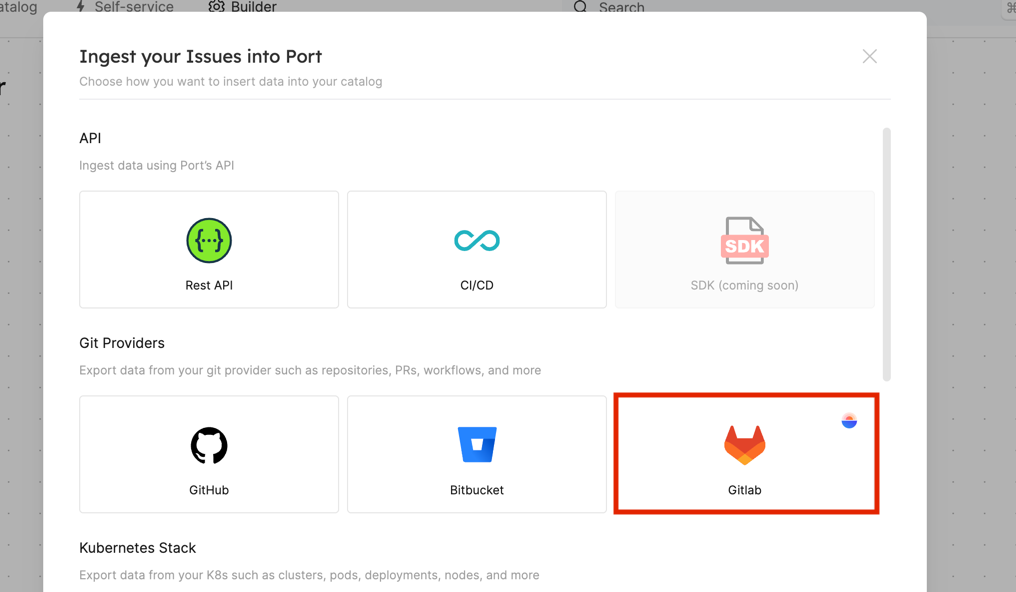 3.复制 helm 安装命令并设置required configuration ;
4.使用更新后的参数运行 helm 命令,在 Kubernetes 集群中安装集成。
To install the integration using ArgoCD, follow these steps:
- 在你的 git 仓库的
argocd/my-ocean-gitlab-integration中创建一个values.yaml文件,内容如下:
GITLAB_TOKEN_MAPPING 的占位符。initializePortResources: true
scheduledResyncInterval: 120
integration:
identifier: my-ocean-gitlab-integration
type: gitlab
eventListener:
type: POLLING
secrets:
tokenMapping: GITLAB_TOKEN_MAPPING
2.创建下面的 "my-ocean-gitlab-integration.yaml "配置清单,安装 "my-ocean-gitlab-integration "ArgoCD应用程序:
YOUR_PORT_CLIENT_ID``YOUR_PORT_CLIENT_SECRET 和 YOUR_GIT_REPO_URL 的占位符。多种来源的 ArgoCD 文档可在here 上找到。
ArgoCD Application
apiVersion: argoproj.io/v1alpha1
kind: Application
metadata:
  name: my-ocean-gitlab-integration
  namespace: argocd
spec:
  destination:
    namespace: my-ocean-gitlab-integration
    server: https://kubernetes.default.svc
  project: default
  sources:
  - repoURL: 'https://port-labs.github.io/helm-charts/'
    chart: port-ocean
    targetRevision: 0.1.14
    helm:
      valueFiles:
      - $values/argocd/my-ocean-gitlab-integration/values.yaml
      parameters:
        - name: port.clientId
          value: YOUR_PORT_CLIENT_ID
        - name: port.clientSecret
          value: YOUR_PORT_CLIENT_SECRET
  - repoURL: YOUR_GIT_REPO_URL
    targetRevision: main
    ref: values
  syncPolicy:
    automated:
      prune: true
      selfHeal: true
    syncOptions:
    - CreateNamespace=true
3.使用 kubectl 配置应用程序清单:
kubectl apply -f my-ocean-gitlab-integration.yaml
- GitLab
- Jenkins
此工作流将运行一次 GitLab 集成,然后退出,这对 ** 计划**数据引用非常有用。
确保配置以下GitLab Variables :
| Parameter | Description | Example | Required |
|---|---|---|---|
OCEAN__INTEGRATION__CONFIG__TOKEN_MAPPING | The token mapping configuration used to query GitLab | ✅ | |
OCEAN__PORT__CLIENT_ID | Your Port client (How to get the credentials) id | ✅ | |
OCEAN__PORT__CLIENT_SECRET | Your Port client (How to get the credentials) secret | ✅ | |
OCEAN__INITIALIZE_PORT_RESOURCES | Default true, When set to true the integration will create default blueprints and the port App config Mapping. Read more about initializePortResources | ❌ | |
OCEAN__INTEGRATION__CONFIG__GITLAB_HOST | (for self-hosted GitLab) the URL of your GitLab instance | ❌ | |
OCEAN__INTEGRATION__IDENTIFIER | The identifier of the integration that will be installed | ❌ |
下面是 .gitlab-ci.yml 工作流程文件的示例:
stages:
  - deploy_gitlab

variables:
  # Define non-secret variables
  INTEGRATION_TYPE: "gitlab"
  VERSION: "latest"
  # These variables should be set in GitLab's CI/CD variables for security
  # OCEAN__PORT__CLIENT_ID: $OCEAN__PORT__CLIENT_ID
  # OCEAN__PORT__CLIENT_SECRET: $OCEAN__PORT__CLIENT_SECRET
  # OCEAN__INTEGRATION__CONFIG__TOKEN_MAPPING: $OCEAN__INTEGRATION__CONFIG__TOKEN_MAPPING

deploy_gitlab:
  image: docker:24.0.7
  stage: deploy_gitlab
  services:
    - docker:24.0.7-dind
  script:
    - image_name="ghcr.io/port-labs/port-ocean-$INTEGRATION_TYPE:$VERSION"
    - |
      docker run -i --rm --platform=linux/amd64 \
      -e OCEAN__EVENT_LISTENER='{"type":"ONCE"}' \
      -e OCEAN__INITIALIZE_PORT_RESOURCES=true \
      -e OCEAN__INTEGRATION__CONFIG__TOKEN_MAPPING="$OCEAN__INTEGRATION__CONFIG__TOKEN_MAPPING" \
      -e OCEAN__PORT__CLIENT_ID=$OCEAN__PORT__CLIENT_ID \
      -e OCEAN__PORT__CLIENT_SECRET=$OCEAN__PORT__CLIENT_SECRET \
      $image_name
  only:
    - main
{"glpat-QXbeg-Ev9xtu5_5FsaAQ": ["**/DevopsTeam/*Service", "**/RnDTeam/*Service"]}
(注意,这只是一句话)
将其保存为 GitLab 变量,不做任何修改(无需用单引号 (') 或双引号 (") 包起来)。
另外,在向 Docker CLI 传递 OCEAN__INTEGRATION__CONFIG__TOKEN_MAPPING 参数时,请确保保留双引号 (")(请参阅上面的管道示例)。
该 Pipelines 会运行一次 GitLab 集成,然后退出,这对 ** 计划**数据引用非常有用。
请确保配置以下Jenkins Credentials 的 "Secret Text "类型:
| Parameter | Description | Example | Required |
|---|---|---|---|
OCEAN__INTEGRATION__CONFIG__TOKEN_MAPPING | The token mapping configuration used to query GitLab | ✅ | |
OCEAN__PORT__CLIENT_ID | Your Port client (How to get the credentials) id | ✅ | |
OCEAN__PORT__CLIENT_SECRET | Your Port client (How to get the credentials) secret | ✅ | |
OCEAN__INITIALIZE_PORT_RESOURCES | Default true, When set to true the integration will create default blueprints and the port App config Mapping. Read more about initializePortResources | ❌ | |
OCEAN__INTEGRATION__CONFIG__GITLAB_HOST | (for self-hosted GitLab) the URL of your GitLab instance | ❌ | |
OCEAN__INTEGRATION__IDENTIFIER | The identifier of the integration that will be installed | ❌ |
下面是 Jenkinsfile groovy Pipelines 文件的示例:
pipeline {
    agent any

    stages {
        stage('Run GitLab Integration') {
            steps {
                script {
                    withCredentials([
                        string(credentialsId: 'OCEAN__INTEGRATION__CONFIG__TOKEN_MAPPING', variable: 'OCEAN__INTEGRATION__CONFIG__TOKEN_MAPPING'),
                        string(credentialsId: 'OCEAN__PORT__CLIENT_ID', variable: 'OCEAN__PORT__CLIENT_ID'),
                        string(credentialsId: 'OCEAN__PORT__CLIENT_SECRET', variable: 'OCEAN__PORT__CLIENT_SECRET'),
                    ]) {
                        sh('''
                            #Set Docker image and run the container
                            integration_type="gitlab"
                            version="latest"
                            image_name="ghcr.io/port-labs/port-ocean-${integration_type}:${version}"
                            docker run -i --rm --platform=linux/amd64 \
                                -e OCEAN__EVENT_LISTENER='{"type":"ONCE"}' \
                                -e OCEAN__INITIALIZE_PORT_RESOURCES=true \
                                -e OCEAN__INTEGRATION__CONFIG__TOKEN_MAPPING="$OCEAN__INTEGRATION__CONFIG__TOKEN_MAPPING" \
                                -e OCEAN__PORT__CLIENT_ID=$OCEAN__PORT__CLIENT_ID \
                                -e OCEAN__PORT__CLIENT_SECRET=$OCEAN__PORT__CLIENT_SECRET \
                                $image_name

                            exit $?
                        ''')
                    }
                }
            }
        }
    }
}
有关代理或自签名证书等高级配置,click here 。