让开发人员使用 Gitops 丰富服务内容
本指南只需 10 分钟即可完成,旨在展示 Port 在使用 Gitops 时的灵活性。
- 本指南�假定您已拥有 Port 账户,并已完成onboarding process 。我们将使用Onboarding过程中创建的 "服务 "蓝图。
- 您需要一个 Git 仓库(Github、GitLab 或 Bitbucket),您可以在其中放置我们将在本指南中使用的工作流/Pipelines。如果没有,建议创建一个名为 "Port-actions "的新仓库。
本指南的目标
在本指南中,我们将使用 Gitops 丰富 Port 中的一项服务。 实际上,开发人员可以利用这一点,独立地为 Port 添加有关其服务的更多有价值的数据。
完成这项工作后,你就会了解它如何使你的组织中的不同角色受益:
- 开发人员将能够丰富自己的服务,而无需唠叨开发工程师。
- 平台工程师将能够为开发人员创建受 RBAC 控制的操作,增强他们的独立性。
- 研发经理将能够跟踪有关组织内服务的更多有价值的数据。
为你的 Service 蓝图添加新属性
让我们先在 Service蓝图中添加两个新属性,稍后我们将使用 Gitops 填充这两个属性。
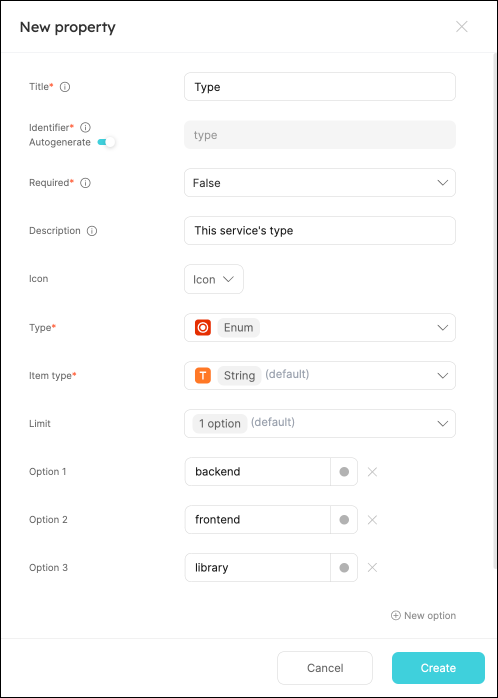
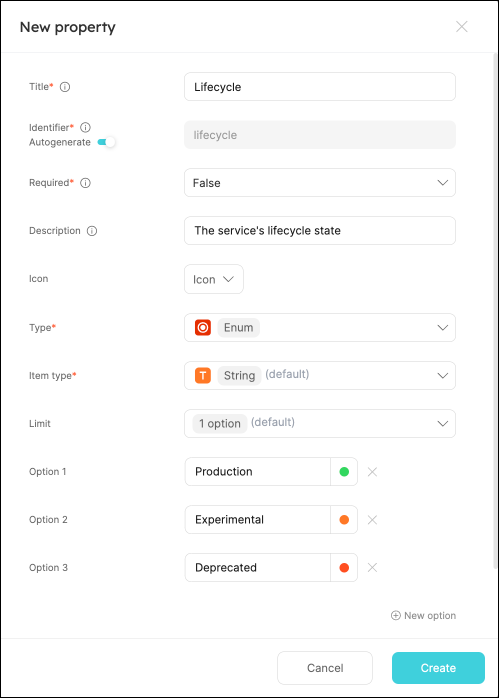
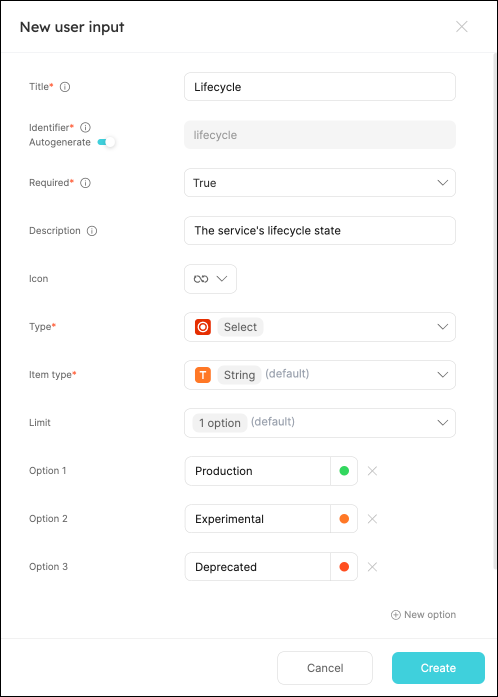
3.第二个属性是服务的生命周期状态,也是从预定义的选项列表中选择的。像这样填写表格,然后点击 "创建":
注意输入的颜色,这将使您更容易在目录中看到服务的生命周期_ 😎
###您的服务的示范域
共享业务目的的服务(如支付、运输)通常使用域分组。 让我们创建一个蓝图来表示 Port 中的域:
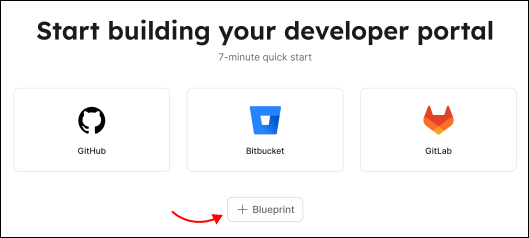
- 在Builder 中,点击右上角的 "添加 "按钮,然后选择 "自定义蓝图":
2.点击右上角的 "编辑 JSON "按钮,用以下定义替换内容,然后点击 "创建":
Blueprint JSON (click to expand)
{
  "identifier": "domain",
  "title": "Domain",
  "icon": "TwoUsers",
  "schema": {
    "properties": {
      "architecture": {
        "title": "Architecture",
        "type": "string",
        "format": "url",
        "spec": "embedded-url"
      }
    },
    "required": []
  },
  "mirrorProperties": {},
  "calculationProperties": {},
  "relations": {}
}
将您的服务与它们的域连接起来
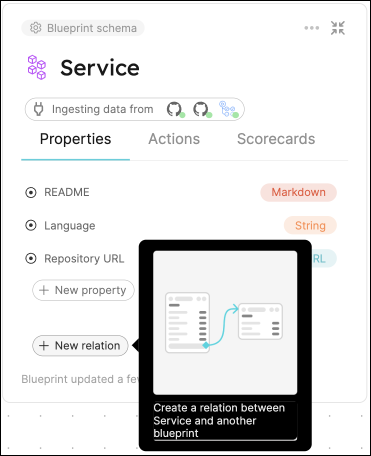
现在我们有了一个代表域的蓝图,让我们把它连接到我们的服务。 我们将通过在 Service 蓝图中添加一个关系来实现这一点:
- 进入Builder ,展开 "服务 "蓝图,点击 "新建关系":
2.像这样填写表格,然后点击 "创建":
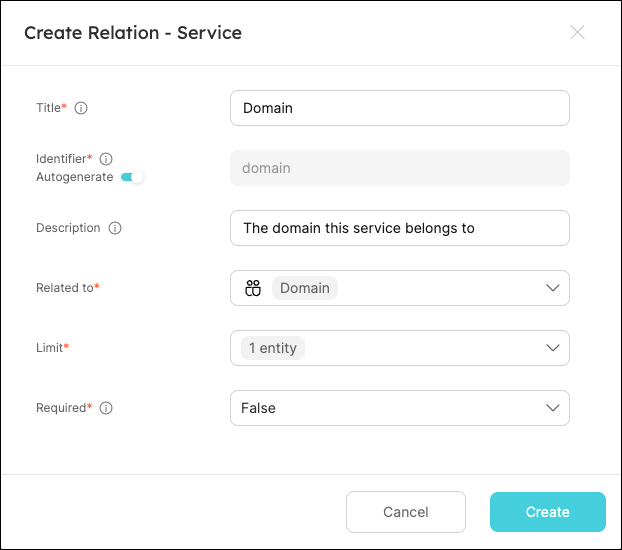
通过 Gitops 创建域名
现在我们有了 "域 "蓝图,可以在 Port 中创建一些域。 这可以通过用户界面手动完成,也可以通过 Gitops 完成,本指南将采用这种方法。
- 在您的
Port-actions(或同等文件)Github 代码库中,在根目录下新建一个名为port.yml的文件,并使用以下代码段作为其内容:
port.yml (click to expand)
- identifier: payment
  title: Payment
  blueprint: domain
  properties:
    architecture: https://lucid.app/documents/embedded/c3d64493-a5fe-4b18-98d5-66d355080de3
- identifier: shipping
  title: Shipping
  blueprint: domain
  properties:
    architecture: https://lucid.app/documents/embedded/c3d64493-a5fe-4b18-98d5-66d355080de3
2.返回software catalog ,您会看到 Port 创建了两个新的 "域 "实体:
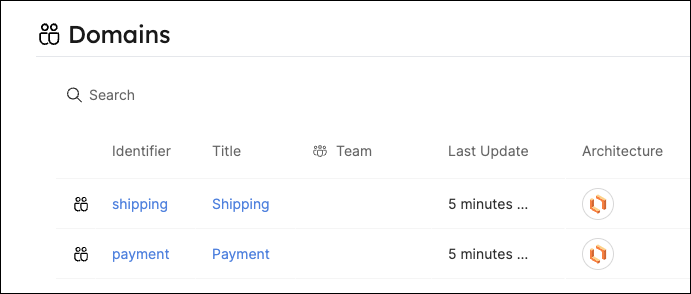
架构 "属性是指向 Lucidchart 图表的 URL。 这是一种在软件目录中跟踪域架构的便捷方法。
创建一个action来丰富服务
作为平台工程师,我们希望让开发人员能够自行执行某些操作。 让我们创建一个操作,开发人员可以用它将数据添加到服务中,并将其分配到域中。
设置动作的前端
作为Onboarding流程的一部分,您的self-service tab 中应该已经有一个名为 "丰富服务 "的操作。在这种情况下,您可以跳到Define backend type 步骤。
如果您跳过了***登录,或者您想从头开始创建操作,请完成以下步骤 1-5。
Create the action's frontend (steps 1-5)
- 进入Self-service page ,然后点击右上角的 "+ 新操作 "按钮。
- 从下拉菜单中选择 "服务 "蓝图。
- 像这样填写基本信息,然后点击
下一步:
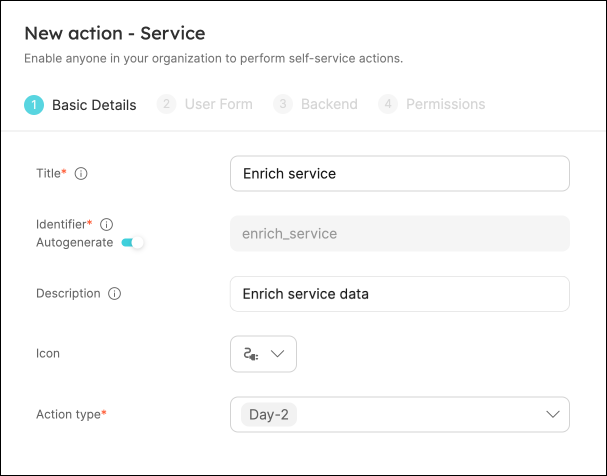
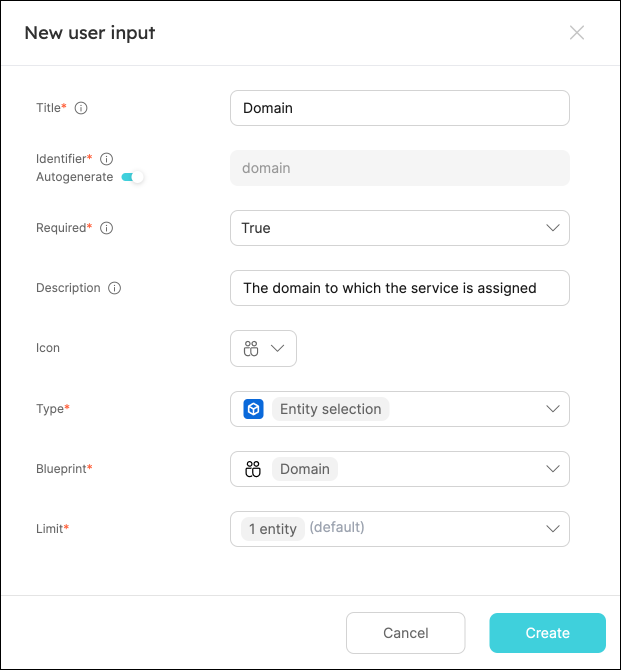
4.我们希望开发人员能够选择将服务分配给哪个域。点击 "新输入",像这样填写表格,然后点击 "下一步":
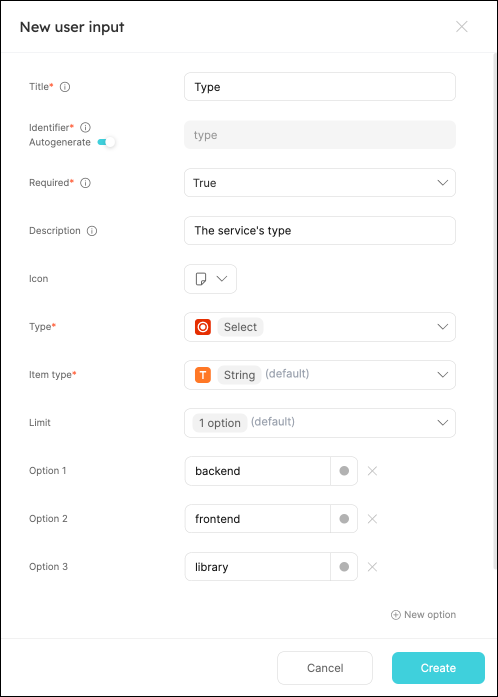
5.让我们为新服务属性添加两个输入--"类型 "和 "生命周期"。创建两个新输入,像这样填写表格,然后单击 "下一步":
定义后端类型
现在我们来定义动作的后端。 Port 支持多种引用类型,本教程中我们将使用 "Github 工作流"、"GitLab 管道 "或 "Jenkins 管道"(如果使用 Bitbucket,请选择此选项)。
- Github
- GitLab
- Bitbucket (Jenkins)
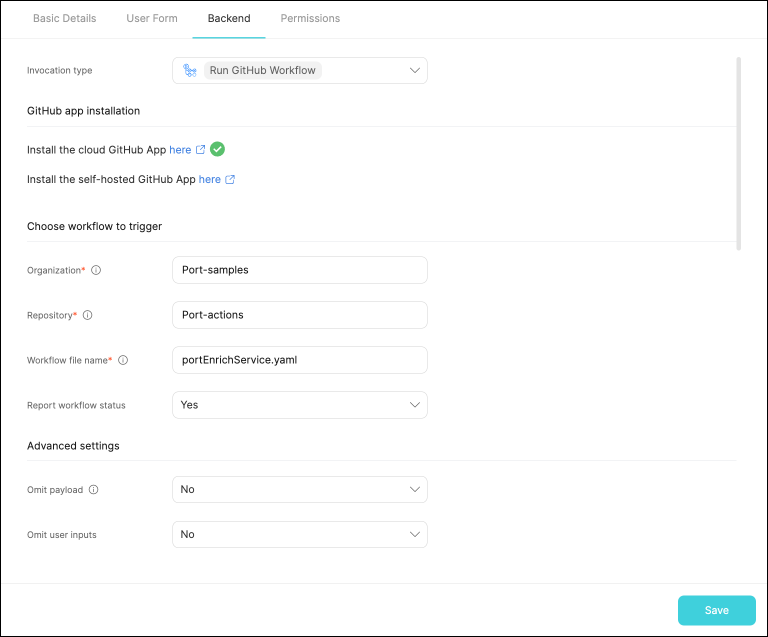
- 您需要在 Github 组织(包含您要使用的版本库的组织)中安装Port's Github app 。
- 用您的 Values 替换
Organization和Repository值(这是工作流将驻留和运行的位置)。 - 将工作流命名为
portEnrichService.yaml。 - 像这样填写表单的其余部分,然后单击
下一步:
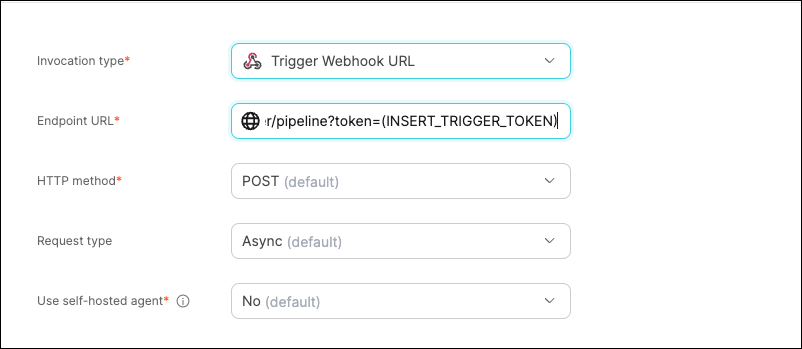
- 选择 "触发 Webhook URL "作为调用类型。
- 端点 URL 应如下所示:
https://gitlab.com/api/v4/projects/<PROJECT_ID>/ref/main/trigger/pipelines?token=<TRIGGER_TOKEN>。我们将在下一节创建 PROJECT_ID 和 TRIGGER_TOKEN,然后回来更新 URL。
- 像这样填写表格的其余部分,然后点击 "下一步":
任何有访问权限的人都可以触发 webhook URL。 为了保护 webhook,请参阅Validating webhook signatures page 。
- You will need to have [Port's Bitbucket app](https://marketplace.atlassian.com/apps/1229886/port-connector-for-bitbucket?hosting=cloud&tab=overview) installed in your Bitbucket workspace (the one that contains the repository you'll work with).
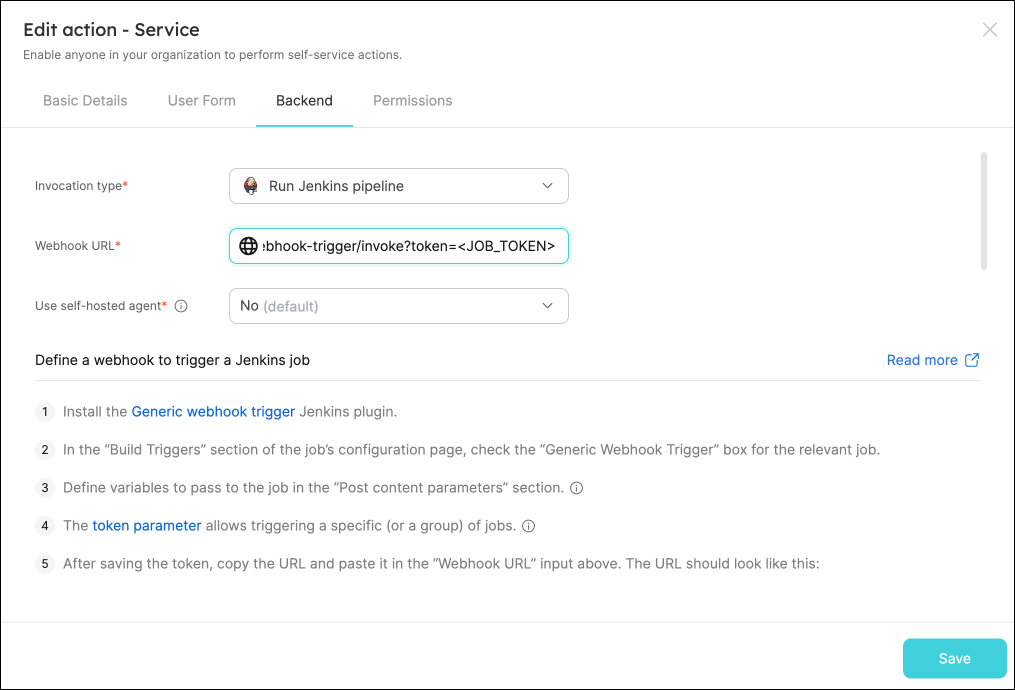
- Choose `Run Jenkins pipeline` as the invocation type.
- The webhook URL should look like this:
`http://<JENKINS_URL>/generic-webhook-trigger/invoke?token=enrichService`
  - Replace `JENKINS_URL` with your configured Jenkins URL.
  - We will use `enrichService` as `JOB_TOKEN`, we will set this token in Jenkins in the next section.
最后一步是自定义动作的权限。 为简单起见,我们将使用默认设置。 欲了解更多信息,请参阅permissions 页面。 点击 "创建"。
设置动作的后端
我们的操作将在服务的资源库中创建一个 pull-request,其中包含一个 port.yml 文件,该文件将向 Port 中的服务添加数据。 在下面选择后端类型以设置工作流:
- Github
- GitLab
- Bitbucket (Jenkins)
- 首先,让我们创建必要的 token 和 secrets。如果您已经完成了
scaffold a new service guide,则应该已经配置了这些内容,可以跳过这一��步。
- 访问Github tokens page ,创建一个具有
repo和admin:org范围的个人访问令牌,并将其复制(从我们的工作流中创建拉取请求需要该令牌) 。
- 访问Port application ,点击右上角的"...",然后点击 "凭据"。复制您的
客户 ID和客户 secret。
2.在Port-actions(或相应的)Github 代码库中,在Settings->Secrets and variables->Actions 下创建 3 个新secret:
- ORG_ADMIN_TOKEN` - 您在上一步中创建的个人访问令牌。
PORT_CLIENT_ID- 从 Port 应用程序复制的客户端 ID。- PORT_CLIENT_SECRET` - 从 Port 应用程序复制的客户机secret。

- 在root group 下访问 "设置->访问令牌",然后创建一个具有 "api"、"read_repository "和 "write_repository "作用域的 "维护者 "角色令牌。复制令牌的 Values。
- 创建名为
Port-pipelines的新项目。复制其 GitLab 项目 ID 并替换 webhook URL 中的(PROJECT_ID)。然后,在设置->CI/CD 下创建一个新的 Pipelines 触发令牌,并用它替换 webhook URL 中的(TRIGGER_TOKEN)。 - 在同一菜单 (CI/CD),向 Pipelines 添加以下变量:
- PORT_CLIENT_ID
- port_client_secret
:::提示 要查找 Port 凭据,请访问Port application ,点击右上角的...,然后点击凭据。 ::: - GITLAB_ACCESS_TOKEN - 在步骤 1 中创建的令牌。

- 创建一个具有
Pull requests:write权限的 Bitbucketapp password ,并复制其值。 - 创建以下[Jenkins 凭据](https://www.jenkins.io/doc/book/using/using-credentials/#configuring-credentials
) 在你的 Jenkins 实例中:
-
一个名为 "BITBUCKET_CREDENTIALS "的 "用户名加密码 "凭证,用户名是你的 Bitbucket 用户名,密码是你在上一步创建的 "应用程序密码"。
Get your Port credentials
To get your Port API credentials go to your Port application, click on the
...button in the top right corner, and selectCredentials. Here you can view and copy yourCLIENT_IDandCLIENT_SECRET:- A
secret textcredential namedPORT_CLIENT_IDwith your Port client ID as the secret. - A
secret textcredential namedPORT_CLIENT_SECRETwith your Port client secret as the secret.
- A
3.用以下配置创建一个 Jenkins Pipeline:
- Enable webhook trigger 的 Pipeline。
- Define post-content variables 为管道设置以下名称和 Values: | 名称 | Values | | 名称 | --- | --- | LIFECYCLE | $.payload.properties.LIFECYCLE | $.payload.properties.TYPE | $.payload.properties.type | $.payload.properties.type | 类型 | DOMAIN | $.payload.properties.domain | $.payload.properties.domain | ENTITY_IDENTIFIER | $.payload.entity.identifier | ENTITY_IDENTIFIER | REPO_URL | $.payload.entity.properties.url | $.payload.properties.URL | RUN_ID | $.context.runId | $.context.runId
- 将
enrichService设置为 Pipelines 的标记。
现在我们将创建一个 YML 文件,作为服务的 port.yml 配置文件的模板。
- 在版本库的
/templates/下创建一个名为enrichService.yml的文件(其路径应为/templates/enrichService.yml)。 - 复制以下代码段并粘贴到文件内容中:
enrichService.yml (click to expand)
# enrichService.yml

- identifier: "{{ service_identifier }}"
  blueprint: service
  properties:
    type: "{{ service_type }}"
    lifecycle: "{{ service_lifecycle }}"
  relations:
    domain: "{{ domain_identifier }}"
现在,让我们创建一个包含逻辑的文件:
- Github
- GitLab
- Bitbucket (Jenkins)
在.github/workflows下的同一版本库中,新建一个名为portEnrichService.yml的文件,并将以下代码段作为其内容:
Github workflow (click to expand)
name: Enrich service
on:
  workflow_dispatch:
    inputs:
      domain:
        required: true
        description: The domain to which the service will be assigned
        type: string
      type:
        required: true
        description: The service's type
        type: string
      lifecycle:
        required: true
        description: The service's lifecycle
        type: string
      port_payload:
        required: true
        description: Port's payload, including details for who triggered the action and general context
        type: string
jobs:
  enrichService:
    runs-on: ubuntu-latest
    steps:
      - uses: actions/checkout@v3
      - uses: actions/checkout@v3
        with:
          repository: "${{ github.repository_owner }}/${{fromJson(inputs.port_payload).context.entity}}"
          path: ./targetRepo
          token: ${{ secrets.ORG_ADMIN_TOKEN }}
      - name: Copy template yml file
        run: |
          cp templates/enrichService.yml ./targetRepo/port.yml
      - name: Update new file data
        run: |
          sed -i 's/{{ service_identifier }}/${{fromJson(inputs.port_payload).context.entity}}/' ./targetRepo/port.yml
          sed -i 's/{{ domain_identifier }}/${{ inputs.domain }}/' ./targetRepo/port.yml
          sed -i 's/{{ service_type }}/${{ inputs.type }}/' ./targetRepo/port.yml
          sed -i 's/{{ service_lifecycle }}/${{ inputs.lifecycle }}/' ./targetRepo/port.yml
      - name: Open a pull request
        uses: peter-evans/create-pull-request@v5
        with:
          token: ${{ secrets.ORG_ADMIN_TOKEN }}
          path: ./targetRepo
          commit-message: Enrich service - ${{fromJson(inputs.port_payload).context.entity}}
          committer: GitHub <[email protected]>
          author: ${{ github.actor }} <${{ github.actor }}@users.noreply.github.com>
          signoff: false
          branch: add-port-yml
          delete-branch: true
          title: Create port.yml - ${{fromJson(inputs.port_payload).context.entity}}
          body: |
            Add port.yaml to enrich service in Port.
          draft: false
      - name: Create a log message
        uses: port-labs/port-github-action@v1
        with:
          clientId: ${{ secrets.PORT_CLIENT_ID }}
          clientSecret: ${{ secrets.PORT_CLIENT_SECRET }}
          operation: PATCH_RUN
          runId: ${{fromJson(inputs.port_payload).context.runId}}
          logMessage: Pull request to add port.yml created successfully for service "${{fromJson(inputs.port_payload).context.entity}}" 🚀
在同一版本库中新建一个名为.gitlab-ci.yml的文件,并在其中粘贴以下内容:
GitLab pipeline (click to expand)
stages:
  - enrichService

enrichService:
  stage: enrichService
  only:
    - triggers # This pipeline will be triggered via the GitLab webhook service.
  before_script:
    - apt-get update && apt-get install -y jq && apt-get install -y yq
  script:
    - PAYLOAD=$(cat $TRIGGER_PAYLOAD)
    - runID=$(echo $PAYLOAD | jq -r '.context.runId')
    - >
      access_token=$(curl --location --request POST 'https://api.getport.io/v1/auth/access_token' --header 'Content-Type: application/json' --data-raw "{\"clientId\": \"$PORT_CLIENT_ID\",\"clientSecret\": \"$PORT_CLIENT_SECRET\"}" | jq '.accessToken' | sed 's/"//g')
    - >
      curl --location --request PATCH "https://api.getport.io/v1/actions/runs/$runID" --header "Authorization: $access_token" --header 'Content-Type: application/json' --data-raw "{\"link\": [\"$CI_PIPELINE_URL\"]
      }"
    - git config --global user.email "[email protected]"
    - git config --global user.name "Git Runner"
    - SERVICE_IDENTIFIER=$(echo $PAYLOAD | jq -r '.payload.entity.identifier')
    - DOMAIN_IDENTIFIER=$(echo $PAYLOAD | jq -r '.payload.properties.domain')
    - SERVICE_TYPE=$(echo $PAYLOAD | jq -r '.payload.properties.type')
    - SERVICE_LIFECYCLE=$(echo $PAYLOAD | jq -r '.payload.properties.lifecycle')
    - git clone https://:${GITLAB_ACCESS_TOKEN}@gitlab.com/${CI_PROJECT_PATH}.git
    - git clone https://:${GITLAB_ACCESS_TOKEN}@gitlab.com/${SERVICE_IDENTIFIER}.git ./targetRepo
    - cp templates/enrichService.yml ./targetRepo/port.yml
    - yq --in-place --arg SERVICE_ID $SERVICE_IDENTIFIER  '.[0].identifier = $SERVICE_ID' ./targetRepo/port.yml -y
    - yq --in-place --arg TYPE $SERVICE_TYPE  '.[0].properties.type = $TYPE' ./targetRepo/port.yml -y
    - yq --in-place --arg LIFECYCLE $SERVICE_LIFECYCLE '.[0].properties.lifecycle = $LIFECYCLE' ./targetRepo/port.yml -Y
    - yq --in-place --arg DOMAIN $DOMAIN_IDENTIFIER  '.[0].relations.domain = $DOMAIN' ./targetRepo/port.yml -Y
    - cd targetRepo
    - git pull
    - git checkout -b add-port-yml
    - git add port.yml
    - git commit -m "Enrich service - ${SERVICE_IDENTIFIER}"
    - set +e
    - output=$(git push origin add-port-yml -o merge_request.create 2>&1)
    - echo "$output"
    - runStatus="SUCCESS"
    - |
      if echo "$output" | grep -qi "rejected"; then
          runStatus="FAILURE"
      elif echo "$output" | grep -qi "error"; then
          runStatus="FAILURE"
      fi
    - echo "$runStatus"
    - |
      if [ "$runStatus" = "SUCCESS" ]; then
          # Generic regex for GitLab merge request URLs
          mergeRequestUrl=$(echo "$output" | grep -oP 'https:\/\/gitlab\.com\/[^\/]+\/[^\/]+\/-\/merge_requests\/\d+')
          echo "Merge Request URL: $mergeRequestUrl"
          curl --location --request POST "https://api.getport.io/v1/actions/runs/$runID/logs" \
          --header 'Content-Type: application/json' \
          --header "Authorization: $access_token" \
          --data-raw "{\"message\": \"PR opened at $mergeRequestUrl\"}"
      else
          curl --location --request POST "https://api.getport.io/v1/actions/runs/$runID/logs" \
          --header 'Content-Type: application/json' \
          --header "Authorization: $access_token" \
          --data-raw "{\"message\": \"The Job failed. Please check the job logs for more information.\"}"
      fi
    - >
      curl --location --request PATCH "https://api.getport.io/v1/actions/runs/$runID" --header "Authorization: $access_token" --header 'Content-Type: application/json' --data-raw "{\"status\": \"${runStatus}\"}"
创建一个包含以下内容的 Jenkins 管道脚本(将 <PORT-ACTIONS-REPO-URL> 替换为上一步中被用于的版本库的 URL):
Jenkins pipeline script (click to expand)
import groovy.json.JsonSlurper

pipeline {
    agent any

    environment {
        DOMAIN = "${DOMAIN}"
        LIFECYCLE = "${LIFECYCLE}"
        ENTITY_IDENTIFIER = "${ENTITY_IDENTIFIER}"
        TYPE = "${TYPE}"
        REPO_URL = "${REPO_URL}"
        BITBUCKET_ORG_NAME = ""
        BITBUCKET_CREDENTIALS = credentials("BITBUCKET_CREDENTIALS")
        PORT_ACCESS_TOKEN = ""
        PORT_RUN_ID = "${RUN_ID}"
    }

    stages {
        stage('Get access token') {
            steps {
                script {
                    withCredentials([
                        string(credentialsId: 'PORT_CLIENT_ID', variable: 'PORT_CLIENT_ID'),
                        string(credentialsId: 'PORT_CLIENT_SECRET', variable: 'PORT_CLIENT_SECRET')
                    ]) {
                        // Execute the curl command and capture the output
                        def result = sh(returnStdout: true, script: """
                            accessTokenPayload=\$(curl -X POST \
                                -H "Content-Type: application/json" \
                                -d '{"clientId": "${PORT_CLIENT_ID}", "clientSecret": "${PORT_CLIENT_SECRET}"}' \
                                -s "https://api.getport.io/v1/auth/access_token")
                            echo \$accessTokenPayload
                        """)

                        // Parse the JSON response using JsonSlurper
                        def jsonSlurper = new JsonSlurper()
                        def payloadJson = jsonSlurper.parseText(result.trim())

                        // Access the desired data from the payload
                        PORT_ACCESS_TOKEN = payloadJson.accessToken
                    }

                }
            }
        }
        stage('checkoutTemplate') {
            steps {
                git credentialsId: 'BITBUCKET_CREDENTIALS', url: 'https://[email protected]/portsamples/port-actions.git', branch: 'main'
            }
        }
        stage('checkoutDestination') {
            steps {
                sh 'mkdir -p destinationRepo'
                dir('destinationRepo') {
                    git credentialsId: 'BITBUCKET_CREDENTIALS', url: "${REPO_URL}", branch: 'master'
                }
            }
        }
        stage('copyTemplateFile') {
            steps {
                sh 'cp templates/enrichService.yml ./destinationRepo/port.yml'
            }
        }
        stage('updateFileData') {
            steps {
                sh """#!/bin/bash
                    sed -i .bak 's/{{ service_identifier }}/${ENTITY_IDENTIFIER}/' ./destinationRepo/port.yml
                    sed -i .bak 's/{{ domain_identifier }}/${DOMAIN}/' ./destinationRepo/port.yml
                    sed -i .bak 's/{{ service_type }}/${TYPE}/' ./destinationRepo/port.yml
                    sed -i .bak 's/{{ service_lifecycle }}/${LIFECYCLE}/' ./destinationRepo/port.yml
                """
            }
        }
        stage('CreateBranch') {
            steps {
                dir('destinationRepo') {
                    script {
                        sh '''#!/bin/bash
                            ORG_URL="${REPO_URL%/*}"
                            BITBUCKET_ORG_NAME="${ORG_URL##*org/}"
                            curl https://api.bitbucket.org/2.0/repositories/${BITBUCKET_ORG_NAME}/${ENTITY_IDENTIFIER}/refs/branches \
                            -u ${BITBUCKET_CREDENTIALS} -X POST -H "Content-Type: application/json" \
                            -d '{
                                "name" : "add-port-yml",
                                "target" : {
                                    "hash" : "master"
                                }
                            }'
                        '''
                    }
                }
            }
        }
        stage('PushPortYml') {
            steps {
                dir('destinationRepo') {
                   script {
                        sh '''#!/bin/bash
                            ORG_URL="${REPO_URL%/*}"
                            BITBUCKET_ORG_NAME="${ORG_URL##*org/}"
                            curl -X POST -u ${BITBUCKET_CREDENTIALS} https://api.bitbucket.org/2.0/repositories/${BITBUCKET_ORG_NAME}/${ENTITY_IDENTIFIER}/src \
                            -F message="Add port.yml" -F branch=add-port-yml \
                            -F [email protected]
                        '''
                    }
                }
            }
        }
        stage('CreatePullRequest') {
            steps {
                dir('destinationRepo') {
                    script {
                        sh '''#!/bin/bash
                            ORG_URL="${REPO_URL%/*}"
                            BITBUCKET_ORG_NAME="${ORG_URL##*org/}"
                            curl -v https://api.bitbucket.org/2.0/repositories/${BITBUCKET_ORG_NAME}/${ENTITY_IDENTIFIER}/pullrequests \
                            -u ${BITBUCKET_CREDENTIALS} \
                            --request POST \
                            --header 'Content-Type: application/json' \
                            --data '{
                                "title": "Add port.yml",
                                "source": {
                                    "branch": {
                                        "name": "add-port-yml"
                                    }
                                }
                            }'
                        '''
                    }
                }
            }
        }
        stage('Update Port Run Status') {
            steps {
                script {
                    def status_report_response = sh(script: """
                        curl -X PATCH \
                          -H "Content-Type: application/json" \
                          -H "Authorization: Bearer ${PORT_ACCESS_TOKEN}" \
                          -d '{"status":"SUCCESS", "message": {"run_status": "Scaffold Jenkins Pipeline completed successfully!"}}' \
                             "https://api.getport.io/v1/actions/runs/${PORT_RUN_ID}"
                    """, returnStdout: true)

                    println(status_report_response)
                }
            }
        }
    }
}
该操作已准备就绪 🚀
执行操作
- 创建动作后,它将出现在Self-service page 下。找到新的 "丰富服务 "动作,点击 "执行"。
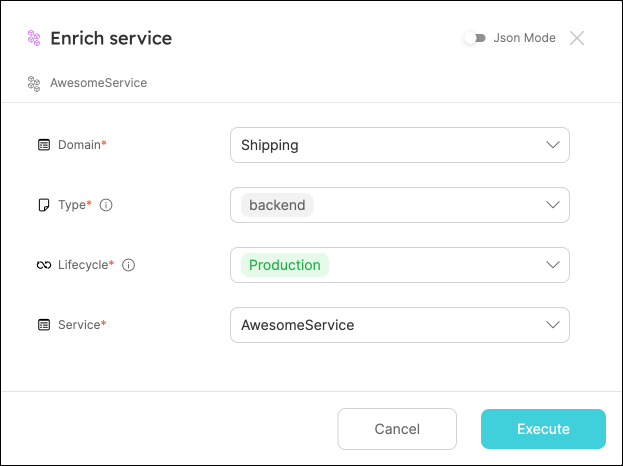
- 从下拉菜单中选择一个服务、一个要将其分配给的域,以及其类型和生命周期的任何 Values,然后单击
执行:
3.弹出一个小窗口,点击 "查看详情":

该页面提供了操作运行的详细信息。 我们可以看到后端返回了 "Success"(成功),拉取请求已成功创建。
4.前往你的服务仓库,你会看到创建了一个新的拉取请求:
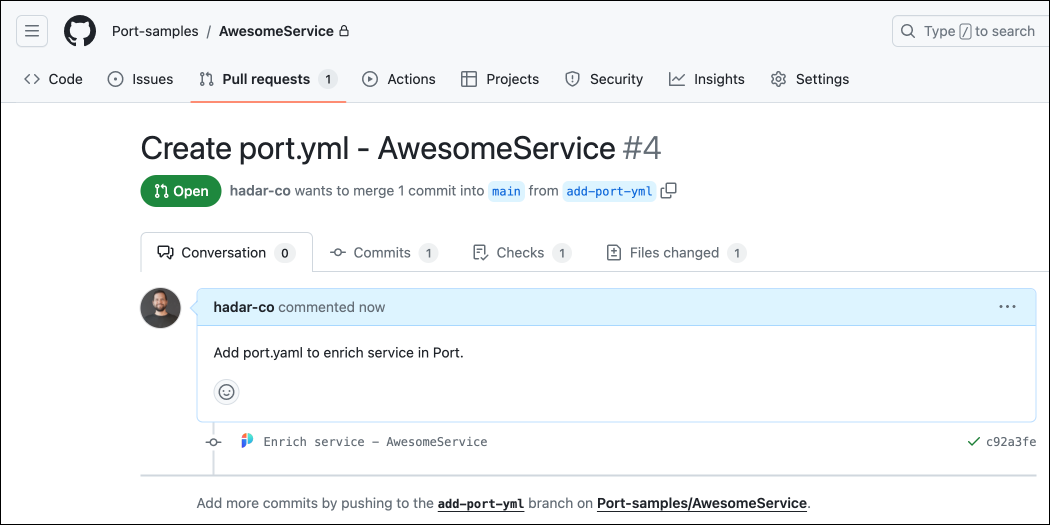
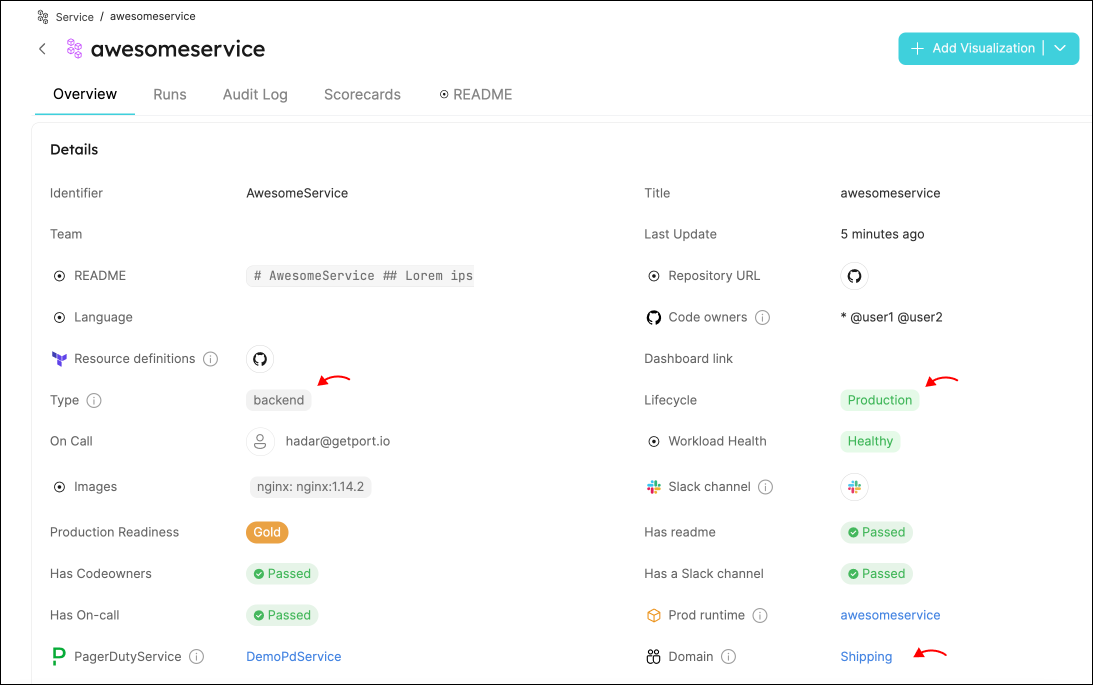
5.合并拉取请求,然后返回software catalog 。 6.找到您的服务,点击其标识符。这将带您进入服务的目录页面,在那里您可以看到用数据填充的新属性:
全部完成! 💪🏽
可能的日常整合
- 从 Sentry 项目中获取数据并反映在软件目录中。
- 只需从开发人员门户点击几下,即可创建和上线服务。
结论
Gitops 是现代软件开发中的一种常见做法,因为它能确保基础架构的状态始终与代码库同步。 Port 可让您轻松地将 Gitops 实践与软件目录集成,反映基础架构的状态,并允许您通过受控操作赋予开发人员权力。
更多指南和教程即将推出,在此期间如有任何问题,请随时通过community slack 或Github project 联系我们。