新服务脚手架
本指南只需 7 分钟即可完成,旨在展示 Port 中自助action的力量。
- 本指南假定您已拥有 Port 账户,并已完成onboarding process 。我们将使用Onboarding过程中创建的 "服务 "蓝图。
- 您需要一个 Git 仓库(Github、GitLab 或 Bitbucket),您可以在其中放置我们将在本指南中使用的工作流/Pipelines。如果没有,建议创建一个名为 "Port-actions "的新仓库。
本指南的目标
在本指南中,我们将创建一个初始化新 Git 仓库的动作。 在现实中,开发人员可以用这样的动作来搭建新服务的脚手架。
完成这项工作后,你就会了解它如何使你的组织中的不同角色受益:
- 开发人员可以轻松构建新服务。
- 研发经理将能获得新服务的总体情况--有多少服务是由谁创建的。
- 平台工程师将能够控制权限,确保只有相关人员才能创建新服务。
设置动作的前端
作为Onboarding流程的一部分,您的self-service tab 中应该已经有一个名为 "新服务脚手架 "的操作。在这种情况下,您可以将鼠标悬停在该操作上,单击右上角的"... "按钮,然后选择 "编辑":
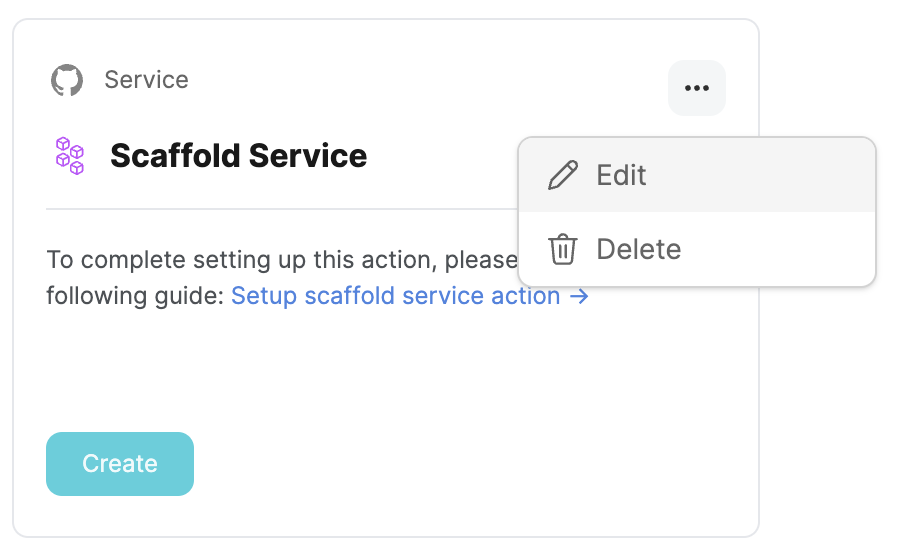
然后,跳到Define backend type 步骤。
如果您跳过了***Onboarding培训,或者您想从头开始创建操作,请完成下面的 "创建操作的前端 "步骤。
Create the action's frontend
- GitHub
- GitLab
- Bitbucket (Jenkins)
- 点击 "新建操作":
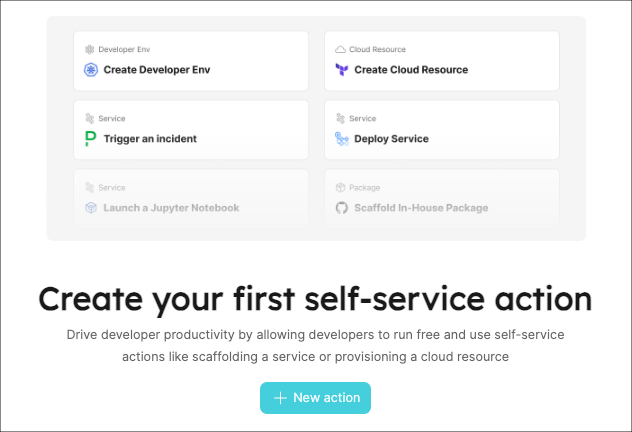
2.Port 中的每个操作都与一个蓝图直接相关。由于我们正在创建一个资源库,因此让我们使用onboarding 流程中为我们创建的 Service 蓝图。从下拉菜单中选择它。
3.像这样填写操作的基本细节,然后单击 "下一步":
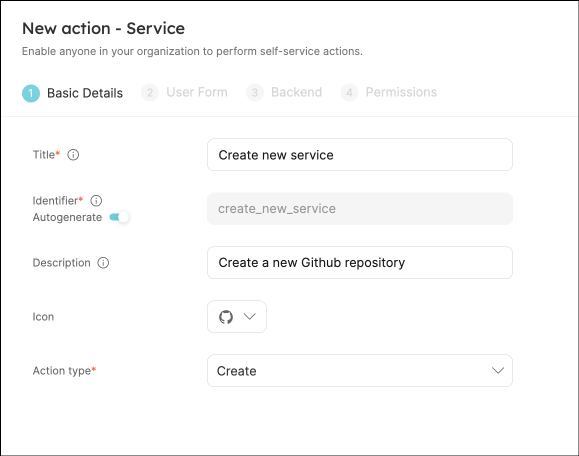
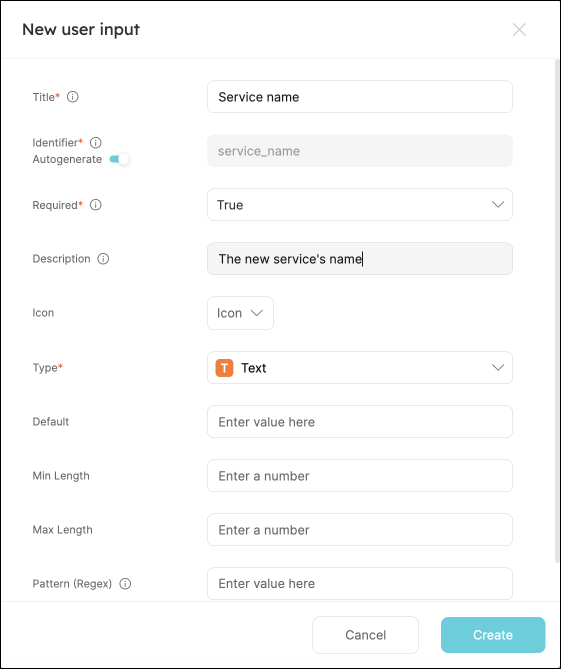
4.下一步是定义动作的输入。当有人被用于此操作时,我们只希望他们输入新版本库的名称。点击 "新输入",像这样填写表格,然后点击 "创建":
- 点击 "新建操作":

2.Port 中的每个操作都与一个蓝图直接相关。由于我们正在创建一个资源库,因此让我们使用onboarding 流程中为我们创建的 Service 蓝图。从下拉菜单中选择它。
3.像这样填写操作的基本细节,然后单击 "下一步":

4.下一步是定义动作的输入。当有人被用于此操作时,我们只希望他们输入新版本库的名称。点击 "新输入",像这样填写表格,然后点击 "创建":

- 点击 "新建操作":

2.Port 中的每个操作都与一个蓝图直接相关。由于我们正在创建一个资源库,因此让我们使用onboarding 流程中为我们创建的 Service 蓝图。从下拉菜单中选择它。
3.像这样填写操作的基本细节,然后单击 "下一步":

4.下一步是定义动作的输入。当有人被用于此操作时,我们只希望他们输入新版本库的名称。点击 "新输入",像这样填写表格,然后点击 "创建":

5.该操作还需要两个输入,因此再次点击 "新建输入",然后像这样填写表格:
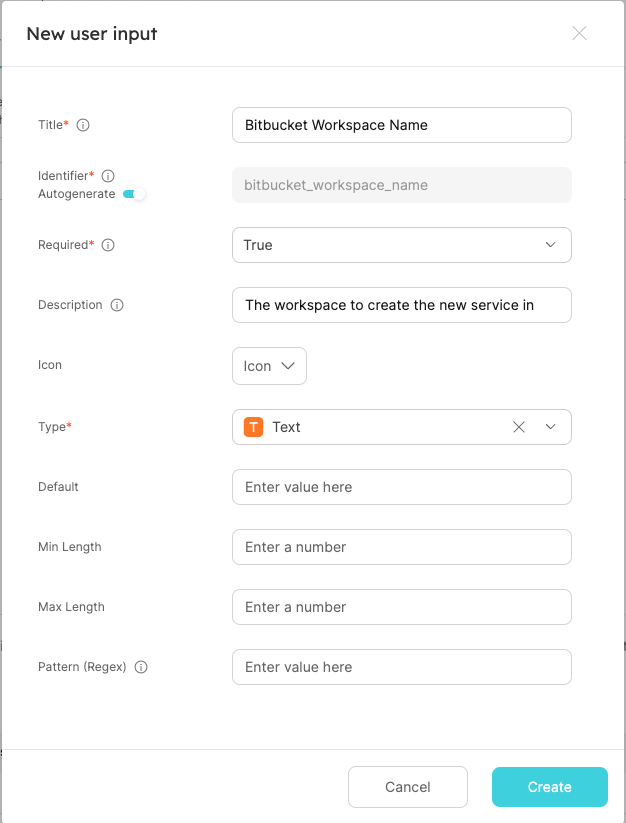
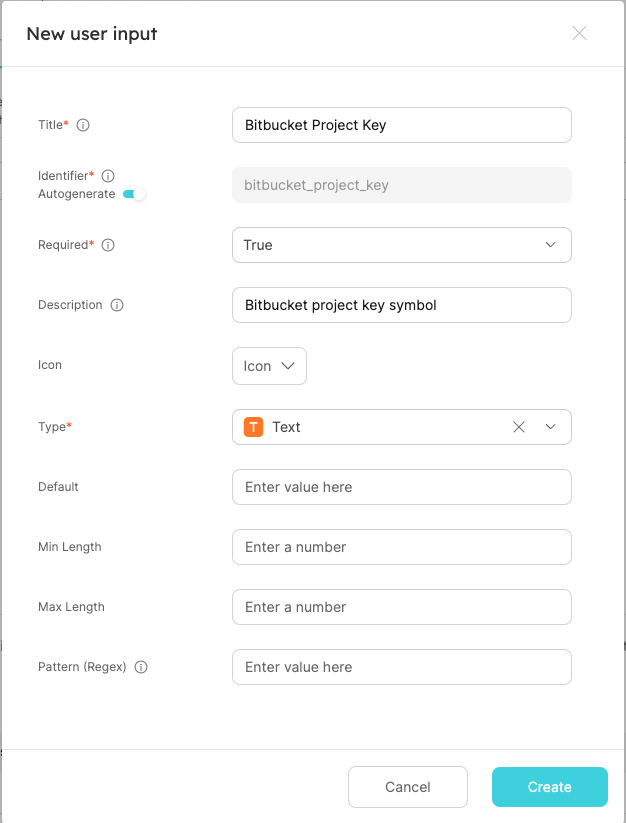
- 我们将 "Required "字段设置为 "true",以确保在使用此操作时始终提供一个名称。
- 由于这是一个名称,因此我们将类型设置为
Text,但请注意 Port 允许的所有不同类型的输入。 - 在被用于
Text输入时,您可以设置约束和限制以强制执行某些模式。
定义后端类型
现在我们来定义操作的后端。 Port 支持多种调用类型,根据您在入门过程中选择的 Git Provider,我们会为您选择其中一种。
- GitHub
- GitLab
- Bitbucket (Jenkins)
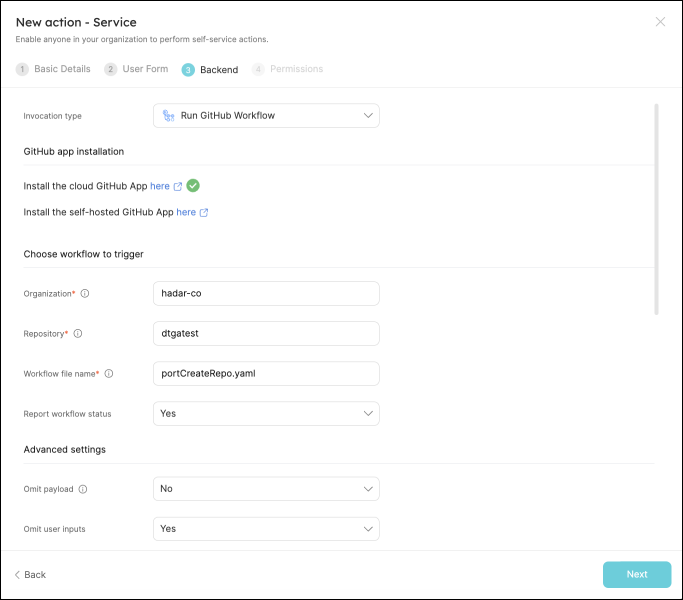
在表格中填写您的 Values:
- 用您的 Values 替换
Organization和Repository值(这是工作流将驻留和运行的位置)。 - 将工作流命名为
portCreateRepo.yaml。 - 将 "忽略用户输入 "设置为 "是"。
- 像这样填写表单的其余部分,然后单击
下一步:
在我们的工作流中,cookiecutter 使用有效载荷作为输入。 为了避免向工作流发送额外的输入,我们省略了用户输入。
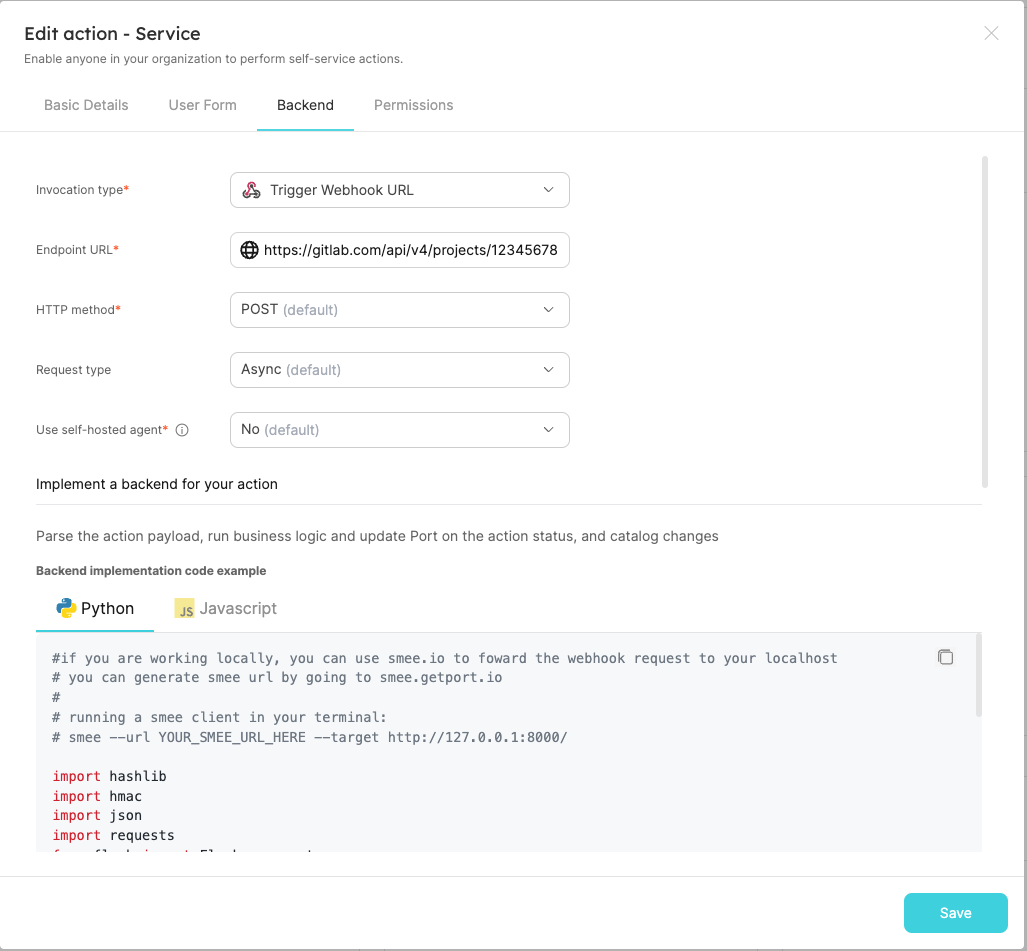
在表格中填写您的 Values:
-
端点 URL "需要添加以下格式的 URL:
https://gitlab.com/api/v4/projects/{GITLAB_PROJECT_ID}/ref/main/trigger/pipeline?token={GITLAB_TRIGGER_TOKEN}- The value for
{GITLAB_PROJECT_ID}is the ID of the GitLab group that you create in the setup the action's backend section which stores the.gitlab-cy.ymlpipeline file.- To find the project ID, browse to the GitLab page of the group you created, at the top right corner of the page, click on the vertical 3 dots button (next to
Fork) and selectCopy project ID
- To find the project ID, browse to the GitLab page of the group you created, at the top right corner of the page, click on the vertical 3 dots button (next to
- The value for
{GITLAB_TRIGGER_TOKEN}is the trigger token you create in the setup the action's backend section.
- The value for
- Set
HTTP methodtoPOST. - Set
Request typetoAsync. - Set
Use self-hosted agenttoNo.
在表格中填写您的 Values:
-
端点 URL "需要添加以下格式的 URL:
https://{JENKINS_URL}/generic-webhook-trigger/invoke?token={JOB_TOKEN}- The value for
{JENKINS_URL}is the URL of your Jenkins server. - The value for
{JOB_TOKEN}is the unique token used to trigger the pipeline you create in the setup the action's backend section.
- The value for
- Set
HTTP methodtoPOST. - Set
Request typetoAsync. - Set
Use self-hosted agenttoNo.
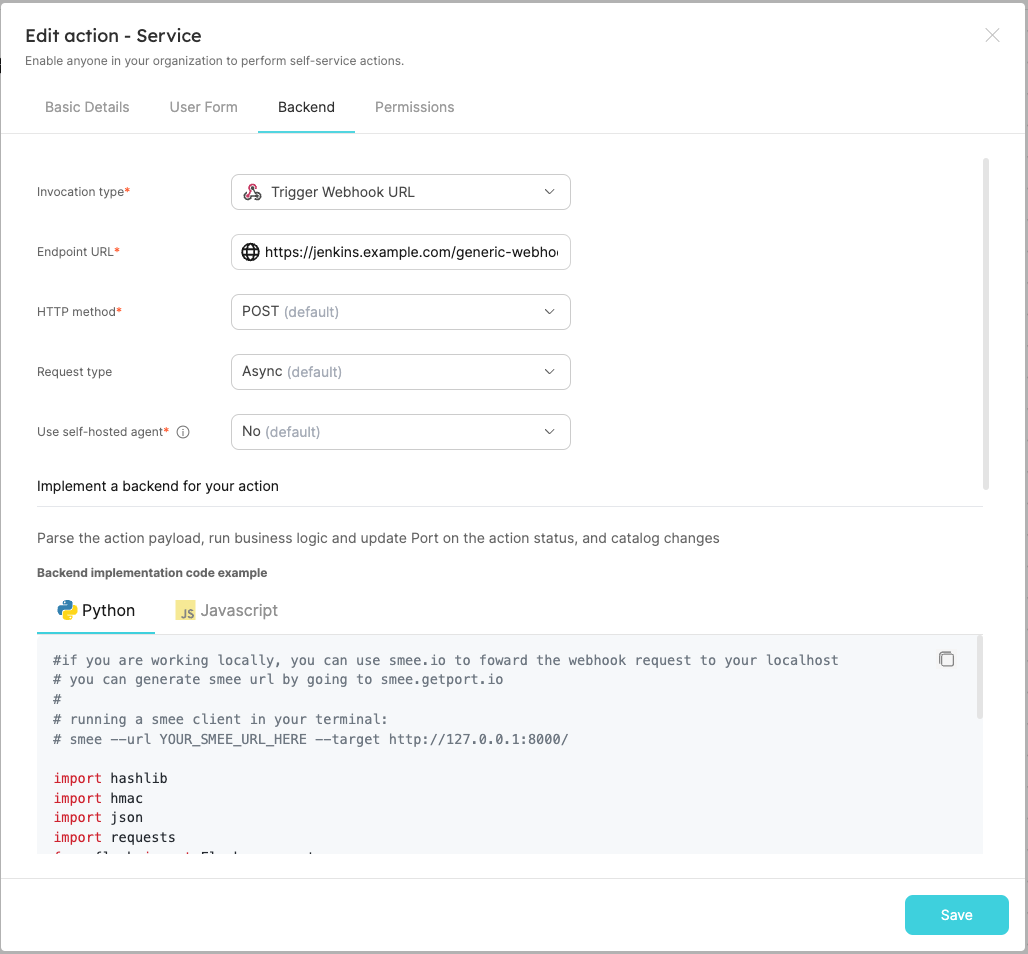
最后一步是自定义动作的权限。 为简单起见,我们将使用默认设置。 欲了解更多信息,请参阅permissions 页面。 点击 "创建"。
action的前端已准备就绪 🥳
设置action的后端
现在,我们要编写我们的操作将触发的逻辑。
- GitHub
- GitLab
- Bitbucket (Jenkins)
- 首先,让我们创建必要的令牌和secret:
- 访问Github tokens page ,创建一个包含
repo、admin:repo_hook和admin:org范围的个人访问令牌(经典) ,然后复制它(从我们的工作流中创建 repo 需要此令牌) 。
- 进入Port application ,点击右上角的"...",然后点击 "凭据"。复制您的 "客户 ID "和 "客户 secret"。
2.在工作流程所在的版本库中,在 "设置->secret和变量->操作 "下创建 3 个新secret:
- ORG_ADMIN_TOKEN` - 您在上一步中创建的个人访问令牌。
PORT_CLIENT_ID- 从 Port 应用程序复制的客户端 ID。- PORT_CLIENT_SECRET` - 从 Port 应用程序复制的客户机secret。

3.现在,让我们创建包含逻辑的工作流文件。在.github/workflows下创建一个名为portCreateRepo.yaml的新文件,并使用以下代码段作为其内容(�记得将第 19 行中的<YOUR-ORG-NAME>更改为您的 GitHub 组织名称):
Github workflow (click to expand)
name: Scaffold a new service
on:
  workflow_dispatch:
    inputs:
      port_payload:
        required: true
        description: "Port's payload, including details for who triggered the action and general context (blueprint, run id, etc...)"
        type: string
    secrets:
      ORG_ADMIN_TOKEN:
        required: true
      PORT_CLIENT_ID:
        required: true
      PORT_CLIENT_SECRET:
        required: true
jobs:
  scaffold-service:
    env:
      ORG_NAME: <YOUR-ORG-NAME>
    runs-on: ubuntu-latest
    steps:
      - uses: port-labs/cookiecutter-[email protected]
        id: scaff
        with:
          portClientId: ${{ secrets.PORT_CLIENT_ID }}
          portClientSecret: ${{ secrets.PORT_CLIENT_SECRET }}
          token: ${{ secrets.ORG_ADMIN_TOKEN }}
          portRunId: ${{ fromJson(inputs.port_payload).context.runId }}
          repositoryName: ${{ fromJson(inputs.port_payload).payload.properties.service_name }}
          portUserInputs: '{"cookiecutter_app_name": "${{ fromJson(inputs.port_payload).payload.properties.service_name }}" }'
          cookiecutterTemplate: https://github.com/lacion/cookiecutter-golang
          blueprintIdentifier: "service"
          organizationName: ${{ env.ORG_NAME }}
- 首先,让我们创建一个 GitLab 项目,存储我们新的 Pipelines - 进入 GitLab 账户,创建一个新项目。
- 然后,创建必要的 token 和 secrets:
- 进入Port application ,点击右上角的"...",然后点击 "凭据"。复制 "客户 ID "和 "客户 secret"。
- 访问root group ,按照here 的步骤创建一个新的组访问令牌,其权限范围如下:
api, read_api, read_repository, write_repository,然后保存其值,因为下一步将需要它。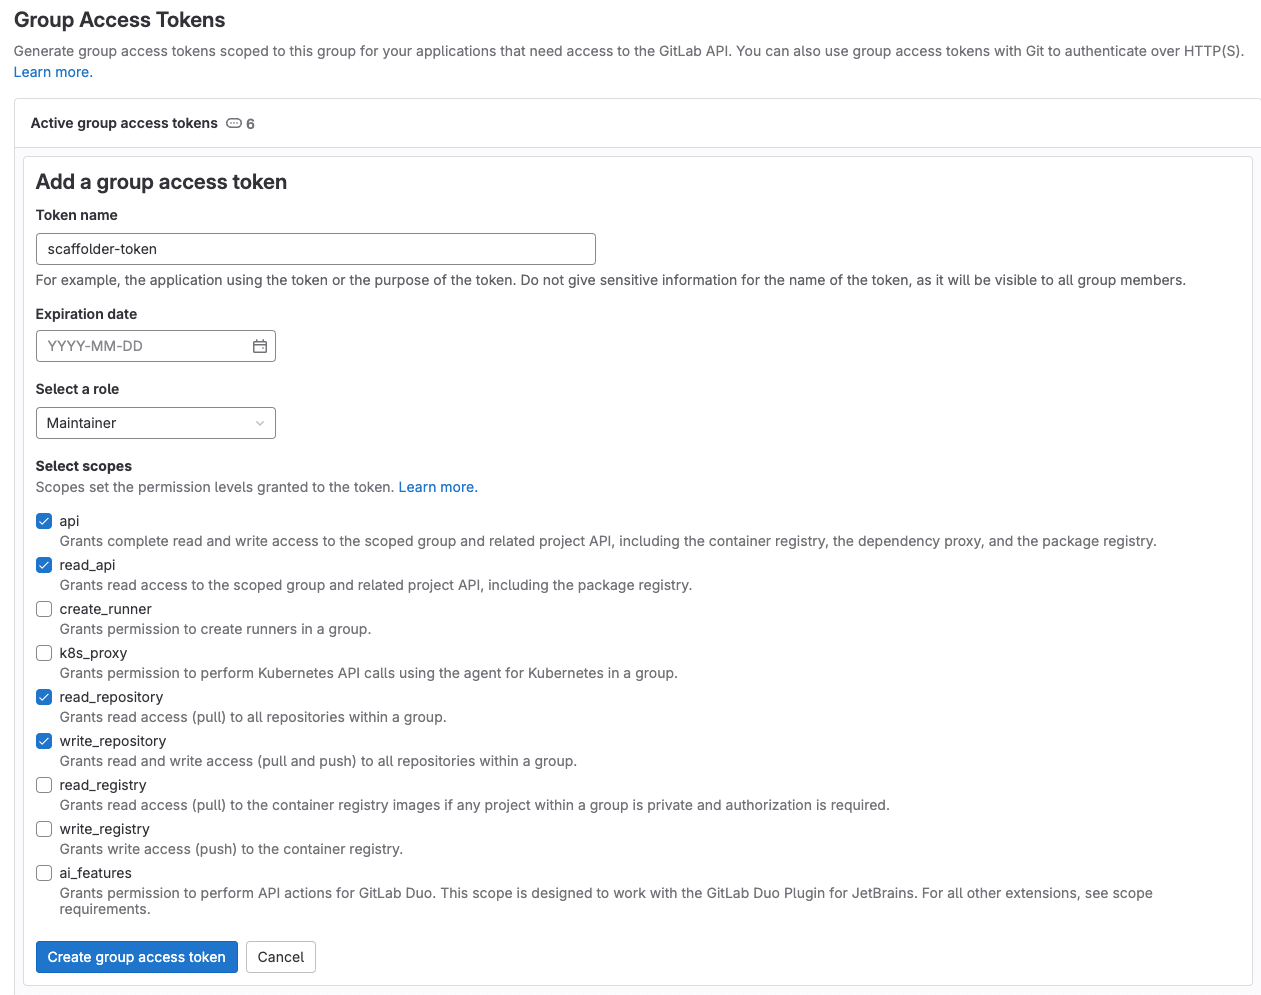
- 转到步骤 1 中创建的新 GitLab 项目,在左侧边栏的 "设置 "菜单中选择 "CI/CD"。
- 展开 "变量 "部分,保存以下secret:
PORT_CLIENT_ID- 您的 Port 客户端 ID。PORT_CLIENT_SECRET- 您的 Port 客户端secret。GITLAB_ACCESS_TOKEN- 在上一步中创建的 GitLab 组访问令牌。
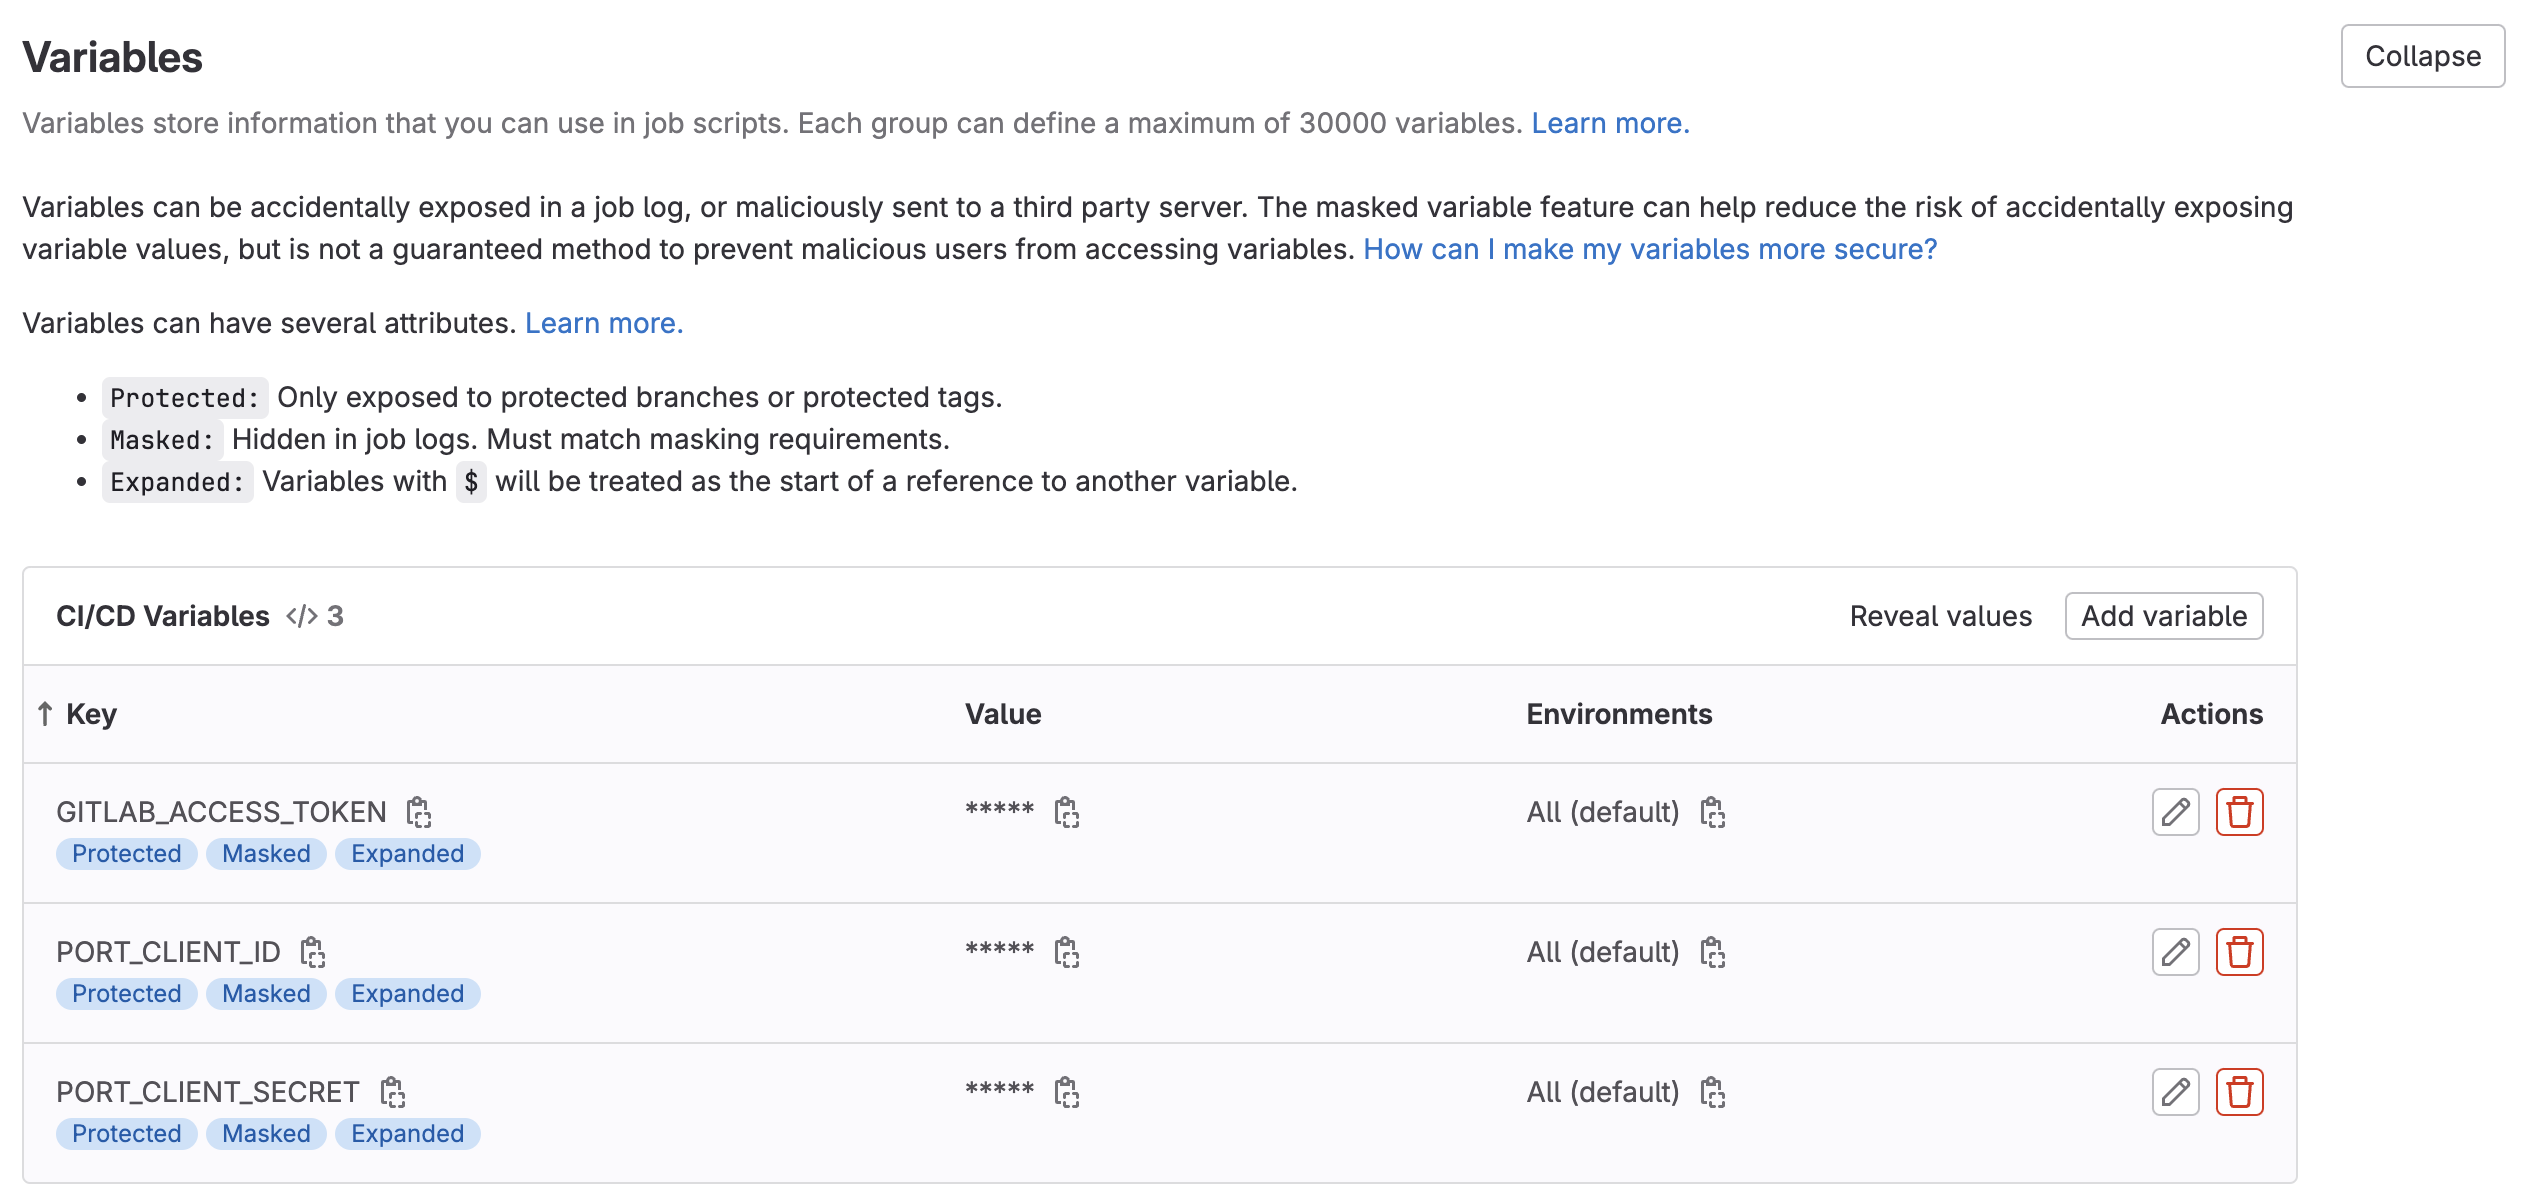
- 展开 "Pipelines 触发令牌 "部分并添加一个新令牌,给它一个有意义的描述,如 "Scaffolder 令牌",并保存其值
- 这是define backend type 部分所需的
{GITLAB_TRIGGER_TOKEN}。
- 这是define backend type 部分所需的

3.现在让我们创建包含逻辑的 Pipelines 文件。在步骤 1 创建的新 GitLab 项目中,在项目根目录下创建一个名为 .gitlab-ci.yml的新文件,并将以下代码段作为其内容:
GitLab pipeline (click to expand)
image: python:3.10.0-alpine
variables:
COOKIECUTTER_TEMPLATE_URL: "https://gitlab.com/AdriaanRol/cookiecutter-pypackage-gitlab"
stages: # List of stages for jobs, and their order of execution
- fetch-port-access-token
- scaffold
- create-entity
- update-run-status
fetch-port-access-token: # Example - get the Port API access token and RunId
stage: fetch-port-access-token
except:
- pushes
before_script:
- apk update
- apk add jq curl -q
script:
- |
echo "Getting access token from Port API"
accessToken=$(curl -X POST \
-H 'Content-Type: application/json' \
-d '{"clientId": "'"$PORT_CLIENT_ID"'", "clientSecret": "'"$PORT_CLIENT_SECRET"'"}' \
-s 'https://api.getport.io/v1/auth/access_token' | jq -r '.accessToken')
echo "ACCESS_TOKEN=$accessToken" >> data.env
runId=$(cat $TRIGGER_PAYLOAD | jq -r '.context.runId')
echo "RUN_ID=$runId" >> data.env
curl -X POST \
-H 'Content-Type: application/json' \
-H "Authorization: Bearer $accessToken" \
-d '{"message":"🏃♂️ Starting new GitLab project scaffold"}' \
"https://api.getport.io/v1/actions/runs/$runId/logs"
curl -X PATCH \
-H 'Content-Type: application/json' \
-H "Authorization: Bearer $accessToken" \
-d '{"link":"'"$CI_PIPELINE_URL"'"}' \
"https://api.getport.io/v1/actions/runs/$runId"
artifacts:
reports:
dotenv: data.env
scaffold:
before_script: |
apk update
apk add jq curl git -q
pip3 install cookiecutter==2.3.0 -q
stage: scaffold
except:
- pushes
script:
- |
echo "Creating new GitLab repository"
curl -X POST \
-H 'Content-Type: application/json' \
-H "Authorization: Bearer $ACCESS_TOKEN" \
-d '{"message":"⚙️ Creating new GitLab repository"}' \
"https://api.getport.io/v1/actions/runs/$RUN_ID/logs"
service_name=$(cat $TRIGGER_PAYLOAD | jq -r '.payload.properties.service_name')
CREATE_REPO_RESPONSE=$(curl -X POST -s "$CI_API_V4_URL/projects" --header "Private-Token: $GITLAB_ACCESS_TOKEN" --form "name=$service_name" --form "namespace_id=$CI_PROJECT_NAMESPACE_ID")
PROJECT_URL=$(echo $CREATE_REPO_RESPONSE | jq -r .http_url_to_repo)
echo "Checking if the repository creation was successful"
if [[ -z "$PROJECT_URL" ]]; then
echo "Failed to create GitLab repository."
exit 1
fi
echo "Repository created"
curl -X POST \
-H 'Content-Type: application/json' \
-H "Authorization: Bearer $ACCESS_TOKEN" \
-d '{"message":"✅ Repository created"}' \
"https://api.getport.io/v1/actions/runs/$RUN_ID/logs"
FIRST_NAME=$(cat $TRIGGER_PAYLOAD | jq -r '.trigger.by.user.firstName')
LAST_NAME=$(cat $TRIGGER_PAYLOAD | jq -r '.trigger.by.user.lastName')
EMAIL=$(cat $TRIGGER_PAYLOAD | jq -r '.trigger.by.user.email')
BLUEPRINT_ID=$(cat $TRIGGER_PAYLOAD | jq -r '.context.blueprint')
echo "PROJECT_URL=$PROJECT_URL" >> data.env
echo "BLUEPRINT_ID=$BLUEPRINT_ID" >> data.env
echo "SERVICE_NAME=$service_name" >> data.env
curl -X POST \
-H 'Content-Type: application/json' \
-H "Authorization: Bearer $ACCESS_TOKEN" \
-d '{"message":"🏗️ Generating new project template from Cookiecutter"}' \
"https://api.getport.io/v1/actions/runs/$RUN_ID/logs"
# Generate cookiecutter.yaml file
cat <<EOF > cookiecutter.yaml
default_context:
full_name: "${FIRST_NAME} ${LAST_NAME}"
email: "${EMAIL}"
project_short_description: "Project scaffolded by Port"
gitlab_username: "${gitlab_username}"
project_name: "${service_name}"
EOF
cookiecutter $COOKIECUTTER_TEMPLATE_URL --no-input --config-file cookiecutter.yaml --output-dir scaffold_out
echo "Initializing new repository..."
git config --global user.email "[email protected]"
git config --global user.name "Mighty Scaffolder"
git config --global init.defaultBranch "main"
curl -X POST \
-H 'Content-Type: application/json' \
-H "Authorization: Bearer $ACCESS_TOKEN" \
-d '{"message":"📡 Uploading repository template"}' \
"https://api.getport.io/v1/actions/runs/$RUN_ID/logs"
modified_service_name=$(echo "$service_name" | sed 's/[[:space:]-]/_/g')
cd scaffold_out/$modified_service_name
git init
git add .
git commit -m "Initial commit"
GITLAB_HOSTNAME=$(echo "$CI_API_V4_URL" | cut -d'/' -f3)
git remote add origin https://:$GITLAB_ACCESS_TOKEN@$GITLAB_HOSTNAME/${CI_PROJECT_NAMESPACE}/${service_name}.git
git push -u origin main
curl -X POST \
-H 'Content-Type: application/json' \
-H "Authorization: Bearer $ACCESS_TOKEN" \
-d '{"message":"👍 Repository updated"}' \
"https://api.getport.io/v1/actions/runs/$RUN_ID/logs"
artifacts:
reports:
dotenv: data.env
create-entity:
stage: create-entity
except:
- pushes
before_script:
- apk update
- apk add jq curl -q
script:
- |
echo "Creating Port entity to match new repository"
curl -X POST \
-H 'Content-Type: application/json' \
-H "Authorization: Bearer $ACCESS_TOKEN" \
-d '{"message":"🚀 Creating new '"$BLUEPRINT_ID"' entity: '"$SERVICE_NAME"'"}' \
"https://api.getport.io/v1/actions/runs/$RUN_ID/logs"
curl --location --request POST "https://api.getport.io/v1/blueprints/$BLUEPRINT_ID/entities?upsert=true&run_id=$RUN_ID&create_missing_related_entities=true" \
--header "Authorization: Bearer $ACCESS_TOKEN" \
--header "Content-Type: application/json" \
-d '{"identifier": "'"$SERVICE_NAME"'","title": "'"$SERVICE_NAME"'","properties": {"url": "'"$PROJECT_URL"'"}, "relations": {}}'
update-run-status:
stage: update-run-status
except:
- pushes
image: curlimages/curl:latest
script:
- |
echo "Updating Port action run status and final logs"
curl -X POST \
-H 'Content-Type: application/json' \
-H "Authorization: Bearer $ACCESS_TOKEN" \
-d '{"message":"✅ Scaffold '"$SERVICE_NAME"' finished successfully!"}' \
"https://api.getport.io/v1/actions/runs/$RUN_ID/logs"
curl -X POST \
-H 'Content-Type: application/json' \
-H "Authorization: Bearer $ACCESS_TOKEN" \
-d '{"message":"🔗 Project URL: '"$PROJECT_URL"'"}' \
"https://api.getport.io/v1/actions/runs/$RUN_ID/logs"
curl -X PATCH \
-H 'Content-Type: application/json' \
-H "Authorization: Bearer $ACCESS_TOKEN" \
-d '{"status":"SUCCESS", "message": {"run_status": "Scaffold '"$SERVICE_NAME"' finished successfully! Project URL: '"$PROJECT_URL"'"}}' \
"https://api.getport.io/v1/actions/runs/$RUN_ID"
- 首先,在 Jenkins 中安装generic webhook trigger 插件。
- 接下来,让我们创建必要的令牌和 Secret
- 进入Port application ,点击右上角的"...",然后点击 "Credentials"。复制你的
客户 ID和客户 secret. - 将以下内容配置为 Jenkins 凭据:
BITBUCKET_USERNAME- 可以访问 Bitbucket Workspace 和项目的用户。BITBUCKET_APP_PASSWORD- 具有Repositories:Read和Repositories:Write权限的App Password 。PORT_CLIENT_ID- 您的 Port 客户端 ID。PORT_CLIENT_SECRET- 您的 Port 客户端secret。

- 进入Port application ,点击右上角的"...",然后点击 "Credentials"。复制你的
- 用以下配置创建一个 Jenkins 管道:
-Enable the webhook trigger for the pipeline
- 定义
token字段的值,您指定的令牌将被用于专门触发脚手架管道。例如,你可以被用于scaffolder-token。 -Define variables for the pipeline 定义SERVICE_NAME、BITBUCKET_WORKSPACE_NAME、BITBUCKET_PROJECT_KEY和RUN_ID变量。向下滚动到 "发布内容参数",并为每个变量添加配置,如图所示(完整的变量列表请参见下表) : 创建以下变量及其相关 JSONPath 表达式: | 变量名 | JSONPath 表达式 | | | JSONPath 表达式 | | | JSONPath 表达式。
| ------------------------ | ----------------------------------------------- |
| 服务名称
BITBUCKET_WORKSPACE_NAME |
 $.payload.properties.bitbucket_workspace_name| | BITBUCKET_WORKSPACE_NAME | BITBUCKET_PROJECT_KEY |$.payload.properties.bitbucket_project_key| | RUN_ID |$.context.runId| $.payload.properties.bitbucket_project_key
- 定义
JOB_TOKEN 值,可以进入define backend type 部分,在 Port 中完成操作配置。4.在新的 Jenkins Pipelines 中添加以下内容:
Jenkins pipeline (click to expand)
import groovy.json.JsonSlurper

pipeline {
    agent any

    environment {
        COOKIECUTTER_TEMPLATE = 'https://github.com/lacion/cookiecutter-golang'
        SERVICE_NAME = "${SERVICE_NAME}"
        BITBUCKET_WORKSPACE_NAME = "${BITBUCKET_WORKSPACE_NAME}"
        BITBUCKET_PROJECT_KEY = "${BITBUCKET_PROJECT_KEY}"
        SCAFFOLD_DIR = "scaffold_${SERVICE_NAME}"
        PORT_ACCESS_TOKEN = ""
        PORT_BLUEPRINT_ID = "microservice"
        PORT_RUN_ID = "${RUN_ID}"
    }

    stages {
        stage('Get access token') {
            steps {
                script {
                    withCredentials([
                        string(credentialsId: 'PORT_CLIENT_ID', variable: 'PORT_CLIENT_ID'),
                        string(credentialsId: 'PORT_CLIENT_SECRET', variable: 'PORT_CLIENT_SECRET')
                    ]) {
                        // Execute the curl command and capture the output
                        def result = sh(returnStdout: true, script: """
                            accessTokenPayload=\$(curl -X POST \
                                -H "Content-Type: application/json" \
                                -d '{"clientId": "${PORT_CLIENT_ID}", "clientSecret": "${PORT_CLIENT_SECRET}"}' \
                                -s "https://api.getport.io/v1/auth/access_token")
                            echo \$accessTokenPayload
                        """)

                        // Parse the JSON response using JsonSlurper
                        def jsonSlurper = new JsonSlurper()
                        def payloadJson = jsonSlurper.parseText(result.trim())

                        // Access the desired data from the payload
                        PORT_ACCESS_TOKEN = payloadJson.accessToken
                    }

                }
            }
        } // end of stage Get access token

        stage('Create BitBucket Repository') {
            steps {
                script {
                    def logs_report_response = sh(script: """
                        curl -X POST \
                          -H "Content-Type: application/json" \
                          -H "Authorization: Bearer ${PORT_ACCESS_TOKEN}" \
                          -d '{"message": "Creating BitBucket repository: ${SERVICE_NAME} in Workspace: ${BITBUCKET_WORKSPACE_NAME}, Project: ${BITBUCKET_PROJECT_KEY}..."}' \
                             "https://api.getport.io/v1/actions/runs/${PORT_RUN_ID}/logs"
                    """, returnStdout: true)

                    println(logs_report_response)
                }
                script {
                    withCredentials([
                        string(credentialsId: 'BITBUCKET_USERNAME', variable: 'BITBUCKET_USERNAME'),
                        string(credentialsId: 'BITBUCKET_APP_PASSWORD', variable: 'BITBUCKET_APP_PASSWORD')
                    ]) {
                        sh """
                            curl -i -u ${BITBUCKET_USERNAME}:${BITBUCKET_APP_PASSWORD} \\
                            -d '{"is_private": true, "scm": "git", "project": {"key": "${BITBUCKET_PROJECT_KEY}"}}' \\
                            https://api.bitbucket.org/2.0/repositories/${BITBUCKET_WORKSPACE_NAME}/${SERVICE_NAME}
                        """
                    }
                }
            }
        } // end of stage Create BitBucket Repository

        stage('Scaffold Cookiecutter Template') {
            steps {
                script {
                    def logs_report_response = sh(script: """
                        curl -X POST \
                          -H "Content-Type: application/json" \
                          -H "Authorization: Bearer ${PORT_ACCESS_TOKEN}" \
                          -d '{"message": "Scaffolding ${SERVICE_NAME}..."}' \
                             "https://api.getport.io/v1/actions/runs/${PORT_RUN_ID}/logs"
                    """, returnStdout: true)

                    println(logs_report_response)
                }
                script {
                    withCredentials([
                        string(credentialsId: 'BITBUCKET_USERNAME', variable: 'BITBUCKET_USERNAME'),
                        string(credentialsId: 'BITBUCKET_APP_PASSWORD', variable: 'BITBUCKET_APP_PASSWORD')
                    ]) {
                        def yamlContent = """
default_context:
  full_name: "Full Name"
  github_username: "bitbucketuser"
  app_name: "${SERVICE_NAME}"
  project_short_description": "A Golang project."
  docker_hub_username: "dockerhubuser"
  docker_image: "dockerhubuser/alpine-base-image:latest"
  docker_build_image: "dockerhubuser/alpine-golang-buildimage"
"""
                    // Write the YAML content to a file
                    writeFile(file: 'cookiecutter.yaml', text: yamlContent)

                        sh("""
                            rm -rf ${SCAFFOLD_DIR} ${SERVICE_NAME}
                            git clone https://${BITBUCKET_USERNAME}:${BITBUCKET_APP_PASSWORD}@bitbucket.org/${BITBUCKET_WORKSPACE_NAME}/${SERVICE_NAME}.git

                            cookiecutter ${COOKIECUTTER_TEMPLATE} --output-dir ${SCAFFOLD_DIR} --no-input --config-file cookiecutter.yaml -f

                            rm -rf ${SCAFFOLD_DIR}/${SERVICE_NAME}/.git*
                            cp -r ${SCAFFOLD_DIR}/${SERVICE_NAME}/* "${SERVICE_NAME}/"

                            cd ${SERVICE_NAME}
                            git config user.name "Jenkins Pipeline Bot"
                            git config user.email "jenkins-pipeline[bot]@users.noreply.jenkins.com"
                            git add .
                            git commit -m "Scaffolded project ${SERVICE_NAME}"
                            git push -u origin master
                            cd ..

                            rm -rf ${SCAFFOLD_DIR} ${SERVICE_NAME}
                        """)
                    }

                }
            }
        } // end of stage Clone Cookiecutter Template

        stage('CREATE Microservice entity') {
            steps {
                script {
                    def logs_report_response = sh(script: """
                        curl -X POST \
                          -H "Content-Type: application/json" \
                          -H "Authorization: Bearer ${PORT_ACCESS_TOKEN}" \
                          -d '{"message": "Creating ${SERVICE_NAME} Microservice Port entity..."}' \
                             "https://api.getport.io/v1/actions/runs/${PORT_RUN_ID}/logs"
                    """, returnStdout: true)

                    println(logs_report_response)
                }
                script {
                    def status_report_response = sh(script: """
    					curl --location --request POST "https://api.getport.io/v1/blueprints/$PORT_BLUEPRINT_ID/entities?upsert=true&run_id=$PORT_RUN_ID&create_missing_related_entities=true" \
        --header "Authorization: Bearer $PORT_ACCESS_TOKEN" \
        --header "Content-Type: application/json" \
        --data-raw '{
    			"identifier": "${SERVICE_NAME}",
    			"title": "${SERVICE_NAME}",
    			"properties": {"description":"${SERVICE_NAME} golang project","url":"https://bitbucket.org/${BITBUCKET_WORKSPACE_NAME}/${SERVICE_NAME}/src"},
    			"relations": {}
    		}'

                    """, returnStdout: true)

                    println(status_report_response)
                }
            }
        } // end of stage CREATE Microservice entity

        stage('Update Port Run Status') {
            steps {
                script {
                    def status_report_response = sh(script: """
                        curl -X PATCH \
                          -H "Content-Type: application/json" \
                          -H "Authorization: Bearer ${PORT_ACCESS_TOKEN}" \
                          -d '{"status":"SUCCESS", "message": {"run_status": "Scaffold Jenkins Pipeline completed successfully!"}}' \
                             "https://api.getport.io/v1/actions/runs/${PORT_RUN_ID}"
                    """, returnStdout: true)

                    println(status_report_response)
                }
            }
        } // end of stage Update Port Run Status
    }

    post {

        failure {
            // Update Port Run failed.
            script {
                def status_report_response = sh(script: """
                    curl -X PATCH \
                        -H "Content-Type: application/json" \
                        -H "Authorization: Bearer ${PORT_ACCESS_TOKEN}" \
                        -d '{"status":"FAILURE", "message": {"run_status": "Failed to Scaffold ${SERVICE_NAME}"}}' \
                            "https://api.getport.io/v1/actions/runs/${PORT_RUN_ID}"
                """, returnStdout: true)

                println(status_report_response)
            }
        }

        // Clean after build
        always {
            cleanWs(cleanWhenNotBuilt: false,
                    deleteDirs: true,
                    disableDeferredWipeout: false,
                    notFailBuild: true,
                    patterns: [[pattern: '.gitignore', type: 'INCLUDE'],
                               [pattern: '.propsfile', type: 'EXCLUDE']])
        }
    }
}
完成!动作已准备就绪,可以开始使用 🚀
执行操作
创建操作后,该操作将出现在 Port 应用程序的 "自助服务 "选项卡下:
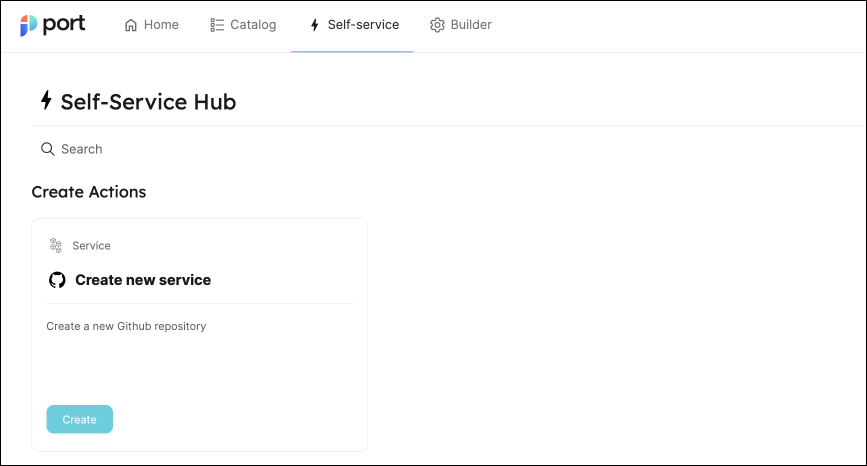
- 点击 "创建 "开始执行操作。
- 输入新版本库的名称,然后点击 "执行"。弹出一个小窗口,点击
查看详情:

要触发 Bitbucket scaffolder,您需要提供两个附加参数:
- Bitbucket Workspace Name(Bitbucket 工作区名称)--要在其中创建新版本库的工作区名称
- Bitbucket 项目密钥 - 要在其中创建新版本库的 Bitbucket 项目的密钥。
- 要找到 Bitbucket 项目密钥,请访问
https://bitbucket.org/YOUR_BITBUCKET_WORKSPACE/workspace/projects/,在列表中找到所需的项目,然后复制在表中Key列看到的值
- 要找到 Bitbucket 项目密钥,请访问
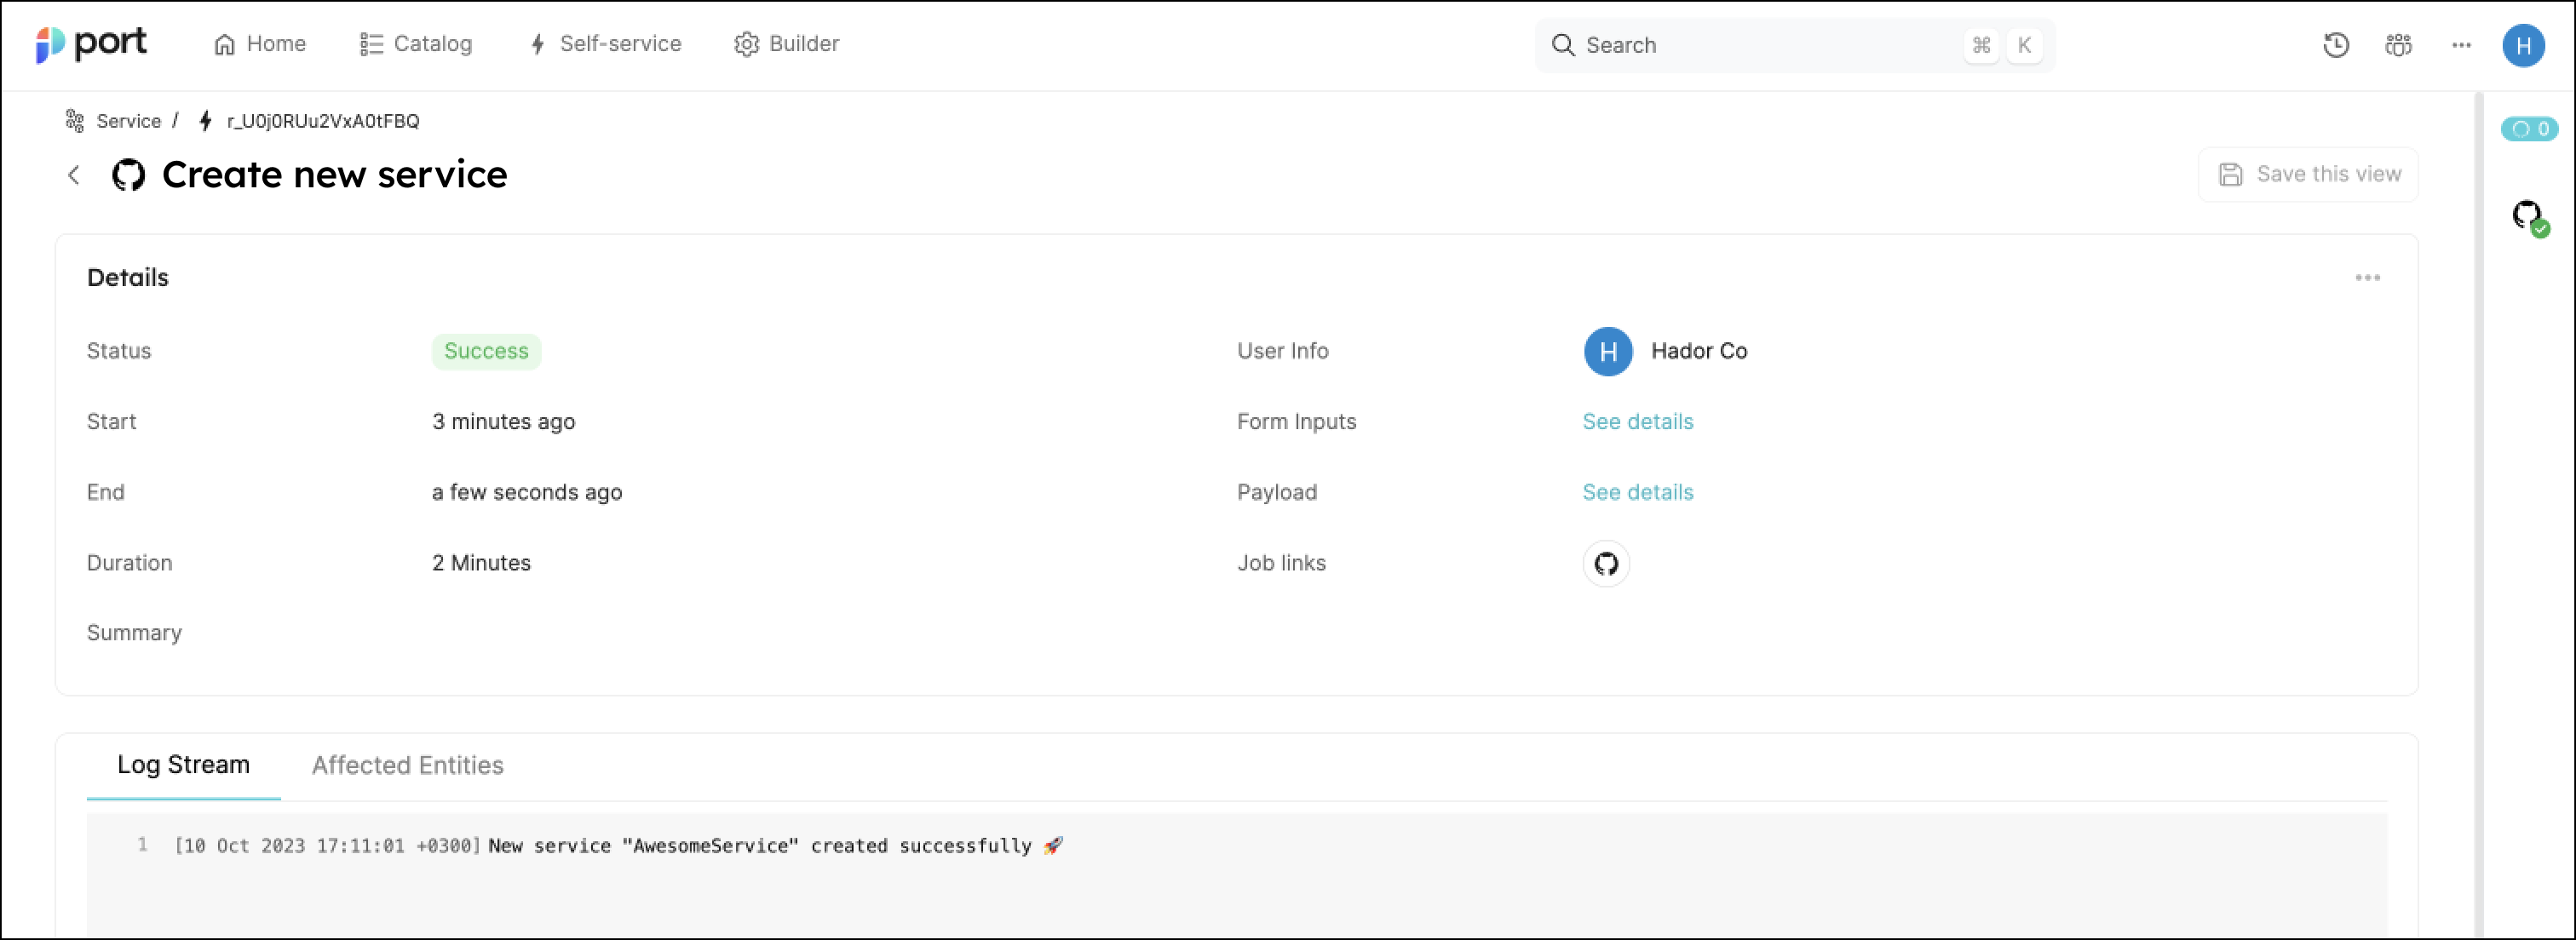
- 该页面提供了有关操作运行的详细信息。如您所见,后端返回了
Success且 repo 已成功创建(这可能需要片刻时间):
恭喜!您现在可以从 Port 💪🏽 轻松创建服务了。
可能的日常整合
- 在研发频道中发送一条松弛消息,让每个人都知道创建了一项新服务。
- 为管理人员发送周报/月报,显示该时间段内创建的所有新服务及其 Owner。
结论
创建服务并不只是开发人员的一项定期任务,而是每月都会发生的重要步骤。 然而,我们必须认识到,这只是我们努力为开发人员创造的更广泛体验的一个片段。 我们的最终目标是促进从构思到生产的无缝过渡。 这样做,我们的目标是消除开发人员在大量工具中穿梭的需要,减少摩擦并加快生产时间。 从本质上讲,我们并不只是在构建一个工具,而是在构建一个生态系统,使开发人员能够以最高的效率将新功能变为现实。